Add custom tabs to product page
I. Introduction
If your Magento eCommerce site needs to stack space despite spoonful information, adding more custom tabs would be an effective solution. Having custom tabs to store your content can give you more flexibility while customizing your online stores.
This tutorial will show you how to add custom tabs for Product pages in your own site.
II. Add Custom Tabs on Product detail
Step1 : Create a new Attribute
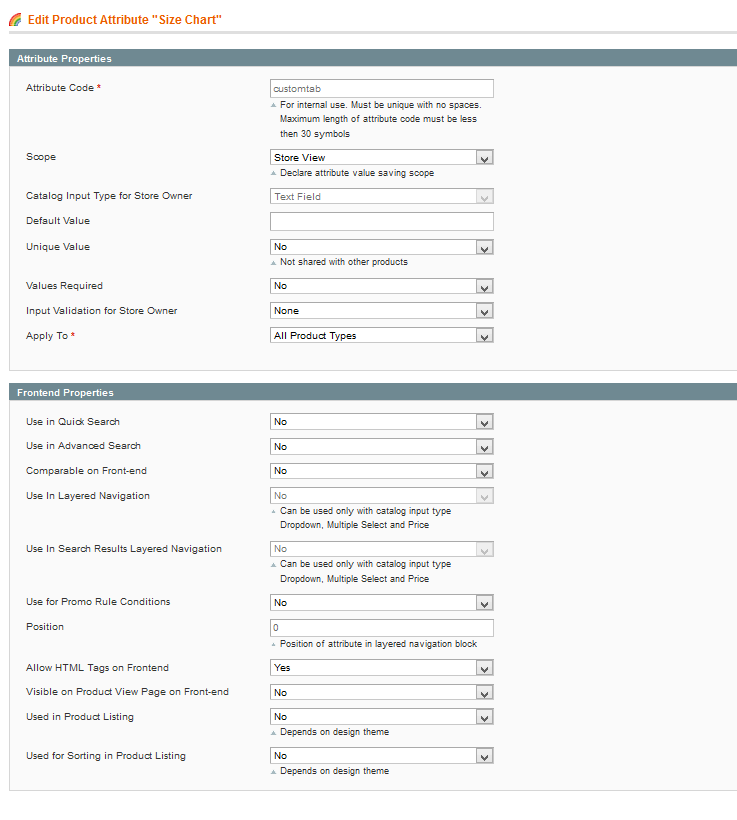
Navigate to Catalog >> Attributes >> Manage Attributes and create a new attribute named customtab
Set Catalog Input Type for Store Owner as Text Field. You can leave the remaining fields as Default.
Next, in the Frontend Properties, determine settings about how the tab work on the front-end. Kindly set Enable WYSIWYG as “Yes”.
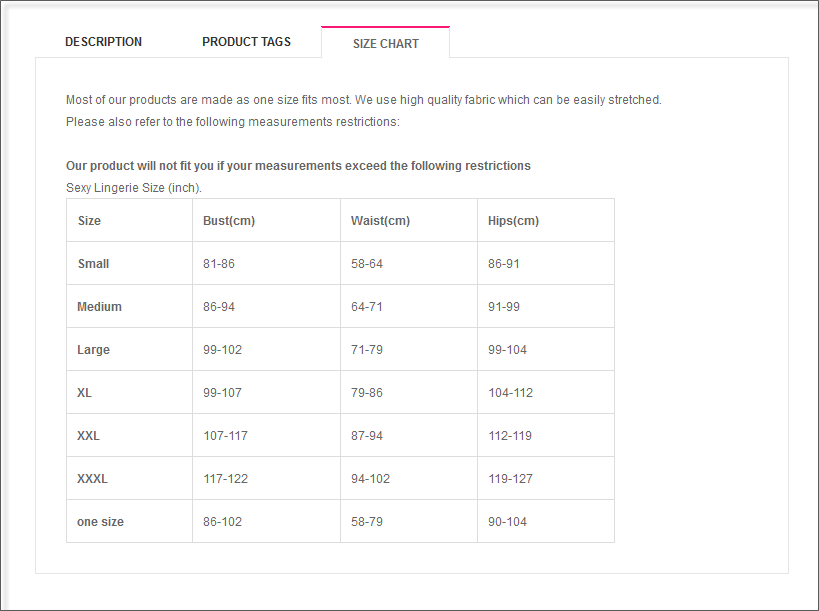
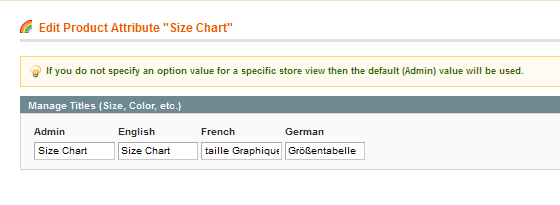
Navigate to the Manage Label / Options tab, enter any title e.g. “Size Chart” for admin and default store view.
Save the Attribute. Now your new attribute is all set!
- Properties -- Back-end Settings
- Manage Label/ Options -- Back-end Settings
Step 2 : Assign the Attribute
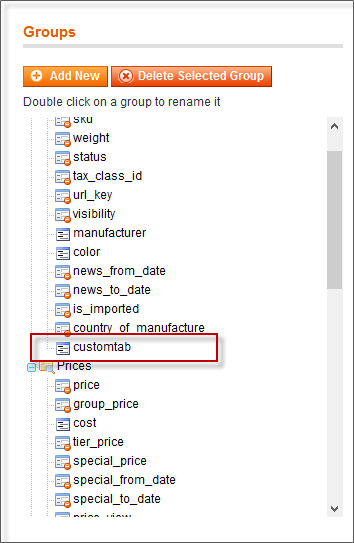
Navigate to Catalog >> Attributes >> Manage Attributes Sets.
1. Choose Attribute Set.
2. Drop the “customtab” from Unassigned Attributes into Groups.
3. Save it.
Step 3: Create content
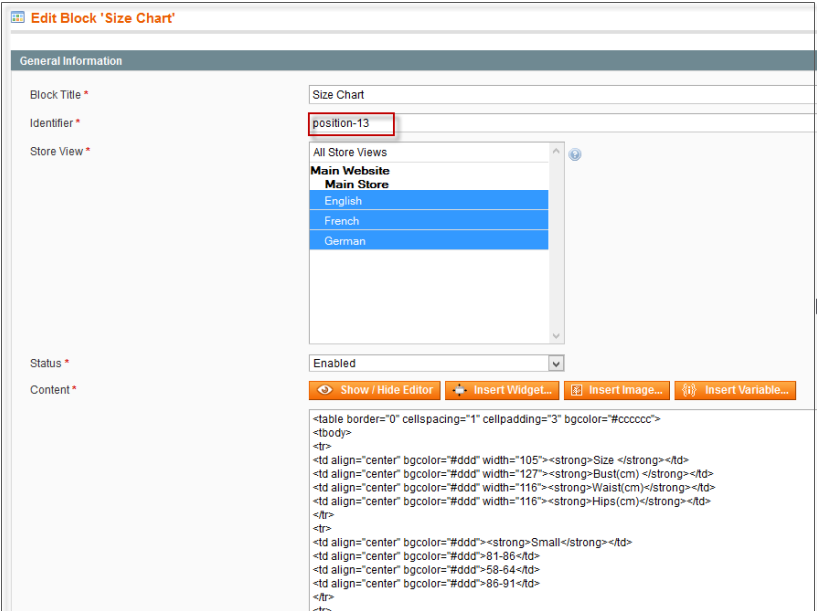
We will make a static lock for content. Navigate to CMS >> Static Block. Add a new block the the following content:
1. Block Title : Size Chart
2. Identifier : position-13
3. Status : Enabled
4. Content : Input what you want here
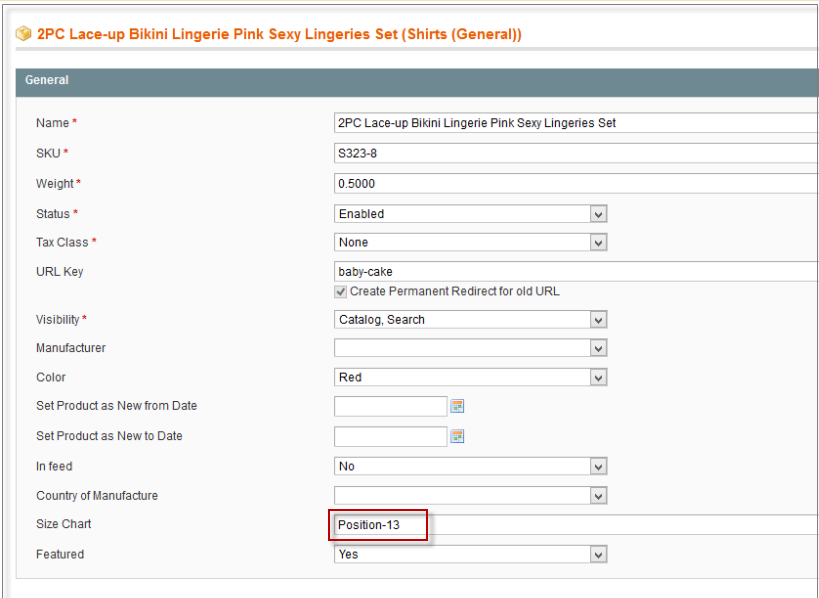
Step 4: Add Product tab contentt
Navigate to Catalog >> Manage Products. You now can see your new textarea, in this case we call it “Size chart”.
1. Fill in the content
2. Save content
3. Refresh the cache
Step 5. Update Product page view
To see our tab on the front-end, let’s add it to your view.phtml file. If it’s your first time adding tabs, copy the file at \app\design\frontend\base\default\template\catalog\product\view.phtml. Paste this into the theme’s folder. Now your view.phtml will have the location like that: \app\design\frontend\default\yourtheme\template\catalog\product\view.phtml.
In view.phtml, find the following code line :
<div id="ja-tab-products" class="product-collateral">
Add this section before the line:
<?php
//add the customtab to the product tab
$attribute = $_product->getResource()->getAttribute('customtab');
if(is_object($attribute)){
  $identifier = $_product->getData("customtab");
  }
$blockcustom =  Mage::app()->getLayout()->createBlock('cms/block')->setBlockId($identifier);
$blockcustommodel = Mage::getModel('cms/block')->load($identifier);
$customtitle = $blockcustommodel->getTitle();
$customtab = $blockcustom->toHtml();
?>
Next, find this follows:
<?php if($review_form = $this->getChildHtml('review_form')): ?>
<li><a href="#ja-tabitem-reviewform"><?php echo $this->__('Write Your Own Review') ?></a></li>
<?php endif; ?>
Under this block code, insert as below:
 <?php if($customtab): ?>
<li><a href="#ja-tabitem-custom"><?php echo $this->__($customtitle) ?></a></li>
<?php endif; ?>
Then, find the follows:
<?php if($customtab): ?><?php if($review_form): ?>
<div id="ja-tabitem-reviewform">
<?php echo $review_form; ?>
</div>
<?php endif/;?>
Under this, insert:
 <?php if($customtab): ?>
<div id="ja-tabitem-custom">
<?php echo $customtab; ?>
</div>
<?php endif; ?>
Save the file and you are done now! Enter your front-end to see what we’ve got. I’m pretty sure it will be the same as our demo.