Crafts 2.0 for Magento 2
Theme Introduction
Crafts 2.0 is our first premium Magento theme for Magento 2.x. It is fully responsive and ready to bring your handmade store reach out to more mobile and tablet users. If you’re new to Crafts 2.0, you may find the following links useful to learn more about this theme:
I. Installation Prerequisites
Crafts 2.0 is native with Magento 2.x. Please make sure your system meets the Magento 2 System requirements.
II. Download Packages
The download package includes:
- Theme: Crafts 2.0 (single theme including UB Theme Helper for manual installation)
- Extensions: contains all extensions built in the theme
- QuickStart: is a full Magento 2 CMS version with our template and extensions already integrated to match demo
- PSD source files: contains all source files of the theme
III. Installation Instruction
There are two ways to install a UberTheme Magento theme:
- Manual Installation: Applicable if your store is full with content that you don’t want to overwrite.
- QuickStart Installation: Applicable if you want to get a whole new fresh site as per Demo.
Provided that you have installed the Magento base already, decide which way to install and follow steps as below.
Manual Installation
To install UB Crafts 2.0 manually, you need to take a few steps, including:
- Step 1: Download and install UB Crafts 2.0 theme
- Step 2: Enable UB Theme Helper
- Step 3: Download and install Magento 2 extensions
- Step 4: Import Sample Data
- Step 5: Activate theme
Step 1. Download and install UB Crafts 2.0 theme
1.1. Download and extract UB Crafts 2.0 theme
Download the crafts_vx.x.x zip file from your profile at Ubertheme, and extract it on your computer. Navigate inside the extracted folder, you should see the necessary folders listed below:
2.2: Copy and paste the folders to your web root
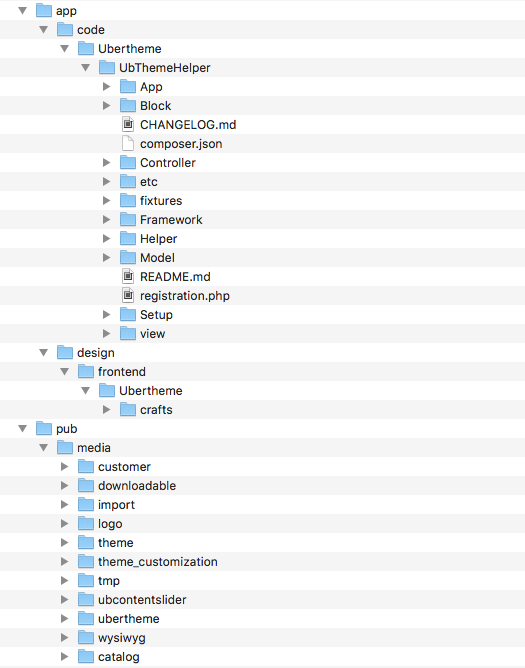
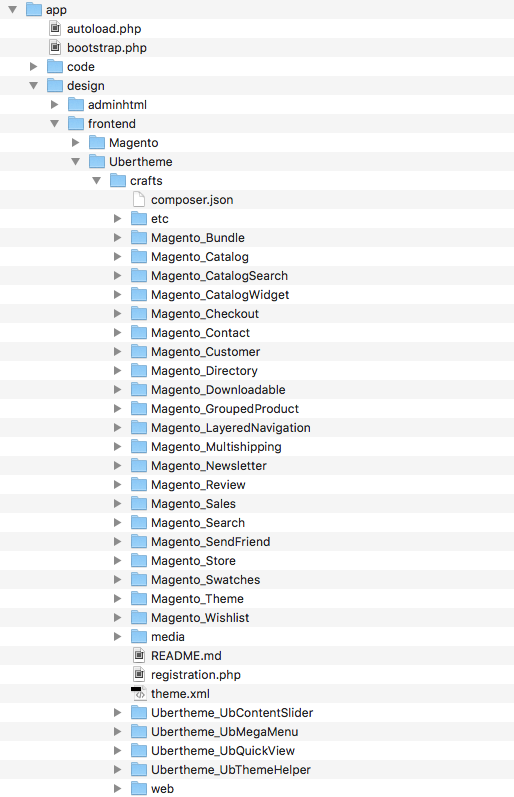
2.2.1. Copy and paste the folder app of the package you have unzipped to your web root. Once done, you should see the path:
..app/design/frontend/Ubertheme/crafts/
The overwritten folders should have a directory layout like this:
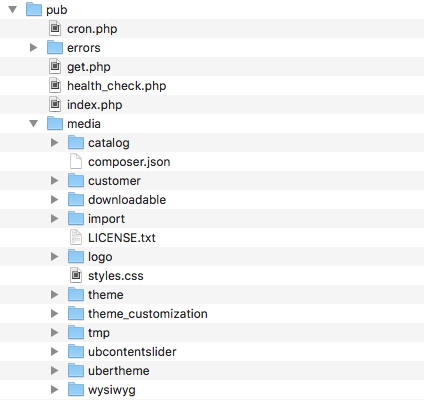
2.2.2 Copy and paste folder pub/media of the package you have unzipped to your web root. Make sure you *merge*, not ‘replace’ existing media folder contents. The overwritten folders should have a directory layout like this:
Step 2: Enable UB Theme Helper
Open your terminal and go to the Magento directory. In this directory, run the following commands:
- php -f bin/magento module:enable -c Ubertheme_UbThemeHelper
- php -f bin/magento setup:upgrade
- php -f bin/magento cache:clean
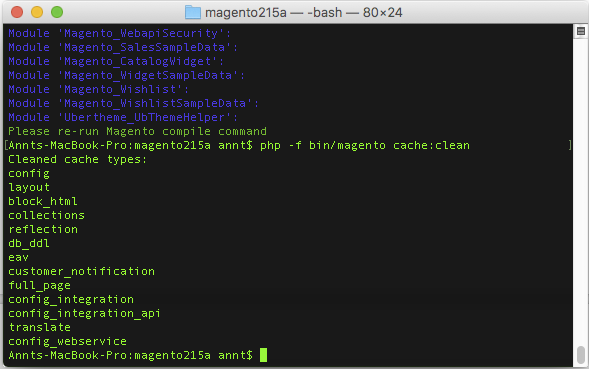
Once you finish the last command to clean cache, you have UB Theme Helper installed and ready for your use.
Step 3: Download and install built-in Magento 2 extensions
There are three Magento 2 extensions that are packed with UB Crafts 2.0 by default, including: UB Mega Menu, UB Content Slider and UB Quick View.
You need to download and install each extension following the guides below:
Once each extension is installed, navigate to your Magento Admin Panel | Content, you should see the extension’s menu respectively as follows:

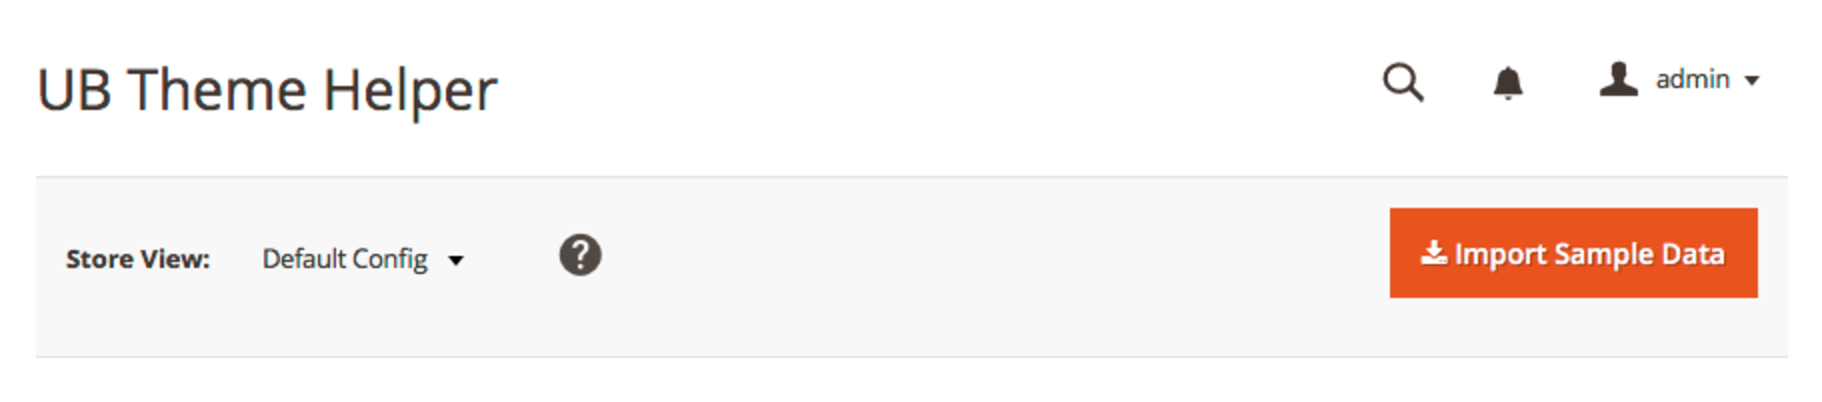
Step 4: Import Sample Data
Now that you’ve installed UB Crafts 2.0 theme and all built-in extensions, let’s move on to the next step -- Import Sample data.
Sample data refers to all CMS pages, CMS blocks and widgets we created for Crafts 2.0.
In your Magento Admin Panel, navigate to Content | (UB ThemeHelper) Theme Configuration, then simply click Import Sample Data button.
Step 5: Activate theme
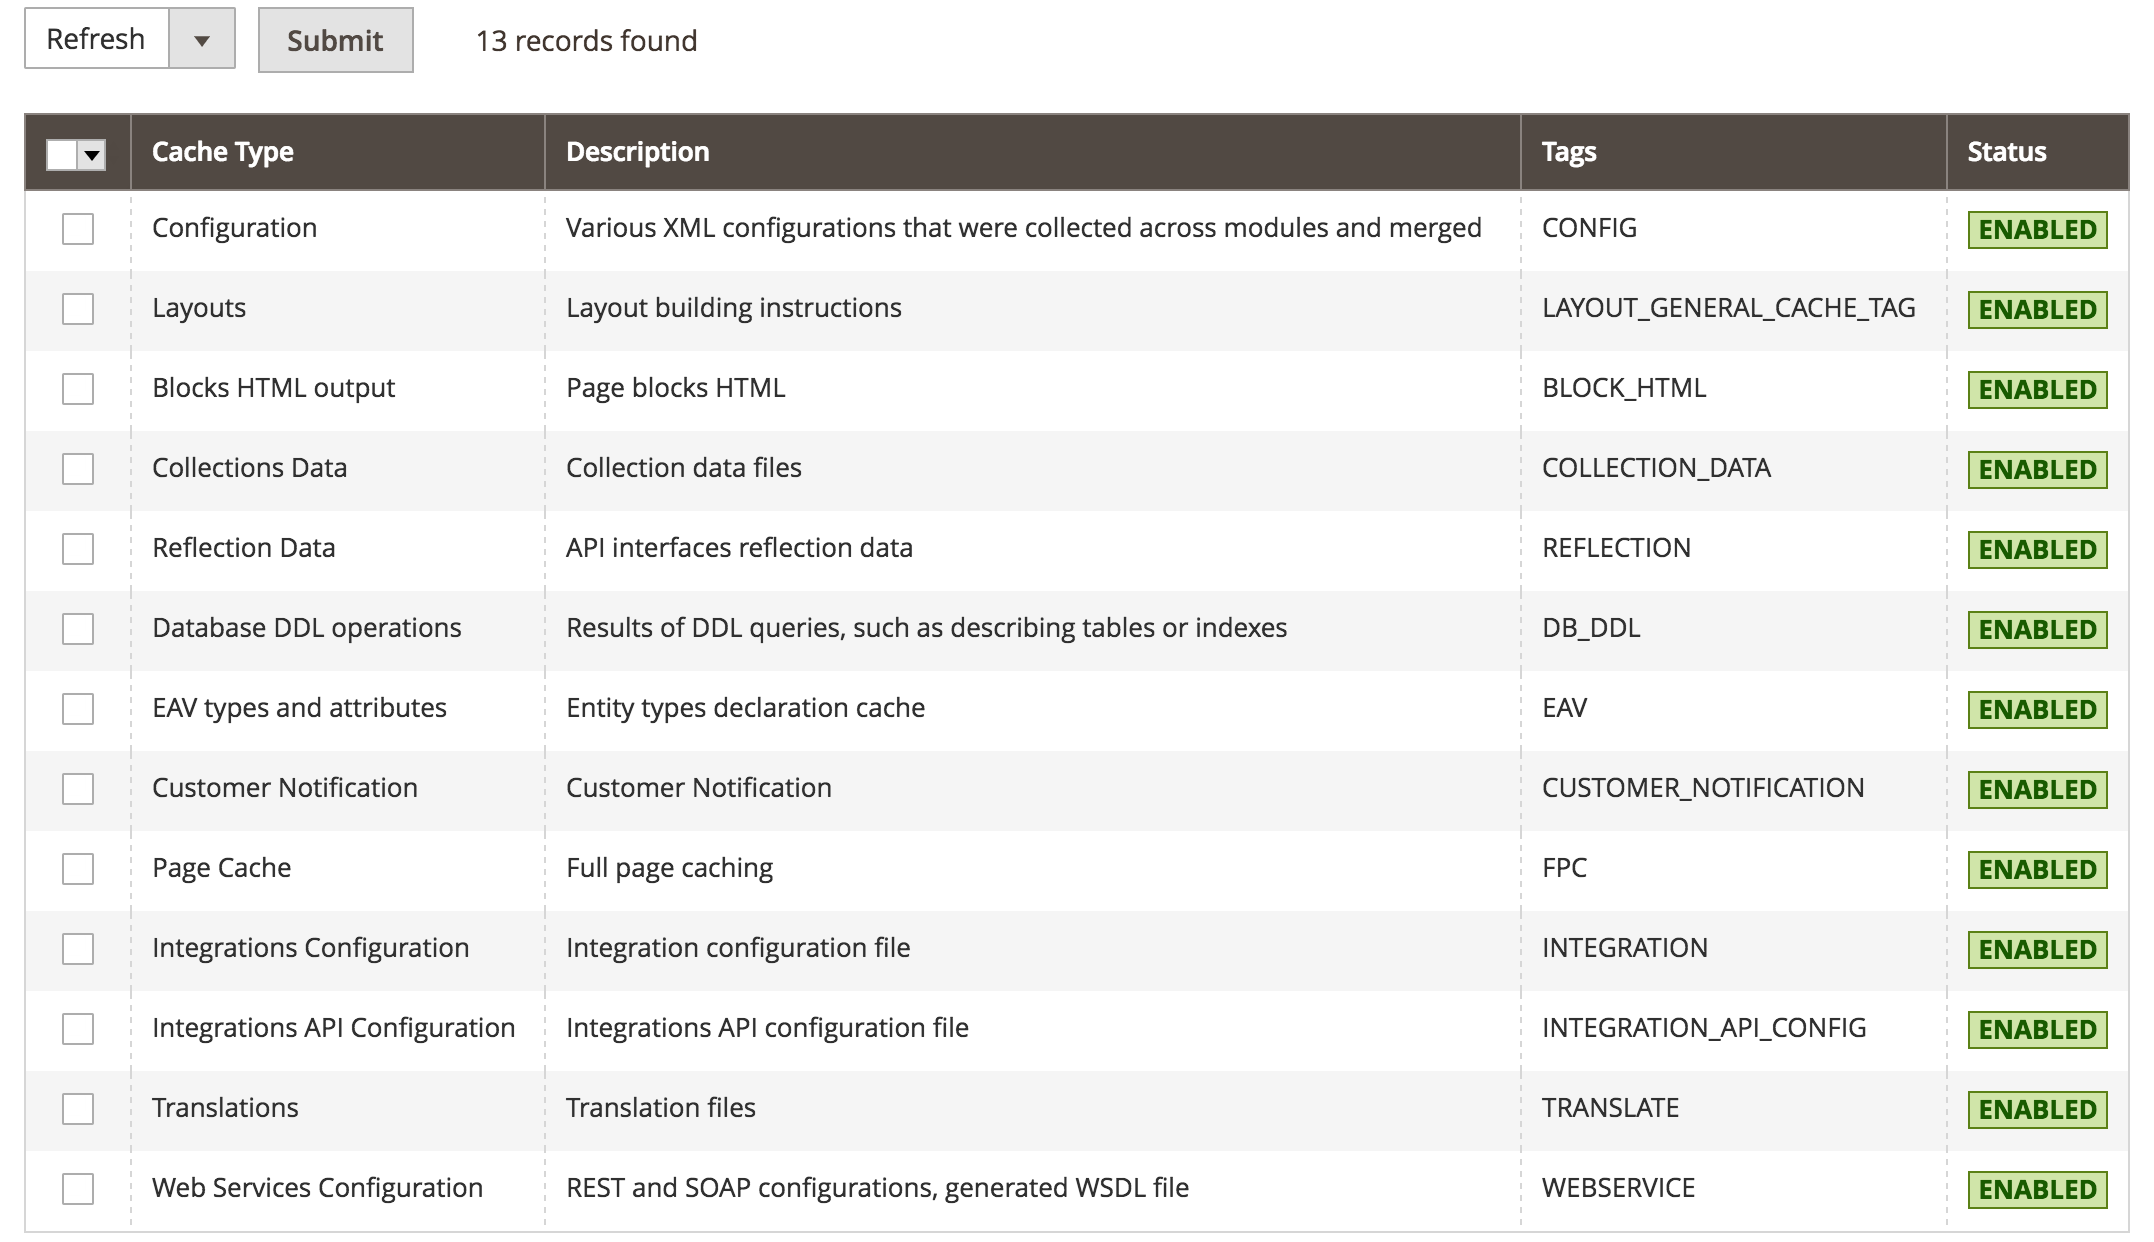
1. In your Magento Admin Panel, navigate to System | Tools | Cache Management, Sellect All the cache types, take Action as Refresh and Submit.
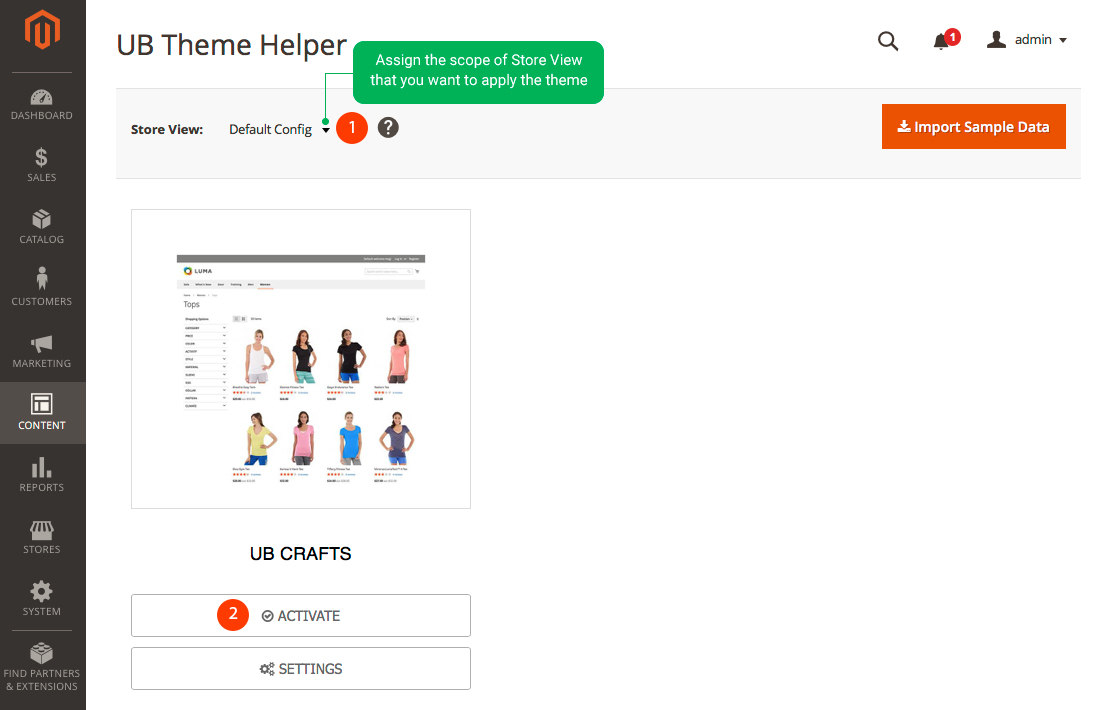
2. Then, navigate to Content | (UB ThemeHelper) Theme Configuration. You will see a grid of themes available.
3. Specify scope of Store View you want to apply the theme (if you do not set scope of Store View, Default Config will be applied). Then click Activate button to apply specific theme you select.
4. Once done, you run the following commands before you see the theme applied in the frontend.
- php -f bin/magento setup:static-content:deploy
- php -f bin/magento indexer:reindex
- php -f bin/magento cache:clean
That’s all. Now you can scroll down to learn more how to configure the theme.
Quickstart Installation
Quickstart package is to minimize time and effort in installing the theme as per Demo site. Kindly note that, with Quickstart, all your existing data will be overwritten. Thus, we recommend using Quickstart for your first installation or just in case you want to refresh your site to the very beginning. For step by step guide, please Click here
IV. Layout and Block positions
Before we walk you through steps to configure each page as per demo, here is an overview of static blocks you will see in Crafts 2.0 theme:
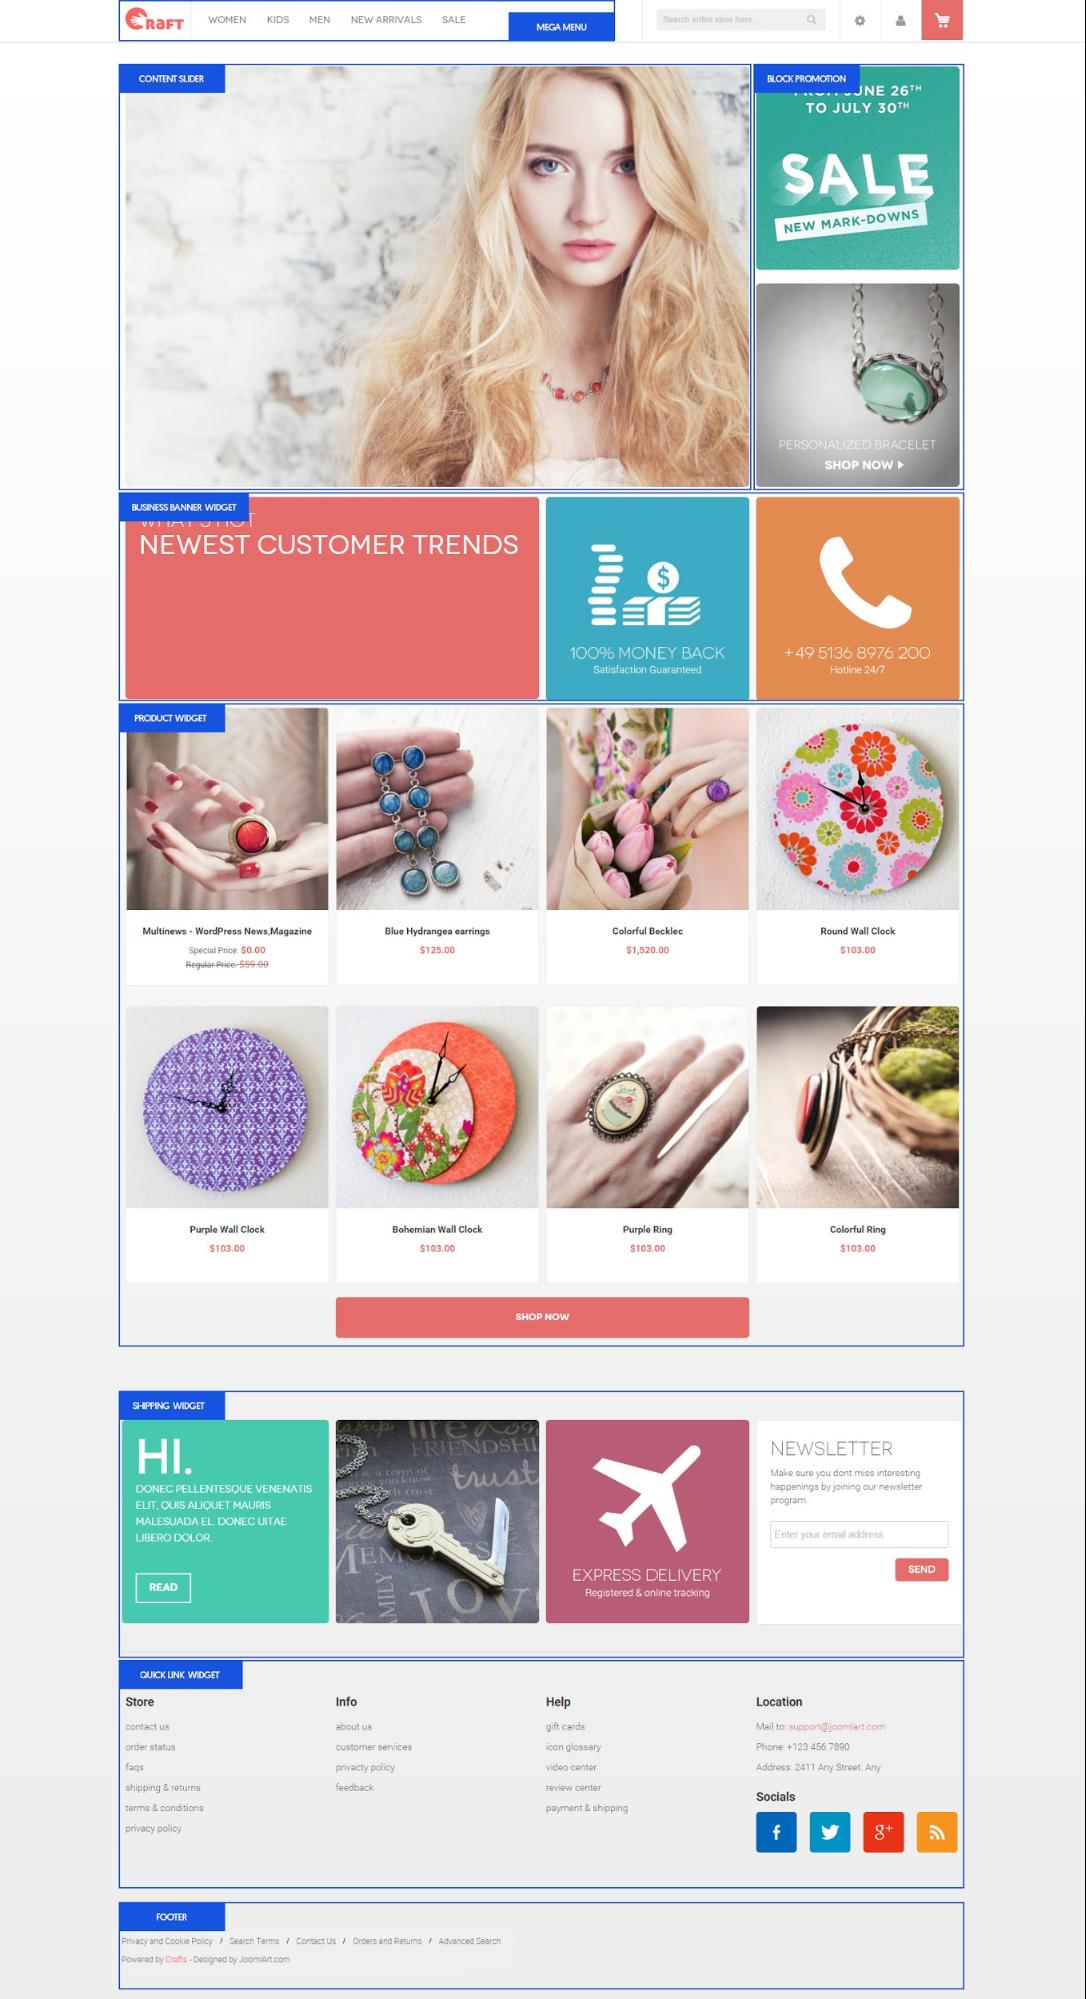
As seen in the screenshot, the Crafts 2.0 frontend has the following static blocks:
- Content slider
- Promotion block
- Business banner
- Product
- Shipping
- Quick link
- Footer
V. Page Configuration
This section will guide you to configure your pages just as the Demo site of Crafts.
Homepage Configuration
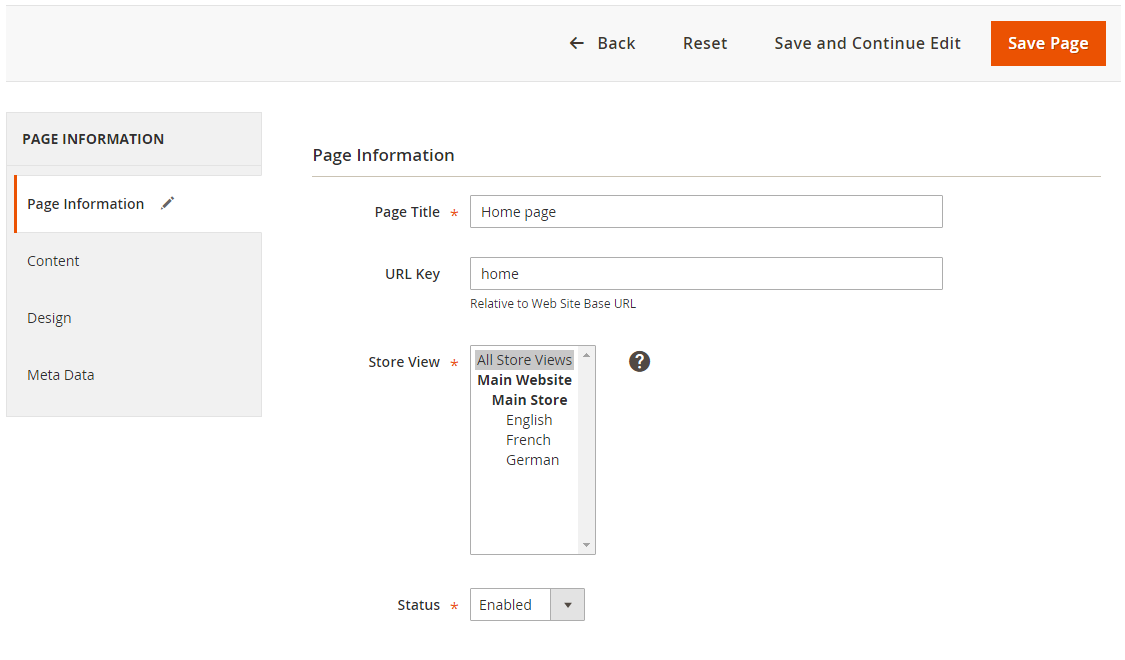
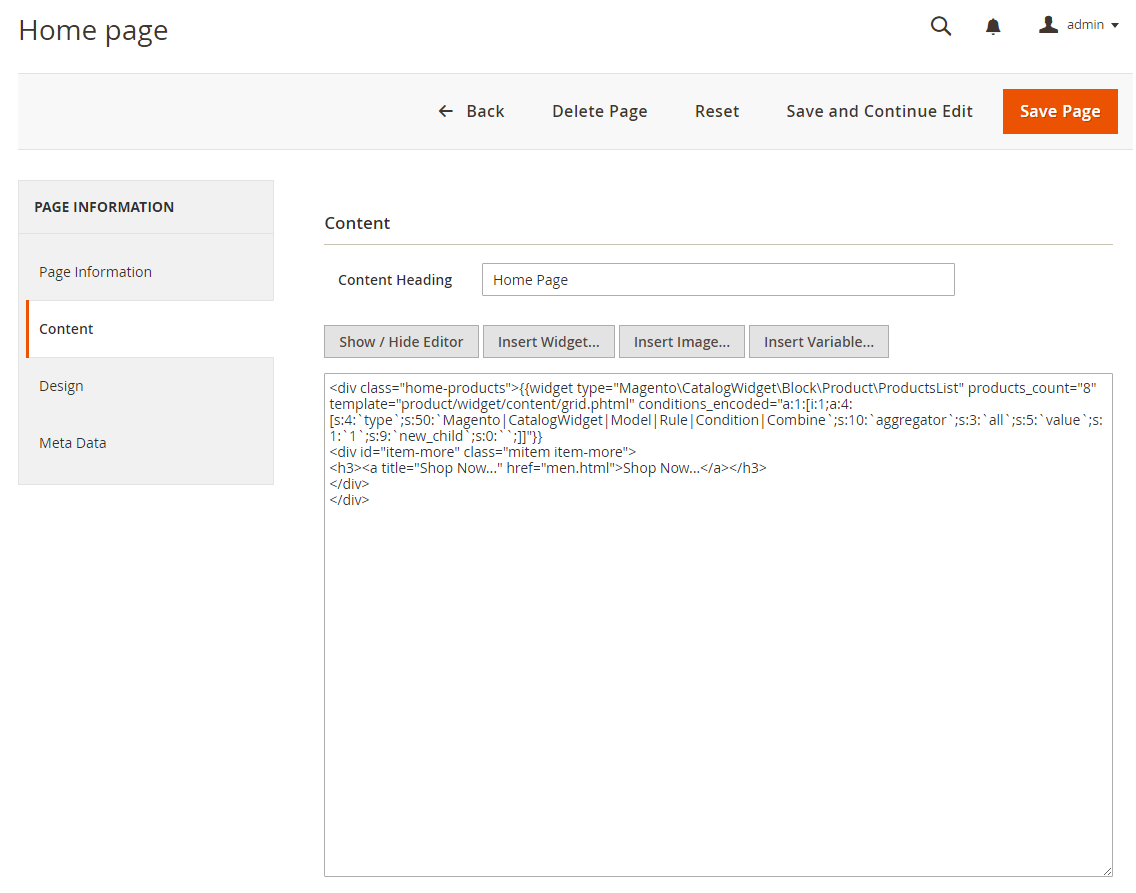
To configure this page, in the Admin Panel, navigate to Content | Elements | Pages | (Select Home Page) Edit.
- a. Page Information Tab: click to see the Back-end setting
- b. Content Tab: click to see the Back-end setting
You can choose one of the following options to create and configure contents:
Option 1: In the Content field, click Show/Hide Editor button, then copy and paste the following code:
<div class="home-products">{{widget type="Magento\CatalogWidget\Block\Product\ProductsList" products_count="8" template="product/widget/content/grid.phtml" conditions_encoded="a:1:[i:1;a:4:[s:4:`type`;s:50:`Magento|CatalogWidget|Model|Rule|Condition|Combine`;s:10:`aggregator`;s:3:`all`;s:5:`value`;s:1:`1`;s:9:`new_child`;s:0:``;]]"}}
<div id="item-more" class="mitem item-more">
<h3><a title="Shop Now..." href="men.html">Shop Now...</a></h3>
</div>
</div>
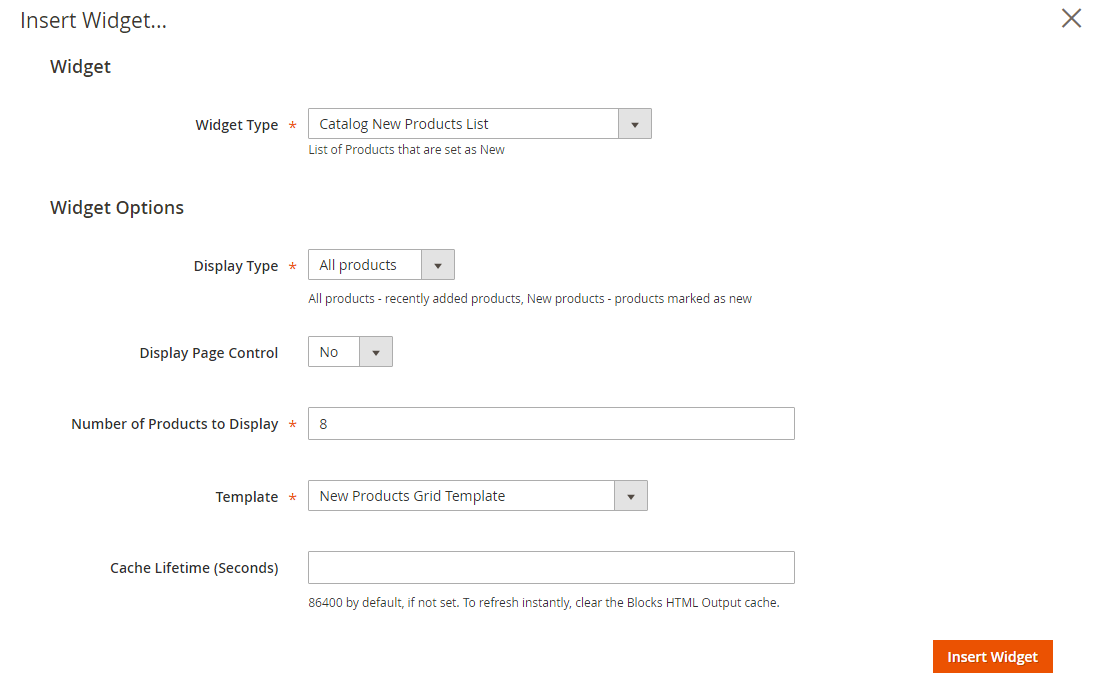
Option 2: In the Content tab, click Show / Hide Editor button, and click Insert Widget button
- c. Design Tab: click to see the Back-end setting
Copy and paste the following code into the “Design” field.
<referenceContainer name="topsl1.container">
<container name="sections.panel.topsl1" label="UberTheme - topsl1" htmlTag="div" htmlClass="container">
<container name="sections.panel.topsl1.content"
label="UberTheme - Topsl1 Content" as="sections.panel.topsl1.content" htmlTag="div" htmlClass="inner">
<block class="Ubertheme\UbContentSlider\Block\Slider" name="ub.content.slider"
 as="ub-content-slider" content_type="slider" slider_key="main-slideshow">
<arguments>
<argument name="item_width" xsi:type="number">910</argument>
<argument name="item_height"  xsi:type="number">604</argument>
<argument name="show_item_title"  xsi:type="number">0</argument>
<argument name="show_item_desc"  xsi:type="number">1</argument>
<argument name="single_item"  xsi:type="number">1</argument>
<argument name="show_thumbnail"  xsi:type="number">0</argument>
<argument name="show_navigation"  xsi:type="number">1</argument>
<argument name="show_paging"  xsi:type="number">1</argument>
<argument name="paging_numbers"  xsi:type="number">0</argument>
</arguments>
</block>
<block class="Magento\Cms\Block\Block" name="banner-promotion" after="-">
<arguments>
<argument name="block_id" xsi:type="string">banner-promotion</argument>
</arguments>
</block>
</container>
</container>
</referenceContainer>
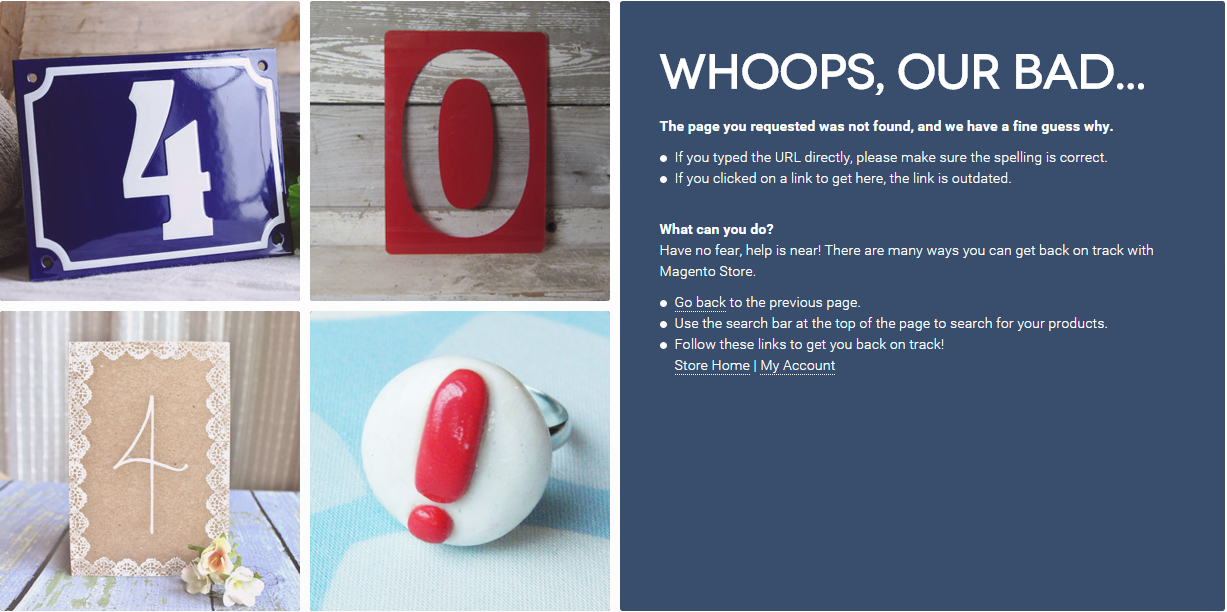
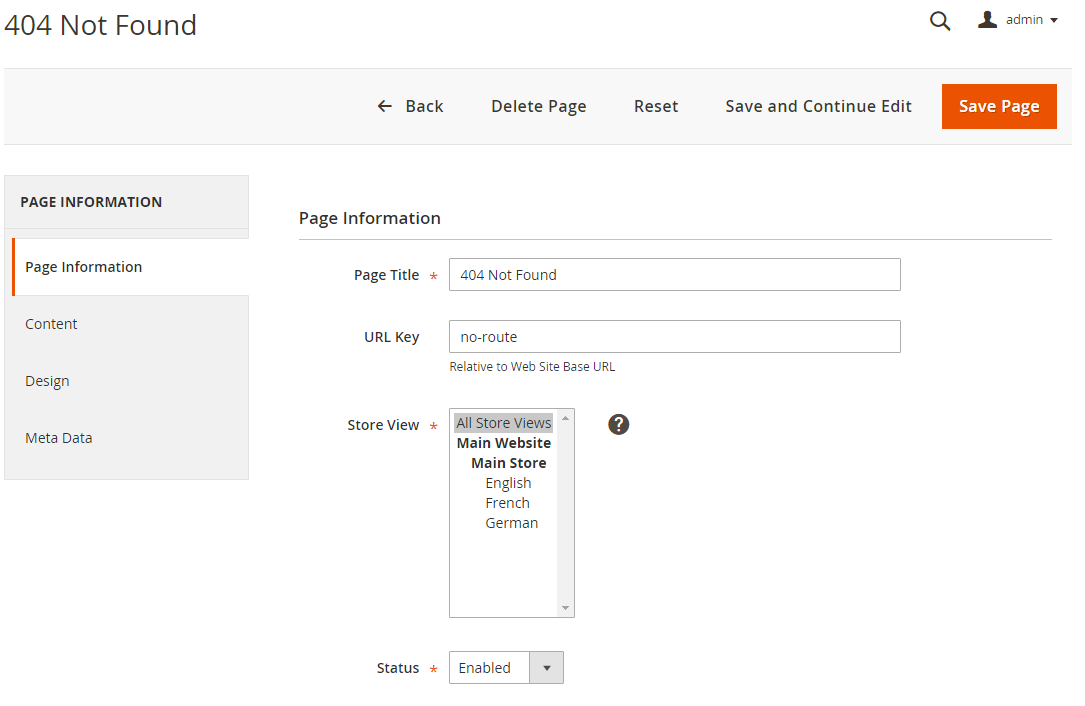
404 page Configuration
To configure this page, in the Admin Panel, navigate to Content | Elements | Pages, then select 404 Not Found 1 page to update the settings as follows:
- Page Information Tab: click to see the Back-end setting
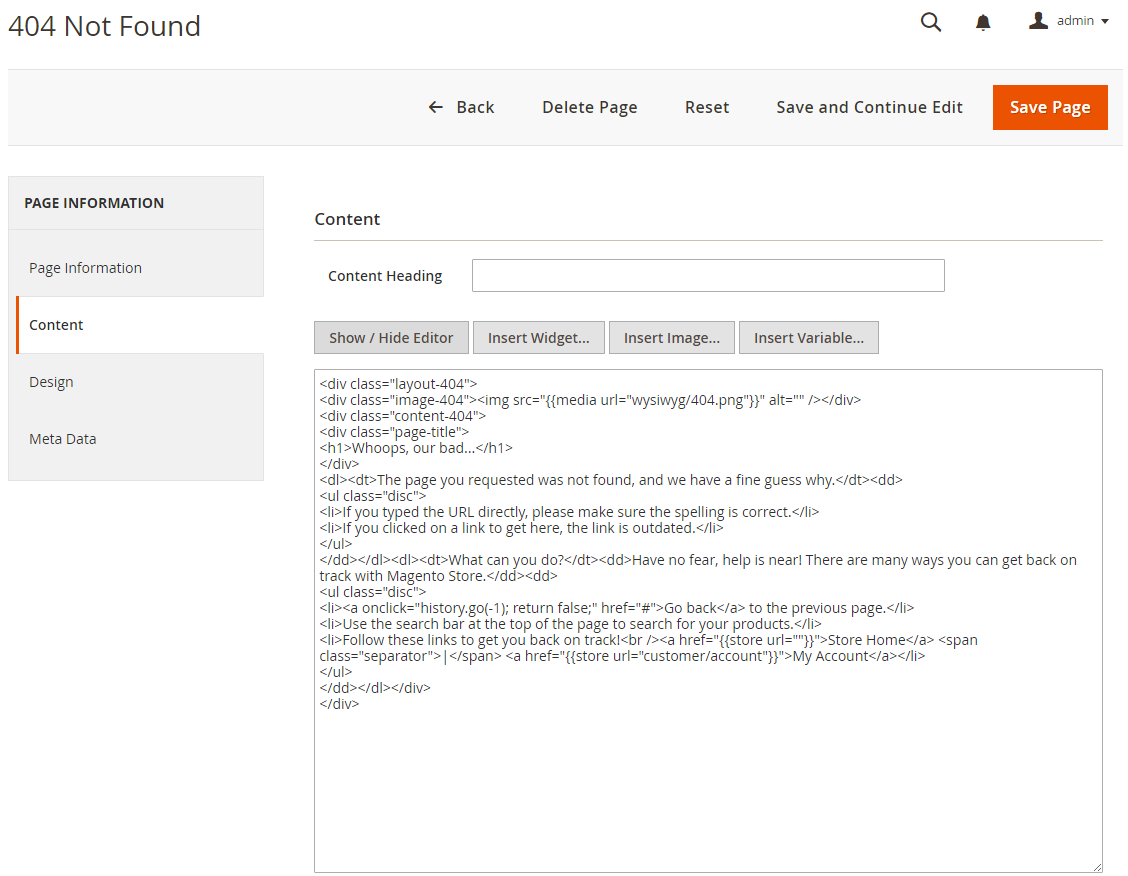
- Content Tab: click to see the Back-end setting
Copy and paste the code below on the Content field:
<div class="layout-404">
<div class="image-404"><img src="{{media url="wysiwyg/404.png"}}" alt="" /></div>
<div class="content-404">
<div class="page-title">
<h1>Whoops, our bad...</h1>
</div>
<dl><dt>The page you requested was not found, and we have a fine guess why.
</dt><dd>
<ul class="disc">
<li>If you typed the URL directly, please make sure the spelling is correct.</li>
<li>If you clicked on a link to get here, the link is outdated.</li>
</ul>
</dd>
</dl>
<dl><dt>What can you do?
</dt><dd>Have no fear, help is near! There are many ways you can get back on track with Magento Store.
</dd><dd>
<ul class="disc">
<li><a onclick="history.go(-1); return false;" href="#">Go back</a> to the previous page.</li>
<li>Use the search bar at the top of the page to search for your products.</li>
<li>Follow these links to get you back on track!<br /><a href="{{store url=""}}">Store Home</a>
<span class="separator">|</span> <a href="{{store url="customer/account"}}">My Account</a></li>
</ul>
</dd>
</dl>
</div>
</div>
Front-end Appearance:
VI. Static Block Configuration
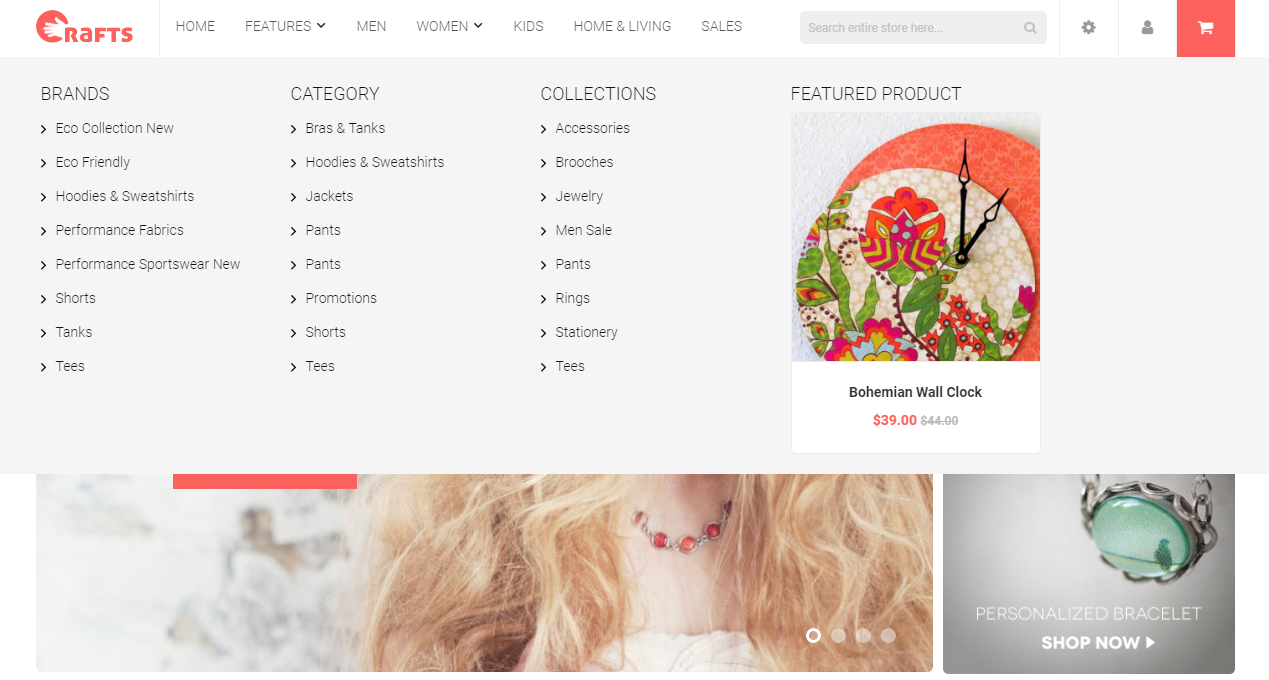
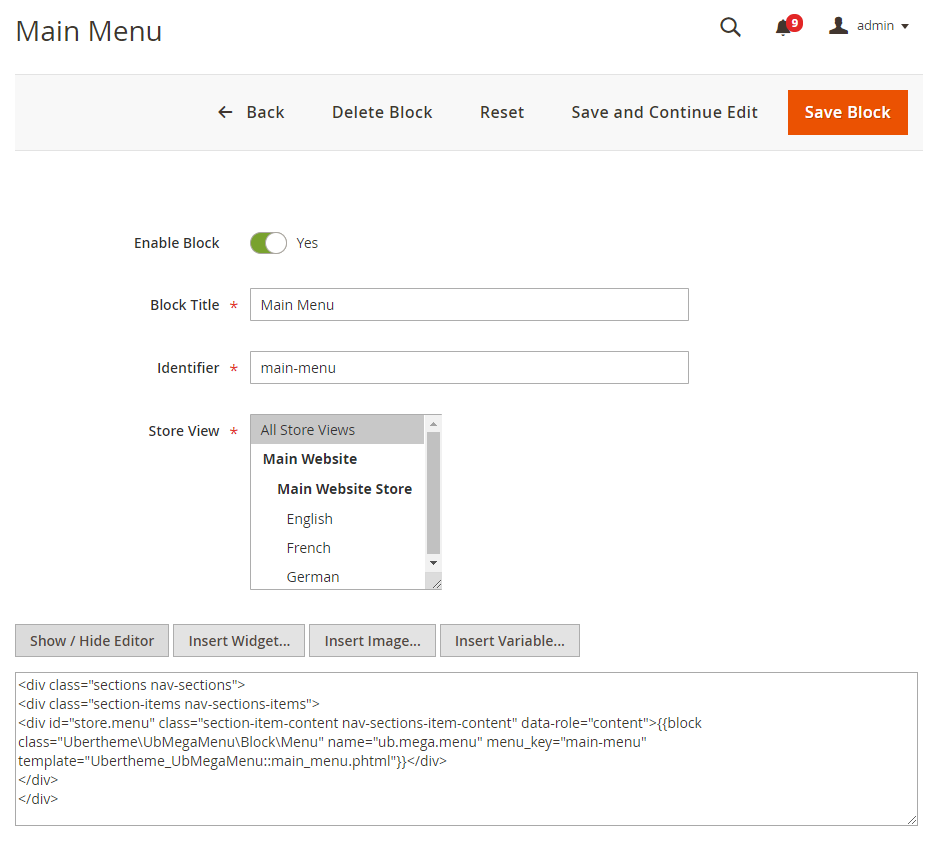
1. Main Menu
In your admin dashboard, click Content | (Elements) Blocks | Add New Block, then create Main Menu block with configuration as follows:
Back-end setting
In the Content field, click Show/Hide Editor button, then copy and paste the following code:
<div class="sections nav-sections">
<div class="section-items nav-sections-items">
<div id="store.menu" class="section-item-content nav-sections-item-content" data-role="content">{{block class="Ubertheme\UbMegaMenu\Block\Menu" name="ub.mega.menu" menu_key="main-menu" template="Ubertheme_UbMegaMenu::main_menu.phtml"}}</div>
</div>
</div>
Front-end Appearance:
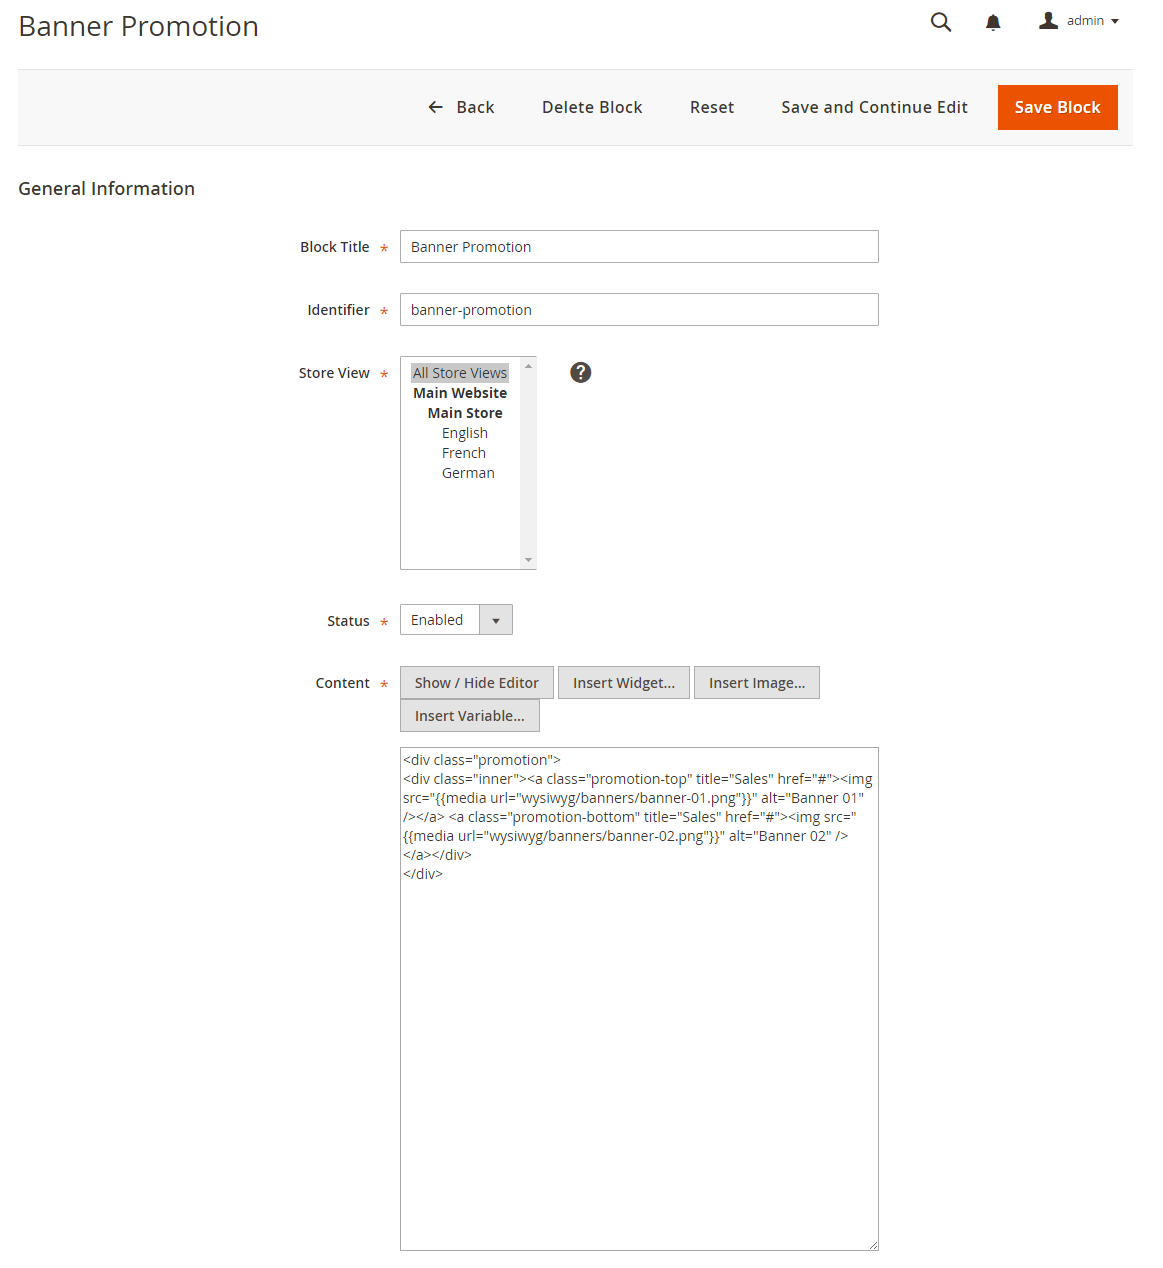
2. Banner Promotion
In your admin dashboard, click Content | (Elements) Blocks | Add New Block, then create Banner Promotion block with configuration as follows:
Back-end setting
In the Content field, click Show/Hide Editor button, then copy and paste the following code:
<div class="promotion">
<div class="inner"><a class="promotion-top" title="Sales" href="#">
<img src="{{media url="wysiwyg/banners/banner-01.png"}}" alt="Banner 01" /></a>
<a class="promotion-bottom" title="Sales" href="#"><img src="{{media url="wysiwyg/banners/banner-02.png"}}" alt="Banner 02" />
</a></div>
</div>
Front-end Appearance:

3. Business banner
In your admin dashboard, click Content | (Elements) Blocks | Add New Block, then create Business banner block with configuration as follows:
Back-end setting
In the Content field, click Show/Hide Editor button, then copy and paste the following code:
<<div class="hot-products">
<div class="inner">
<h3>What's Hot</h3>
<h4>Newest customer trends</h4>
</div>
</div>
<div class="static-top bg-static-3">
<div class="inner"><a title="Shop Now" href="#"><img src="{{media url="wysiwyg/banners/banner-03.png"}}" alt="Banner 03" /></a></div>
</div>
<div class="static-top bg-static-4">
<div class="inner"><a title="Shop Now" href="#"><img src="{{media url="wysiwyg/banners/banner-04.png"}}" alt="Banner 04" /></a></div>
</div>
- Front-end Appearance:

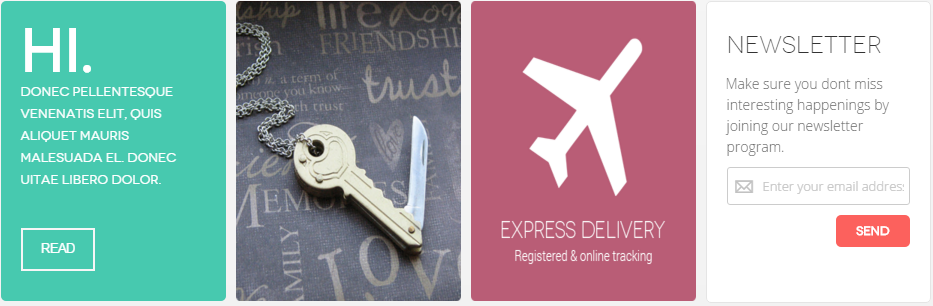
4. Shipping
In your admin dashboard, click Content | (Elements) Blocks | Add New Block, then create Shipping block with configuration as follows:
Back-end setting
In the Content field, click Show/Hide Editor button, then copy and paste the following code:<div class="block block-welcome"> <div class="col-inner"> <div class="hello">Hi.</div> <div class="desc">Donec pellentesque venenatis elit, quis aliquet mauris malesuada el. Donec uitae libero dolor.</div> <a class="read-welcome" title="Read More" href="#">Read</a></div> </div> <div class="block block-static-adv"> <div class="col-inner"> <div class="static-bottom bg-static-5"><a title="Shop Now" href="#"><img src="{{media url="wysiwyg/banners/banner-05.png"}}" alt="Banner 05" /></a></div> </div> </div> <div class="block block-static-adv"> <div class="col-inner"> <div class="static-bottom bg-static-6"><a title="Shop Now" href="#"><img src="{{media url="wysiwyg/banners/banner-06.png"}}" alt="Banner 06" /></a></div> </div> </div> <p>{{block class="Magento\Newsletter\Block\Subscribe" name="form.subscribe" as="subscribe" before="-" template="subscribe.phtml"}}</p>Front-end Appearance:
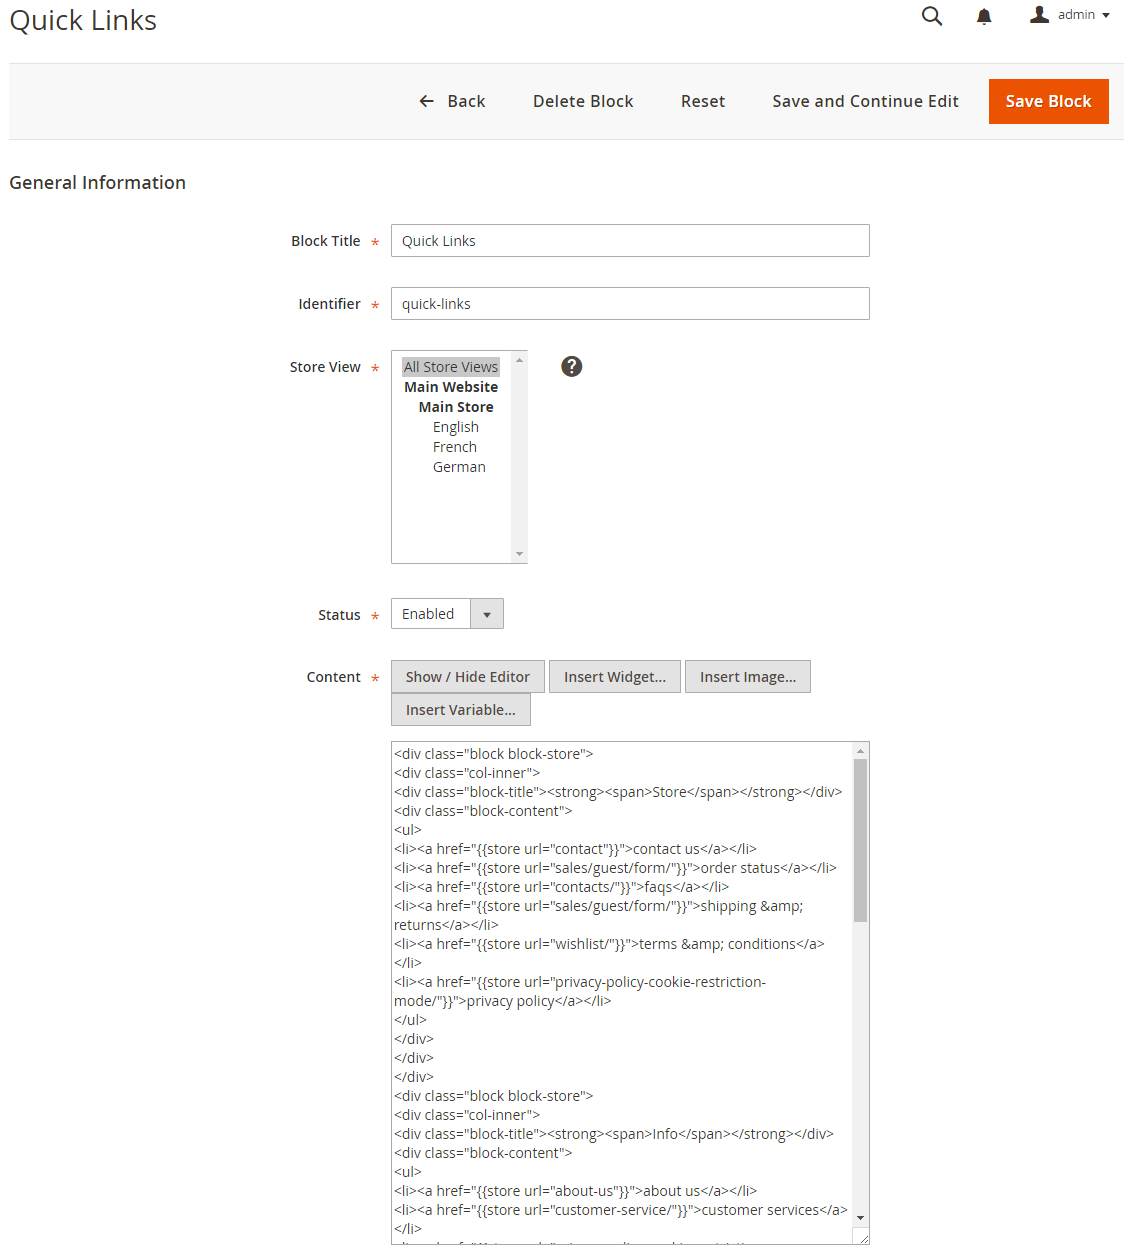
5. Quick Links
In your admin dashboard, click Content | (Elements) Blocks | Add New Block, then create Quick links block with configuration as follows:
Back-end setting
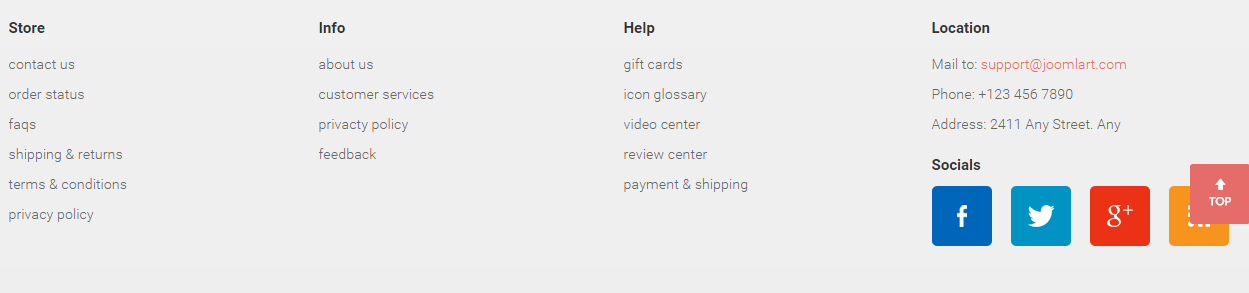
In the Content field, click Show/Hide Editor button, then copy and paste the following code:<div class="block block-store"> <div class="col-inner"> <div class="block-title"><strong><span>Store</span></strong></div> <div class="block-content"> <ul> <li><a href="{{store url="contact"}}">contact us</a></li> <li><a href="{{store url="sales/guest/form/"}}">order status</a></li> <li><a href="{{store url="contacts/"}}">faqs</a></li> <li><a href="{{store url="sales/guest/form/"}}">shipping & returns</a></li> <li><a href="{{store url="wishlist/"}}">terms & conditions</a></li> <li><a href="{{store url="privacy-policy-cookie-restriction-mode/"}}">privacy policy</a></li> </ul> </div> </div> </div> <div class="block block-store"> <div class="col-inner"> <div class="block-title"><strong><span>Info</span></strong></div> <div class="block-content"> <ul> <li><a href="{{store url="about-us"}}">about us</a></li> <li><a href="{{store url="customer-service/"}}">customer services</a></li> <li><a href="{{store url="privacy-policy-cookie-restriction-mode/"}}">privacty policy</a></li> <li><a href="{{store url="contact-us/"}}">feedback</a></li> </ul> </div> </div> </div> <div class="block block-help"> <div class="col-inner"> <div class="block-title"><strong><span>Help</span></strong></div> <div class="block-content"> <ul> <li><a href="{{store url="customer-service/"}}">gift cards</a></li> <li><a href="{{store url="customer-service/"}}">icon glossary</a></li> <li><a href="{{store url="customer-service/"}}">video center</a></li> <li><a href="{{store url="customer-service/"}}">review center</a></li> <li><a href="{{store url="customer-service/"}}">payment & shipping</a></li> </ul> </div> </div> </div> <div class="block block-location"> <div class="col-inner"> <div class="block-location-inner"> <div class="block-title"><strong><span>Location</span></strong></div> <div class="block-content"> <p class="email">Mail to: <a title="[email protected]" href="mailto:[email protected]">[email protected]</a></p> <p class="phone">Phone: +123 456 7890</p> <p class="address">Address: 2411 Any Street. Any</p> </div> </div> <div class="block-socials"> <div class="block-title"><strong><span>Socials</span></strong></div> <div class="block-content"><a class="sfacebook" title="Facebook" href="https://www.facebook.com/UberTheme/"><span>Facebook</span></a> <a class="stwitter" title="twitter" href="https://twitter.com/UberTheme"><span>Twitter</span></a> <a class="sgoogle-plus" title="Google Plus" href="https://plus.google.com/+UberthemeMagento"><span>Google Plus</span></a> <a class="rss-new" title="Rss News" href="https://www.ubertheme.com/"><span>Rss News</span></a></div> </div> </div> </div>Front-end Appearance:
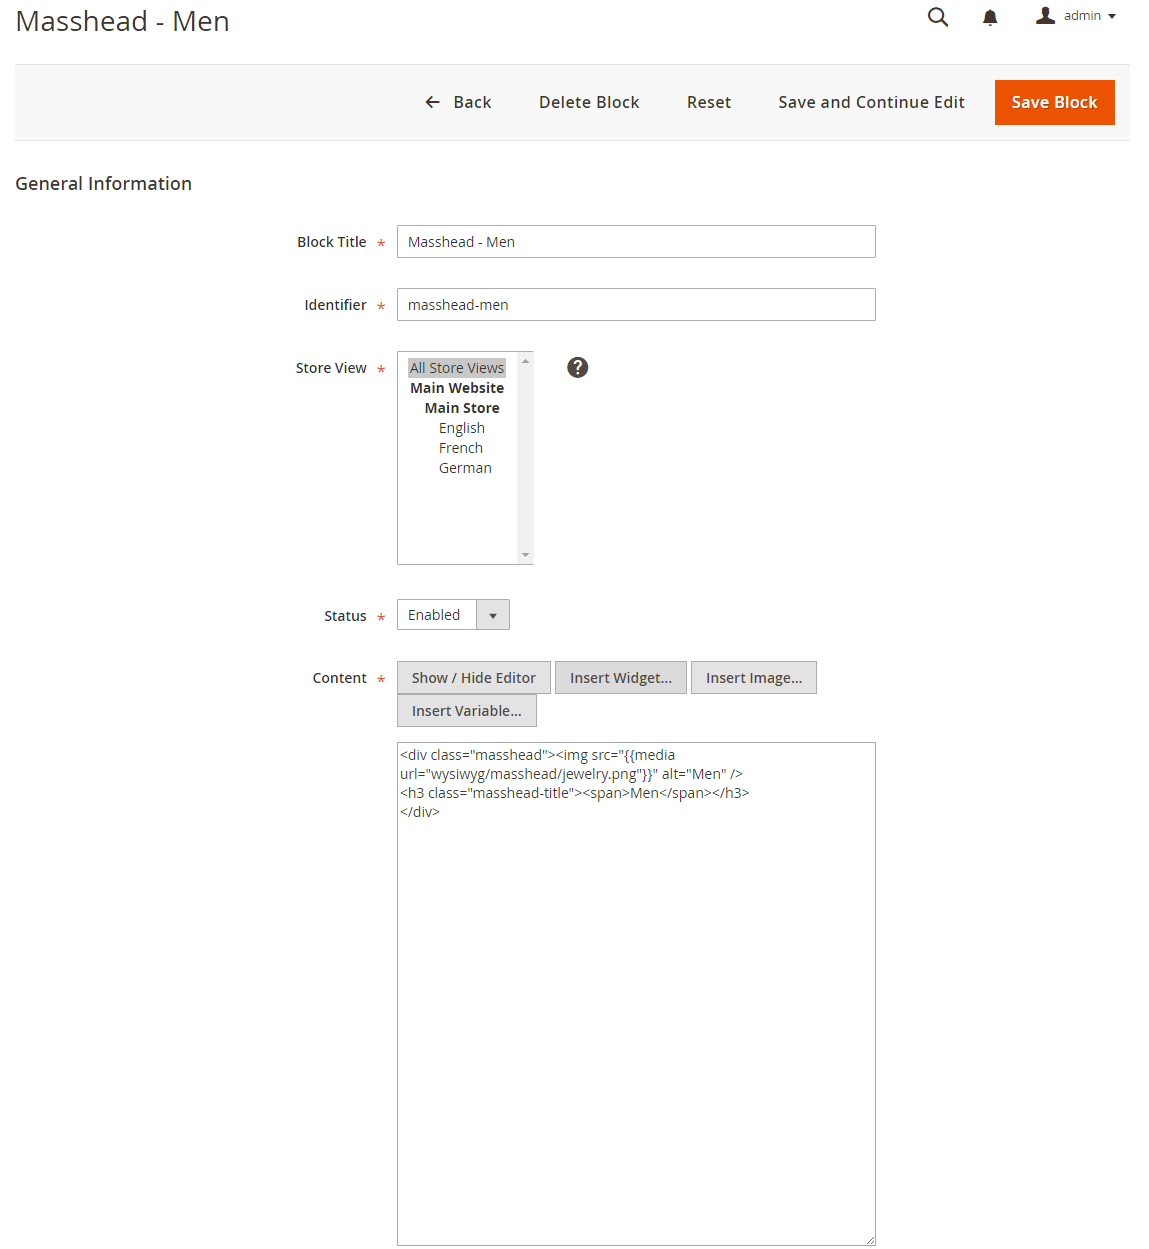
6. Masshead -- Men
In your admin dashboard, click Content | (Elements) Blocks | Add New Block, then create Masshead -- Men block with configuration as follows:
Back-end setting
In the Content field, click Show/Hide Editor button, then copy and paste the following code:<div class="masshead"><img src="{{media url="wysiwyg/masshead/jewelry.png"}}" alt="Men" /> <h3 class="masshead-title"><span>Men</span></h3> </div>
Front-end Appearance:

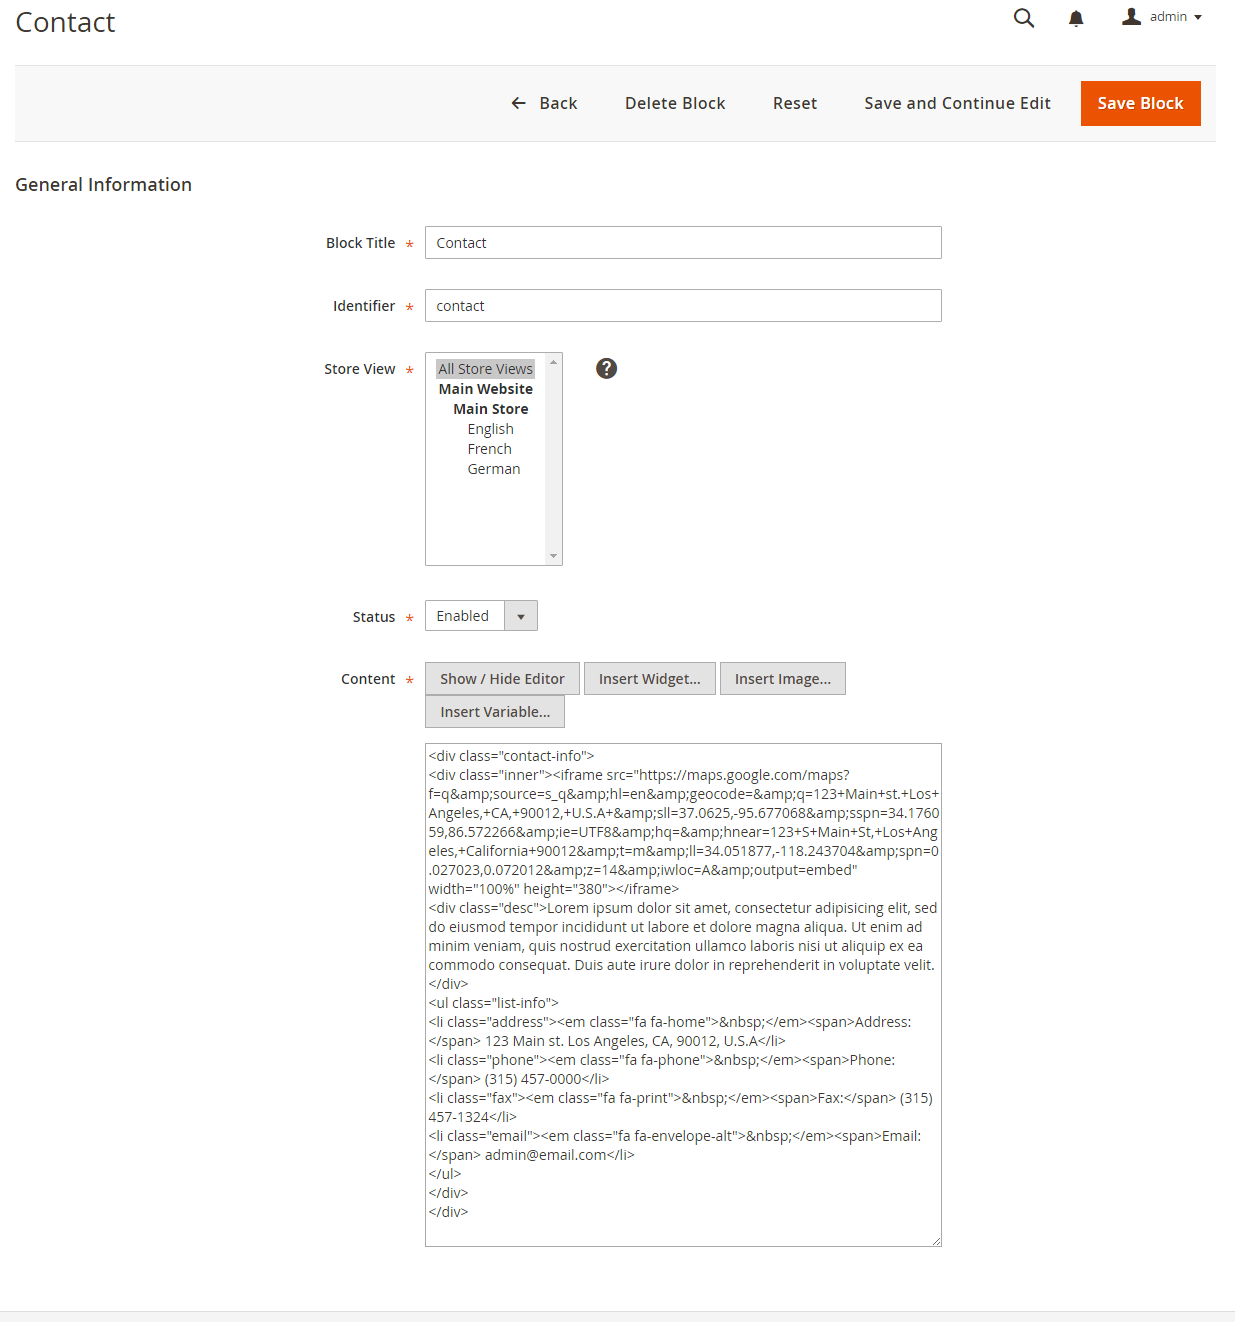
7. Contact
In your admin dashboard, click Content | (Elements) Blocks | Add New Block, then create Contact block with configuration as follows:
Back-end setting
In the Content field, click Show/Hide Editor button, then copy and paste the following code:<div class="contact-info"> <div class="inner"><iframe src="https://maps.google.com/maps?f=q&source=s_q&hl=en&geocode=&q=123+Main+st.+Los+Angeles,+CA,+90012,+U.S.A+&sll=37.0625,-95.677068&sspn=34.176059,86.572266&ie=UTF8&hq=&hnear=123+S+Main+St,+Los+Angeles,+California+90012&t=m&ll=34.051877,-118.243704&spn=0.027023,0.072012&z=14&iwloc=A&output=embed" width="100%" height="380"></iframe> <div class="desc">Lorem ipsum dolor sit amet, consectetur adipisicing elit, sed do eiusmod tempor incididunt ut labore et dolore magna aliqua. Ut enim ad minim veniam, quis nostrud exercitation ullamco laboris nisi ut aliquip ex ea commodo consequat. Duis aute irure dolor in reprehenderit in voluptate velit.</div> <ul class="list-info"> <li class="address"><em class="fa fa-home"> </em><span>Address:</span> 123 Main st. Los Angeles, CA, 90012, U.S.A</li> <li class="phone"><em class="fa fa-phone"> </em><span>Phone:</span> (315) 457-0000</li> <li class="fax"><em class="fa fa-print"> </em><span>Fax:</span> (315) 457-1324</li> <li class="email"><em class="fa fa-envelope-alt"> </em><span>Email:</span> [email protected]</li> </ul> </div> </div>
Front-end Appearance:

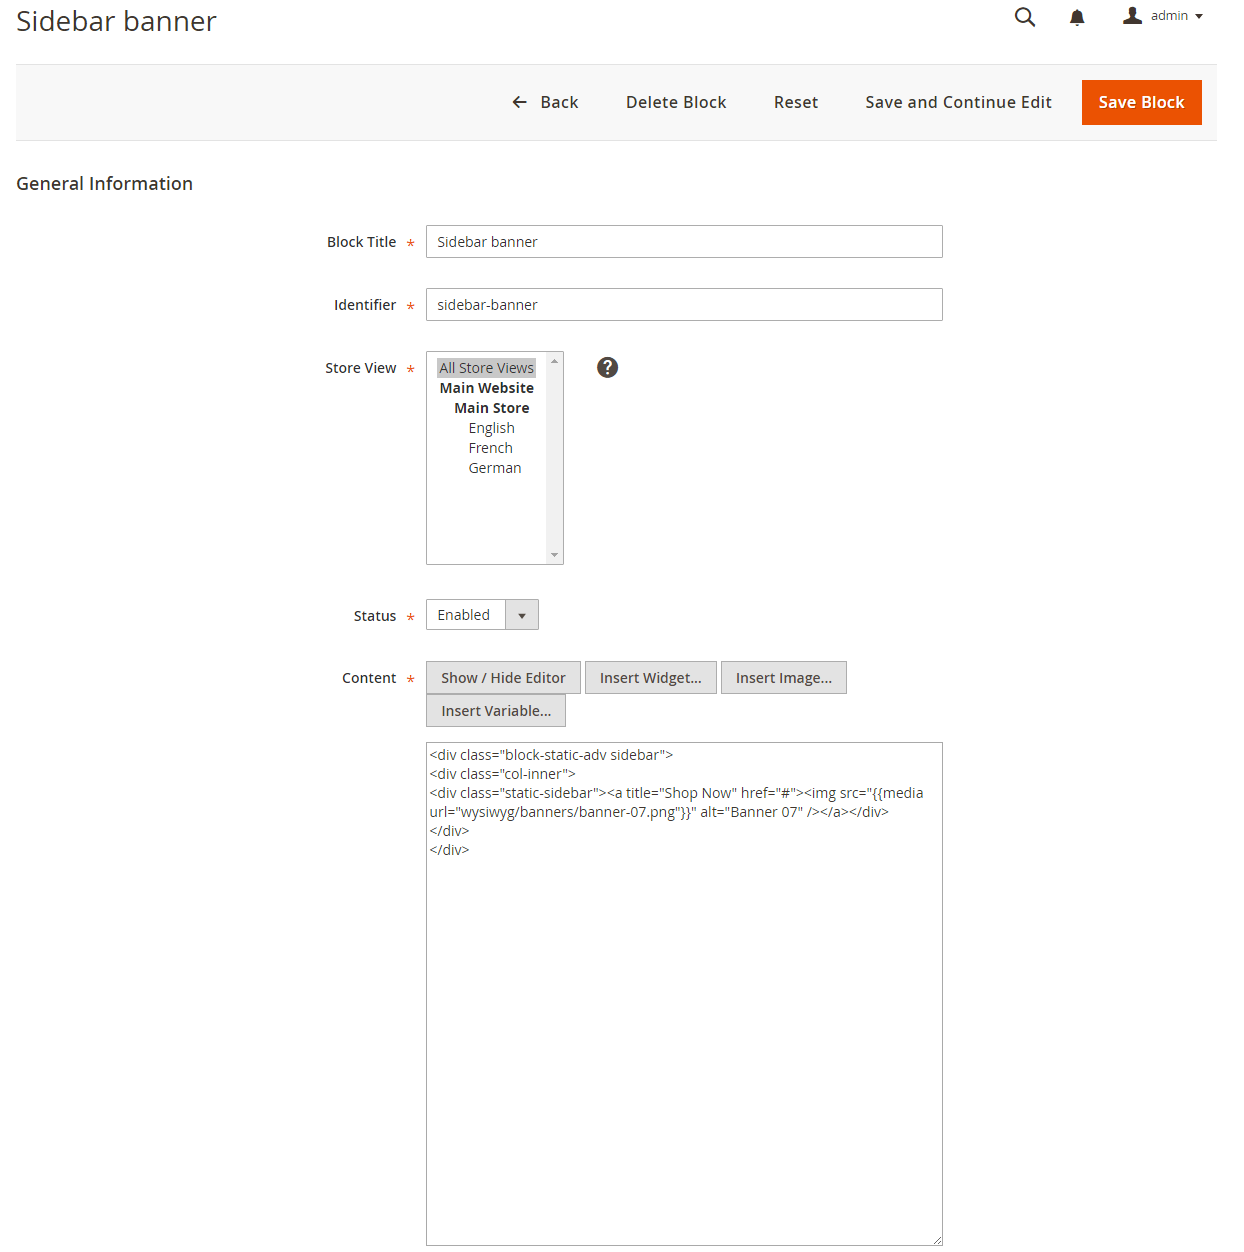
8. Sidebar banner
Step 1: First, you create Sidebar banner block (the same way as afore-mentioned Banner Promotion block) with configuration as follows:
Back-end setting
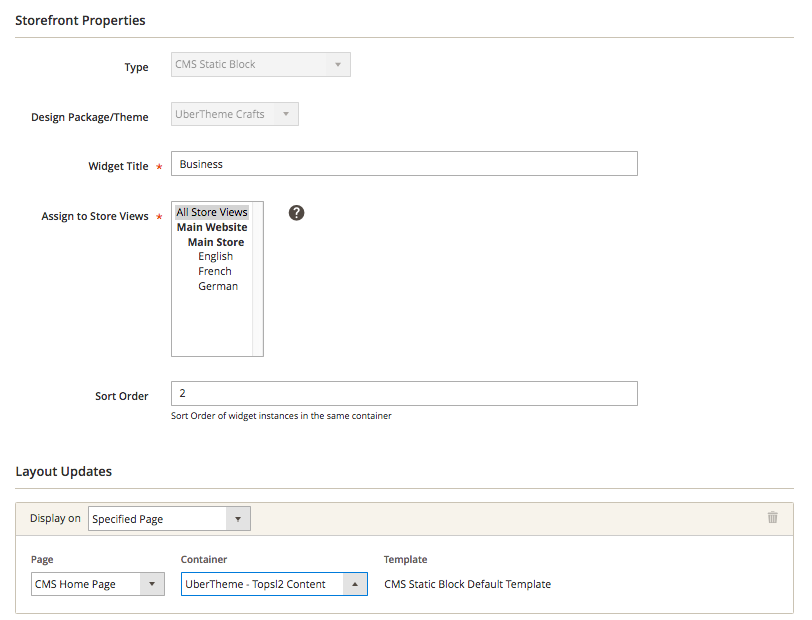
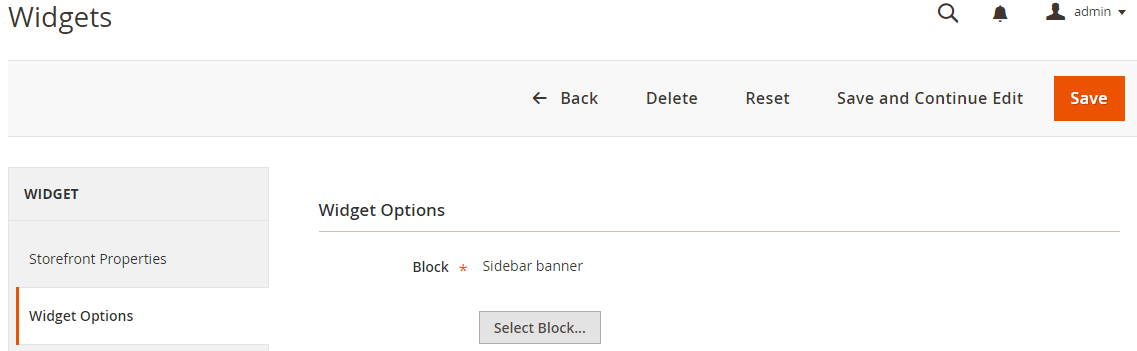
In the Content field, click Show/Hide Editor button, then copy and paste the following code:<<div class="block-static-adv sidebar"> <div class="col-inner"> <div class="static-sidebar"><a title="Shop Now" href="#"><img src="{{media url="wysiwyg/banners/banner-07.png"}}" alt="Banner 07" /></a></div> </div> </div>Step 2: In the Admin Panel, navigate to Content >> Widget >> Add Widget, then update the settings as below:
- StoreFront Properties: click to see the Back-end setting
- Widget Options: click to see the Back-end setting
Front-end Appearance:


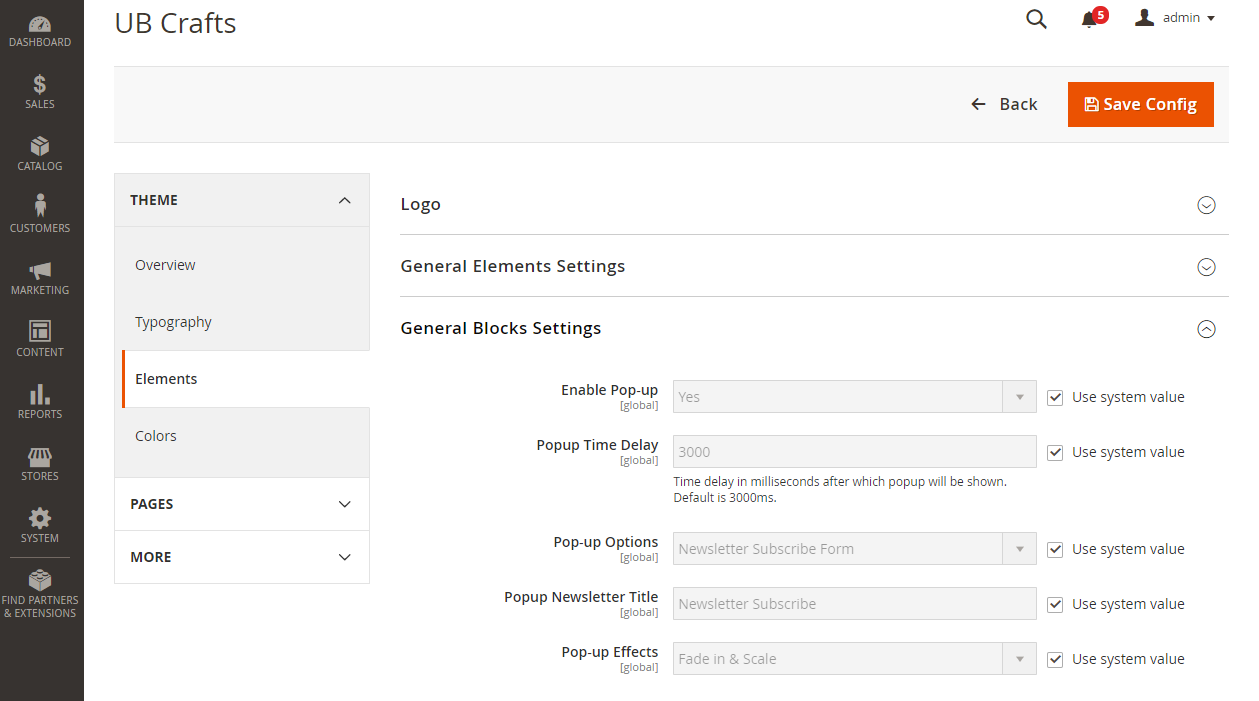
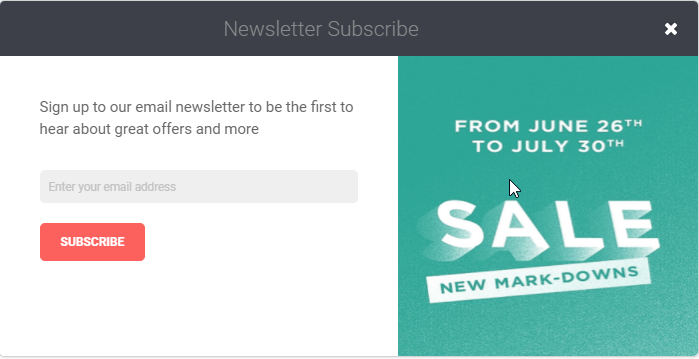
9. Pop up Newsletter Subscribe
Crafts 2.0 theme supports three types of popup:
- Login form
- A specific Static Block
- Newsletter Subscribe
In the demo, we enable Popup Newsletter Subscribe by default. You can easily enable/disable and switch to other popup type via the Admin Panel. Navigate to Content | UB Themehelper | UB Crafts | Settings | Elements | General Blocks Setting , then update the settings as you wish:
Front-end Appearance:
VII. Extention Configuration
Standard Crafts 2.0 is packed with base theme only, with no built-in extensions. If you select Extended Crafts 2.0, depending the extension you purchased, please follow specific userguides below:
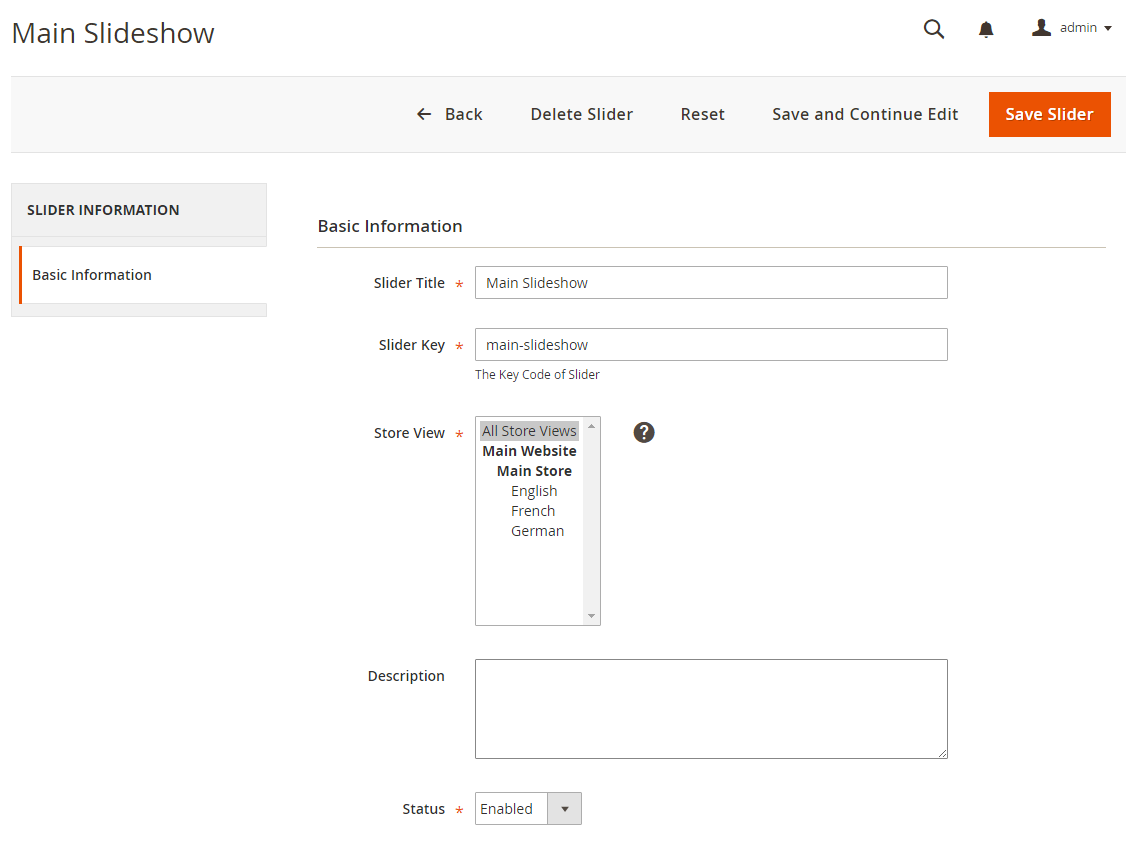
1. UB Content Slider extension
In the Magento Admin Panel, navigate to Content | UB Content Slider | Manage Slider and configure the default settings as the Back-end setting
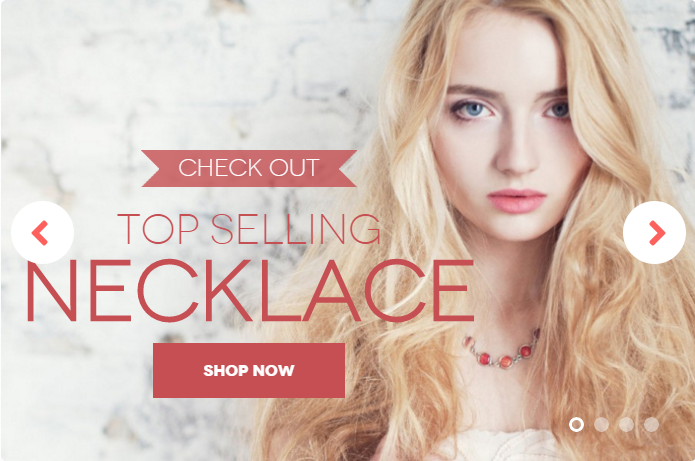
Now your slider should be displayed in the frontend.
2. UB Mega Menu extension
This section provides detailed instruction to configure Mega Menu style as per our Crafts demo site.
UB Top Menu
Step 1 -- Create the Top Menu group
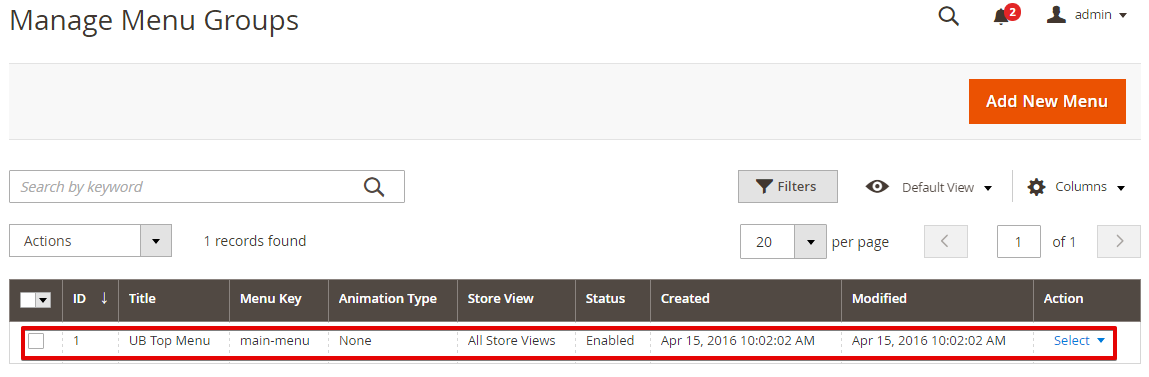
In the Magento backend, navigate to Content | (UB Mega Menu) Manage Menu, then click Add New Menu. In the popup, you can configure as per this screenshot (Make sure you insert menu key as main-menu).
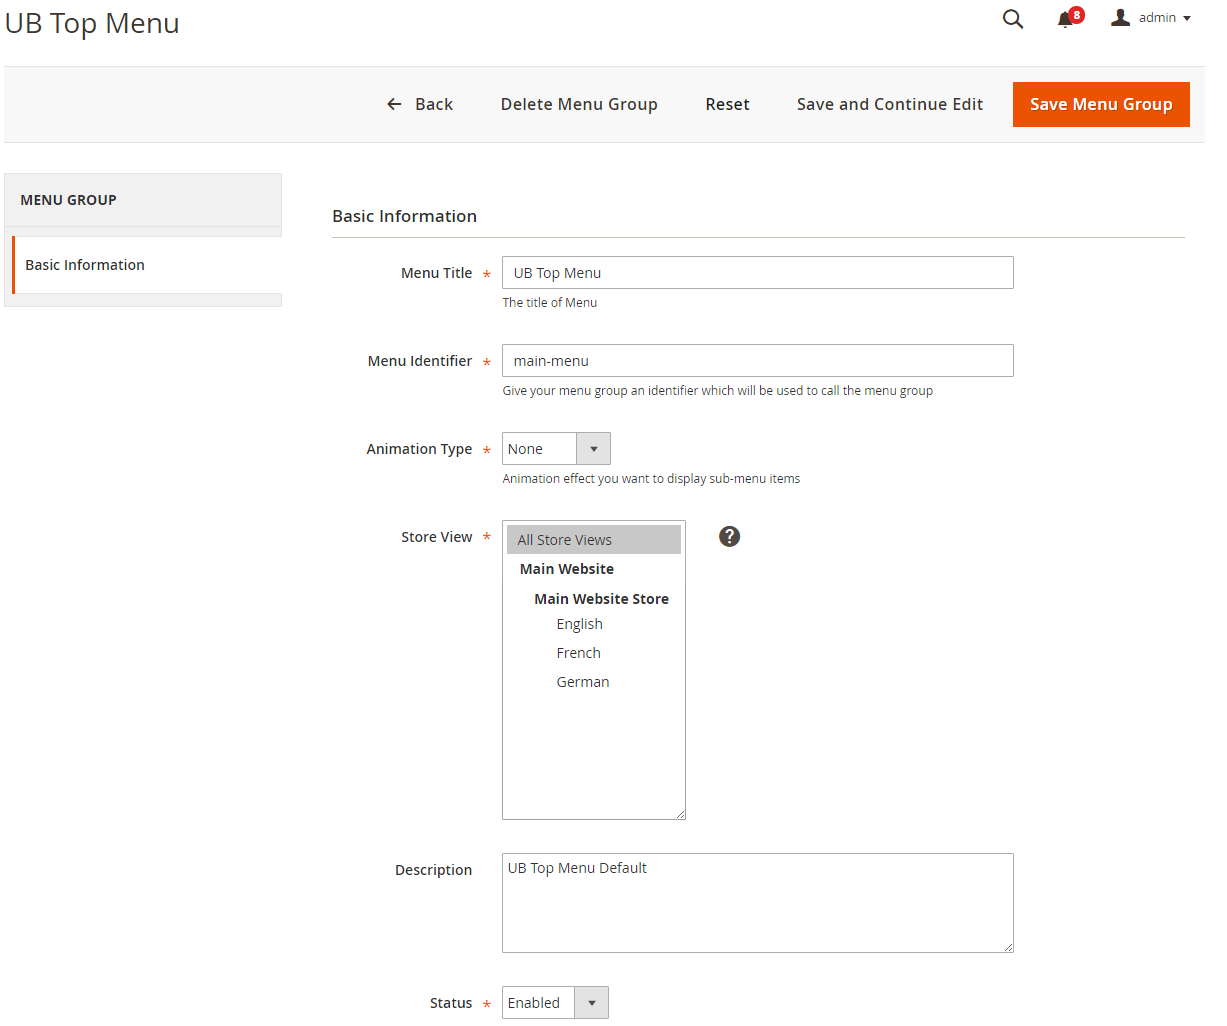
Once done, you should see the new menu group visible as illustration in the following screenshort:
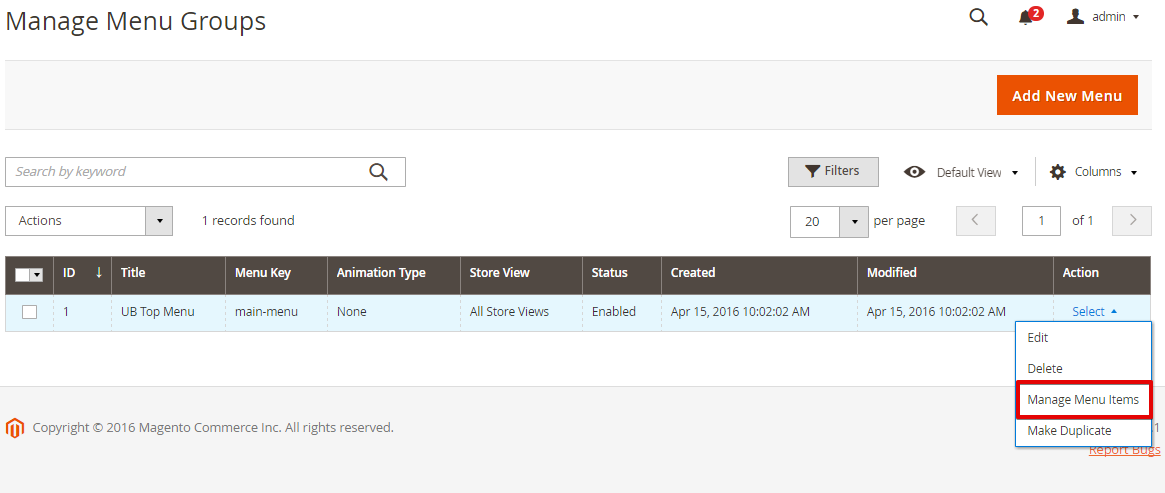
Step 2 -- Create menu item in the UB Top Menu
Supposed that you have some sample products in place already, now we start to create menu items for the mega menu. In the same Menu Group panel, go to Select | Manage Menu items:
Step 2.1 -- Create Women and its sub-menu items:
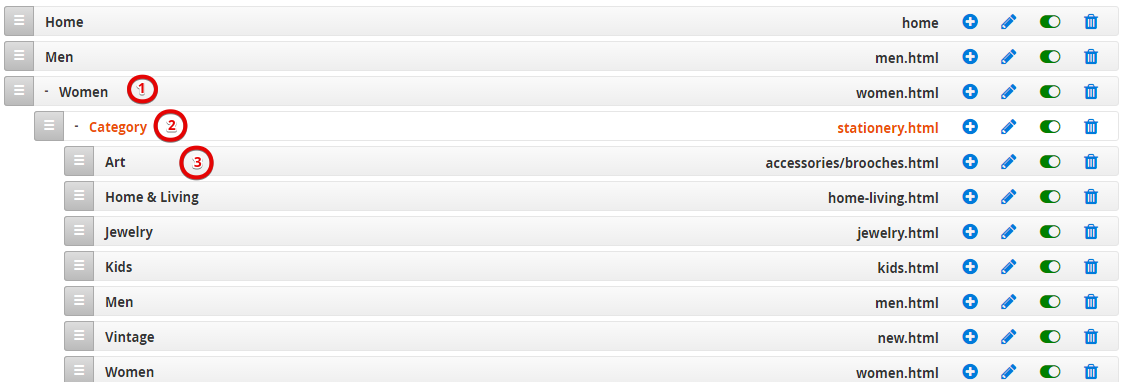
Click Add New Menu Item button to create each of menu item, and follow configuration below:
- Women: Configuration steps -- menu setting 1 > menu setting 2
- Category: Configuration steps -- menu setting 1 > menu setting 2
- Art: Configuration steps -- menu setting 1 > menu setting 2
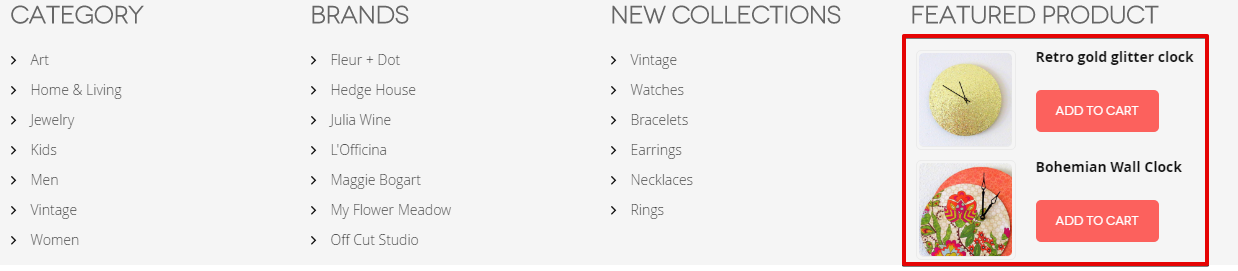
Step 2.2 -- Create Product List menu items
Front-end Appearance:
Click Add New Menu Item again, to create:

(1) Column 3: Configuration steps -- Setting 1 > Setting 2
NOTE: Insert Extra Class ub-submenu-products when you configure Column 3 menu item.
(2) Products: Configuration steps -- Setting 1 > Setting 2 (Make sure in the Setting 2 step, you insert Custom Content as per screenshot)
UB Mega Menu Documentation
3. UB Quick View extension
In the Magento Admin Panel, navigate to Content | UB Quick View | Setting and configure the default settings as the Back-end setting
Front-end Appearance
UB Quick View Documentation