Odinis
I. Installation
There are two ways to install a UberTheme Magento theme like Odinis:
- General Installation: Applicable if you have installed a Magento base on your server before.
- Quickstart Installation: Applicable if you want to get a whole new site as per Demo.
Decide which way to follow. Once downloaded, unzip the package to get the following folders:
- mage_ext: contains all built-in extensions of the theme.
- mage_tpl: contains the theme files only.
- quickstart: a full Magento CMS version with the theme already integrated to match the demo.
- source: contains all source files of the theme.
Provided that you have installed the Magento base already, General Installation will help you adapt the theme and its extensions with your current site.
Note: Your store must be ready before the installation. If not, get it done quickly by following the Magento Installation Guide. See also the following docs for general installations and configurations.
For more details, please check the documentation of the specific extension here.
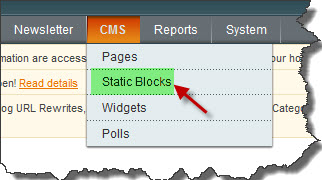
II. Static Blocks
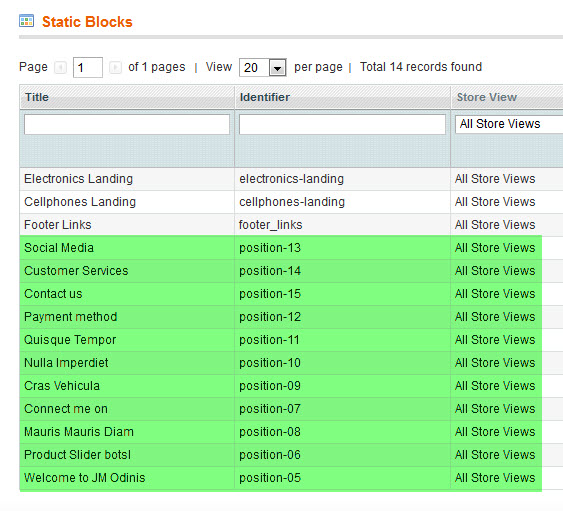
Stakes front-page uses 13 static blocks on Template:
To create these blocks, go to CMS > Static Block >and select page that you want to display this block on.(e.g: Homepage):
You can add a new block by clicking on Add New Block button to create new block and input the content of this block as you need.
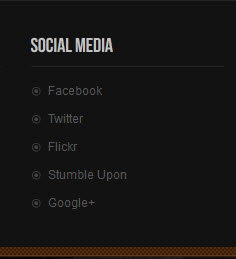
Position-13: Social Media
<div class="col-2">
<div class="block block-social">
<div class="block-title"><strong><span>Social Media</span></strong></div>
<div class="block-content">
<ul class="list">
<li><a title="Facebook" href="#">Facebook</a></li>
<li><a title="Twitter" href="#">Twitter</a></li>
<li><a title="Flickr" href="#">Flickr</a></li>
<li><a title="Stumble Upon" href="#">Stumble Upon</a></li>
<li><a title="Google+" href="#">Google+</a></li>
</ul>
</div>
</div>
</div>
- Back-end Settings
Front-end Appearance
Position-14: Customer Services
<div class="col-3">
<div class="block block-customer">
<div class="block-title"><strong><span>Customer Services</span></strong></div>
<div class="block-content">
<ul class="list">
<li><a title="Shipping Information" href="#">Track Your Order</a></li>
<li><a title="Shipping Information" href="#">Shipping Information</a></li>
<li><a title="Returns" href="#">Returns</a></li>
<li><a title="Catalog Request" href="#">Catalog Request</a></li>
<li><a title="Payment" href="#">Payment</a></li>
</ul>
</div>
</div>
</div>
- Back-end Settings
Front-end Appearance

Position-15: Contact us
<div class="col-4">
<div class="block block-contact">
<div class="block-title"><strong> <span>Contact us</span> </strong></div>
<div class="block-content">
<div class="phone"><label>Mobile: </label><strong>+1 801 111 6543</strong></div>
<div class="mail"><label>Email: </label><a title="mail" href="mailto:[email protected]">[email protected]</a></div>
</div>
</div>
</div>
- Back-end Settings
Front-end Appearance
Position-12: Payment Method
<div class="col-1">
<div class="block block-payment">
<div class="block-title"><strong><span>Payment method</span></strong></div>
<div class="block-content">
<div class="text-intro">Laoreet et ac sapien semper pede tortor interdum quis id elit.</div>
<ul class="icon-payment clearfix">
<li><a href="#"><img title="payment" src="{{media url="demo/payicon-01.png"}}" alt="payment 1" /></a></li>
<li><a href="#"><img title="payment" src="{{media url="demo/payicon-02.png"}}" alt="payment 2" /></a></li>
<li><a href="#"><img title="payment" src="{{media url="demo/payicon-03.png"}}" alt="payment 3" /></a></li>
<li><a href="#"><img title="payment" src="{{media url="demo/payicon-04.png"}}" alt="payment 4" /></a></li>
</ul>
</div>
</div>
</div>
- Back-end Settings
Front-end Appearance
Position-11: Quisque Tempor
<div class="col-4">
<div class="block">
<div class="block-content">
<div class="demo-image"><a href="#"><img title="payment" src="{{media url="demo/sam-04.jpg"}}" alt="image demo" /></a></div>
<div class="text-intro">
<div class="article-name">Quisque Tempor</div>
Aenean sem mi, eleifend et cursus vel, bibendum feugiat purus. Nam quis neque a. <a class="readon" href="#">More</a></div>
</div>
</div>
</div>
- Back-end Settings
Front-end Appearance
Position-10: Nulla Imperdiet
<div class="col-3">
<div class="block">
<div class="block-content">
<div class="demo-image"><a href="#"><img title="payment" src="{{media url="demo/sam-03.jpg"}}" alt="image demo" /></a></div>
<div class="text-intro">
<div class="article-name">Nulla Imperdiet</div>
Integer condimentum facilisis lorem id ullamcorper. Duis eget neque vitae nisi dignissim. <a class="readon" href="#">More</a></div>
</div>
</div>
</div>
- Back-end Settings
Front-end Appearance
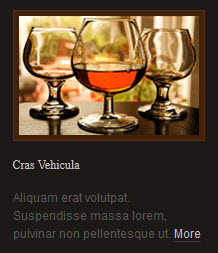
Position-09: Cras Vehicula
<div class="col-2">
<div class="block">
<div class="block-content">
<div class="demo-image"><a href="#"><img title="payment" src="{{media url="demo/sam-02.jpg"}}" alt="image demo" /></a></div>
<div class="text-intro">
<div class="article-name">Cras Vehicula</div>
Aliquam erat volutpat. Suspendisse massa lorem, pulvinar non pellentesque ut. <a class="readon" href="#">More</a></div>
</div>
</div>
</div>
- Back-end Settings
Front-end Appearance
Position-07: Connect me on
<div class="social">DesignFestival: When and How to Update Your Logo Successfully <a title="ow.ly/1gK4fk" href="#"><span>ow.ly/1gK4fk</span></a></div>
- Back-end Settings
Front-end Appearance

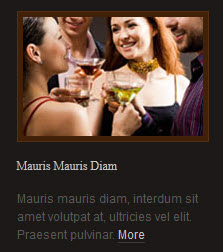
Position-08: Mauris Mauris Diam
<div class="col-1">
<div class="block">
<div class="block-content">
<div class="demo-image"><a href="#"><img title="payment" src="{{media url="demo/sam-01.jpg"}}" alt="image demo" /></a></div>
<div class="text-intro">
<div class="article-name">Mauris Mauris Diam</div>
Mauris mauris diam, interdum sit amet volutpat at, ultricies vel elit. Praesent pulvinar. <a class="readon" href="#">More</a></div>
</div>
</div>
</div>
Back-end Settings
Front-end Appearance
Position-06: Product Slider botsl
<div class="col-1 col-wide">{{block type="joomlart_jmproductsslider/list" name="home.jmproductsslider.list" title="" height="127" width="127" itemheight="127" itemwidth="214" number_items="4" catsid="34" quanlity="4"}}</div>
Back-end Settings
Front-end Appearance

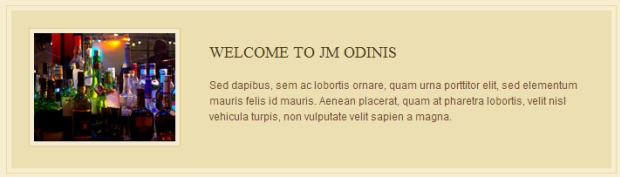
Position-05: Welcome to Odinis
<div class="block block-welcome">
<div class="block-inner">
<div class="block-content">
<div class="product-image left"><a href="#"><img title="payment" src="{{media url="demo/sam-05.jpg"}}" alt="image demo" /></a></div>
<div class="text-intro">
<div class="article-name">Welcome to Odinis</div>
Sed dapibus, sem ac lobortis ornare, quam urna porttitor elit, sed elementum mauris felis id mauris. Aenean placerat, quam at pharetra lobortis, velit nisl vehicula turpis, non vulputate velit sapien a magna.</div>
</div>
</div>
</div>
To push this block onto frontend, go to CMS >> Page. In Design Tab, please fill in Layout Update XML parameter as
below
<reference name="content-top">
    <block type="cms/block" name="position-05">
        <action method="setBlockId"><block_id>position-05</block_id></action>
    </block>
</reference>
- Back-end
Settings - Front-end Appearance
III. Extensions Configuration
Products Module
Odinis used Products extension, named: New Products
To push this extension onto front page like our demo site, go to CMS >> Pages:

Then click on Homepage >> Content Tab, please fill parameter with syntax below:
{{block type="joomlart_jmproducts/list" name="home.jmproducts.list" template="joomlart/jmproducts/list.phtml" }}
Navigate to System>Configuration>Products and configure default criteria as per screenshot below for Product
List:
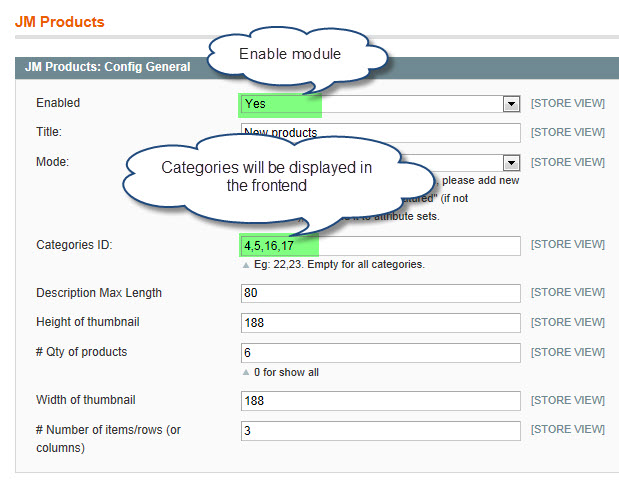
Then, see how it works on front-page:
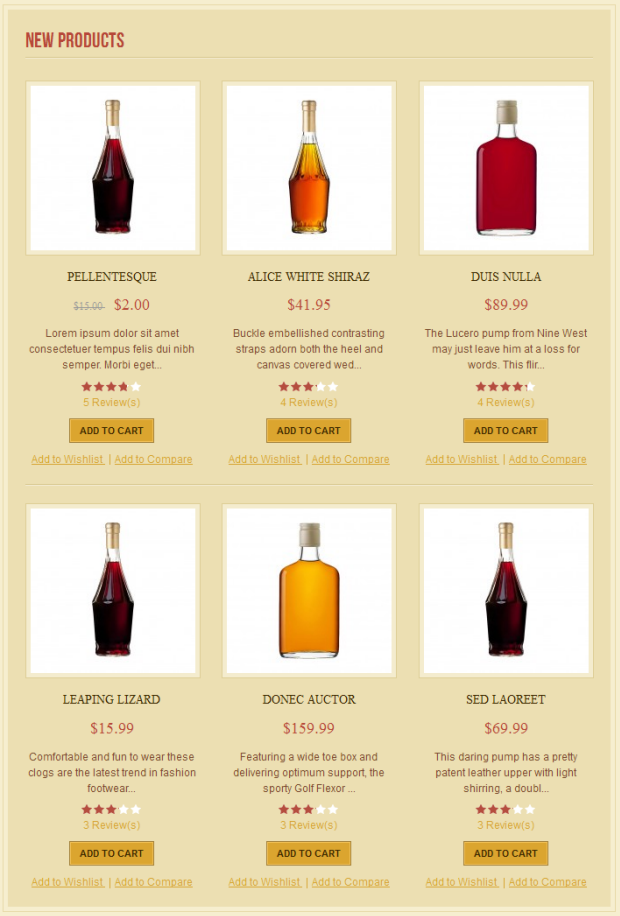
You can configure the Number Of Products or Number Of Items/Row as you need.
Products Slider Extension:
Odinis used Products Slider extension with empty name
To push this extension onto front page like our demo site, go to CMS >> Pages >> Home Page >> Design Content
Please fill in Layout Update XML parameter as below:
<reference name="mass-top">
<block type="joomlart_jmproductsslider/list" name="jmproductsslider" template="joomlart/jmproductsslider/list.phtml" />
</reference>
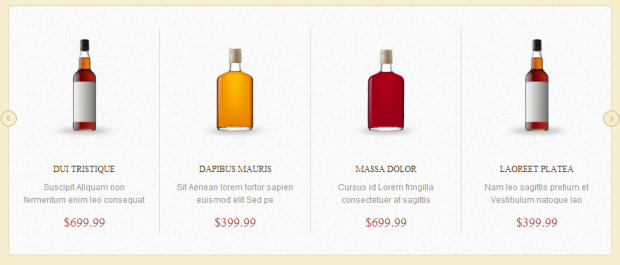
Then Navigate to System>Configuration>Products Slider and configure default criteria as per screenshot below:
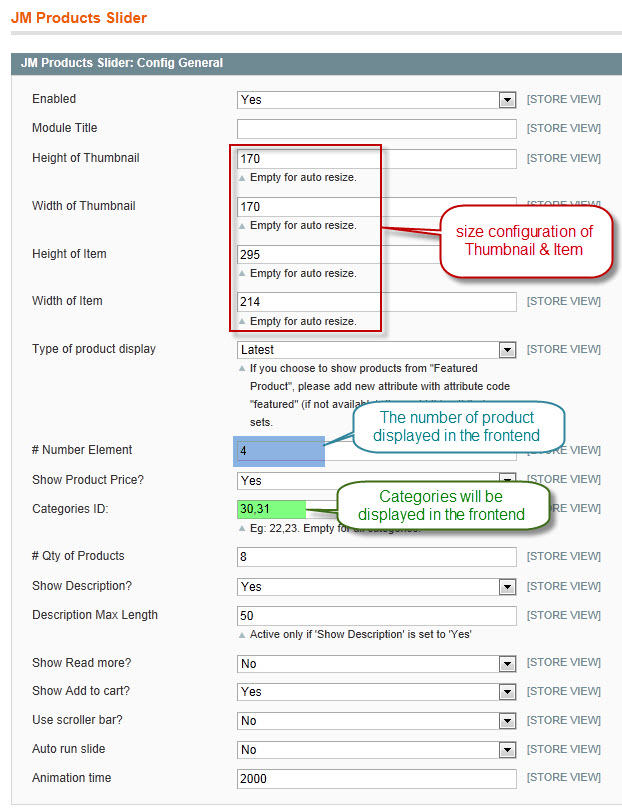
Then, see how it works on front-page:
To be able to use Product attribute of Type of product display , you need to create a new attribute.
IV. Menu Configuration
Odinis uses Mega Menu. Follow the guide below to get it configured properly.
To enable Mega Menu, please navigate Back-end >> System >> Configuration >> Mega Menu

To add menu items, please navigate Back-end >> Mega Menu >> Manage Menu Item You must create add new Menu
Group.The settings below belong to English group. Other language groups have similar settings menu item.
4.1 Home Menu
Front-end Appearance

Back-end Settings
4.2 Skateboards Menu
Front-end Appearance

Back-end Settings
4.3 While Varietals Menu
Front-end Appearance

Back-end Settings
4.4 Wine Regions Menu
Front-end Appearance

Back-end Settings
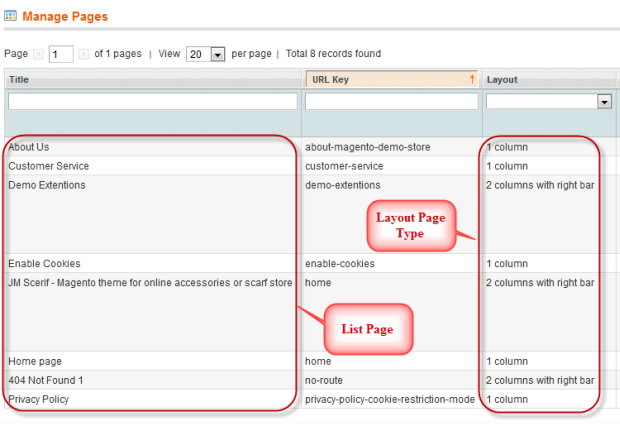
V. Pages Configuration
On Back-end, navigate CMS >> Pages to update page configuration
Pages listed on Back-end
404 Not Found 1 Setting
To config, please navigate to CMS >> Page and open 404 Not Found 1 item to update setting as below:
- Page Information Tab:Back-end Settings
- Content Tab:Back-end Settings
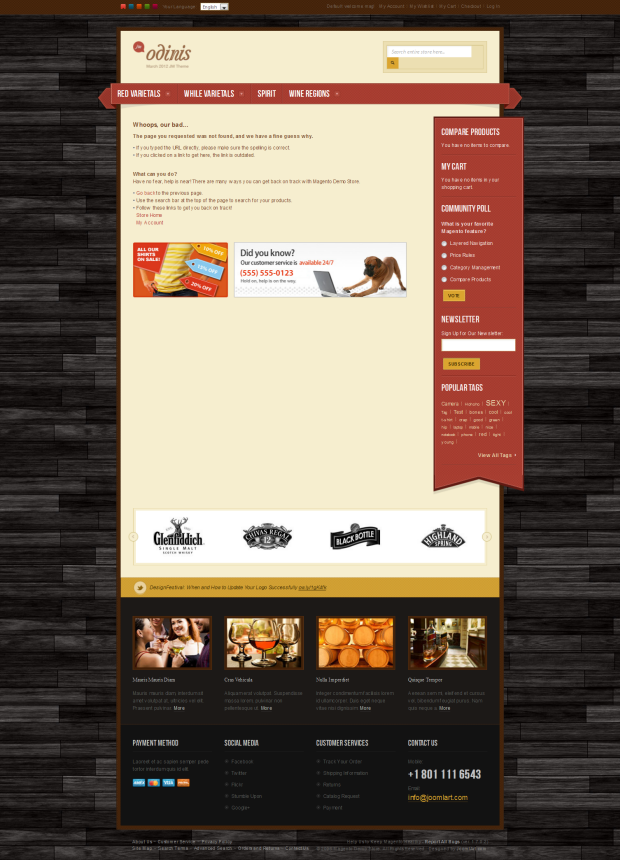
<div class="page-head-alt"> <h3>Whoops, our bad...</h3> </div> <dl><dt>The page you requested was not found, and we have a fine guess why.</dt><dd> <ul class="disc"> <li>If you typed the URL directly, please make sure the spelling is correct.</li> <li>If you clicked on a link to get here, the link is outdated.</li> </ul> </dd></dl> <p> </p> <dl><dt>What can you do?</dt><dd>Have no fear, help is near! There are many ways you can get back on track with Magento Demo Store.</dd><dd> <ul class="disc"> <li><a onclick="history.go(-1);" href="#">Go back</a> to the previous page.</li> <li>Use the search bar at the top of the page to search for your products.</li> <li>Follow these links to get you back on track!<a href="{{store url=""}}">Store Home</a><a href="{{store url="customer/account"}}">My Account</a></li> </ul> </dd></dl> <p> </p> <p><img style="margin-right: 15px;" src="{{skin url='images/media/404_callout1.jpg'}}" alt="" /><img src="{{skin url='images/media/404_callout2.jpg'}}" alt="" /></p> - Design TabBack-end Settings
- Meta Data Tab: Back-end SettingsBack-end Settings
Front-end Appearance