Sterix
Introduction
Sterix is fully responsive and supports Off-canvas menu for collapsed screen devices. There are two ways to install a UberTheme Magento theme like Sterix:
- General Installation: Applicable if you have installed a Magento base on your server before.
- Quickstart Installation: Applicable if you want to get a whole new site as per Demo.
Decide which way to follow. Once downloaded, unzip the package to get the following folders:
- mage_ext: contains all built-in extensions of the theme.
- mage_tpl: contains the theme files only.
- quickstart: a full Magento CMS version with Wall already integrated to match the demo.
- source: contains all source files of the theme.
Provided that you have installed the Magento base already, General Installation will help you adapt the theme and its extensions with your current site.
Note: Your store must be ready before the installation. If not, get it done quickly by following the Magento Installation Guide. See also the following docs for general installations and configurations.
For more details, please check the documentation of the specific extension here.
Create Static Blocks
This user-guide instructs you throughout steps to create template Sterix like our demo site.
Create Static Blocks:
To create these extensions, go to CMS > Static Block > and select page that you want to display this extension on.(e.g: Homepage).
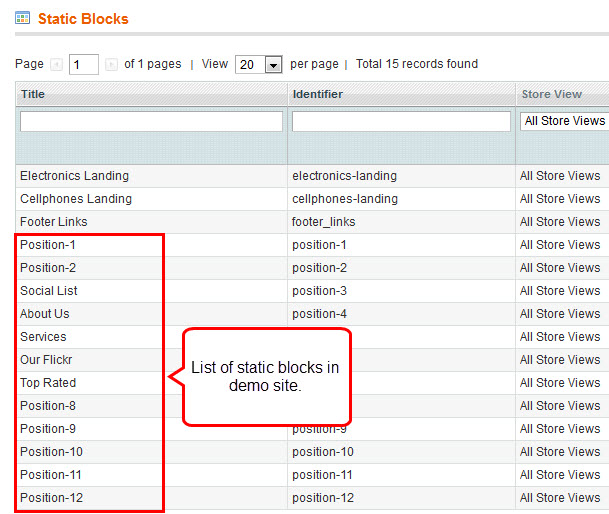
The Sterix front-page uses 6 static blocks on Template:
- Position-1
- Position-2
- Social List
- About Us
- Services
- Our Flickr
- Top Rated
- Position-8
- Position-9
- Position-10
- Position-11
- Position-12
To add a new block, please see here.
Position 1
Back-end settings as in Demo HTML Code:
<div class=" col-1">
<div class="block">
<div class="block-content clearfix">
<div class="image-box"><img src="{{media url="wysiwyg/demo1-intro.jpg"}}" alt="" /></div>
<div class="content-box">
<div class="meta">02/12/2012</div>
<h3><a href="#">Euro 2012: Finals countdown</a></h3>
<p>Lorem ipsum dolor sit amet consectetuer Sed mattis Nam est Donec.</p>
<a class="button" href="#">Read more</a></div>
</div>
</div>
</div>
Front-end Appearance

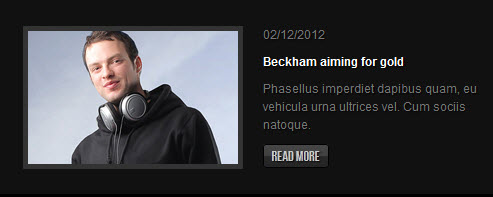
Position 2
HTML Code:
<div class=" col-2">
<div class="block">
<div class="block-content clearfix">
<div class="image-box"><img src="{{media url="wysiwyg/demo2-intro.jpg"}}" alt="" /></div>
<div class="content-box">
<div class="meta">02/12/2012</div>
<h3><a href="#">Beckham aiming for gold</a></h3>
<p>Phasellus imperdiet dapibus quam, eu vehicula urna ultrices vel. Cum sociis natoque.</p>
<a class="button" href="#">Read more</a></div>
</div>
</div>
</div>
Front-end Appearance
About Us
Back-end settings as in Demo
HTML Code:
<div class=" col-wide">
<div class="block">
<div class="block-title"><strong> <span>About Us</span> </strong></div>
<div class="block-content">
<div class="image-box"><img src="{{media url="wysiwyg/demo3.jpg"}}" alt="" /></div>
<div class="content-box">Lorem ipsum dolor sit amet, consectetur adipiscing elit. Vestibulum a fringilla neque. In eget dolor sit amet enim varius rhoncus. Etiam tincidunt porttitor est non pretium. Vivamus faucibus consectetur sapien ac pretium.</div>
</div>
</div>
<div class="block">
<div class="block-title"><strong> <span>Contact Us</span> </strong></div>
<div class="block-content"><span class="telephone">0084 207 112 8810 </span><span class="mail">hello[at]jmheadsets.com</span></div>
</div>
</div>
Front-end Appearance

Social List
Back-end settings as in Demo
HTML Code:
<ul class="social-list">
<li class="ico-facebook"><a title="Facebook" href="#"><span>Facebook</span></a></li>
<li class="ico-twitter"><a title="Twitter" href="#"><span>Twitter</span></a></li>
<li class="ico-flickr"><a title="Flickr" href="#"><span>Flickr</span></a></li>
<li class="ico-pinterest"><a title="Pinterest" href="#"><span>Pinterest</span></a></li>
</ul>
Front-end Appearance

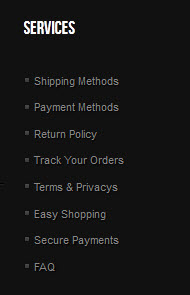
Services
Back-end settings as in Demo
HTML Code:
<div class=" col-narrow"> <div class="block block-list"> <div class="block-title"><strong> <span>Services</span> </strong></div> <div class="block-content"><ol> <li><a title="Shipping Methods" href="#">Shipping Methods</a></li> <li><a title="Payment Methods" href="#">Payment Methods</a></li> <li><a title="Return Policy" href="#">Return Policy</a></li> <li><a title="Track Your Orders" href="#">Track Your Orders</a></li> <li><a title="Terms & Privacy" href="#">Terms & Privacys</a></li> <li><a title="Easy Shopping" href="#">Easy Shopping</a></li> <li><a title="Secure Payments" href="#">Secure Payments</a></li> <li><a title="FAQ" href="#">FAQ</a></li> </ol></div> </div> </div>
Front-end Appearance
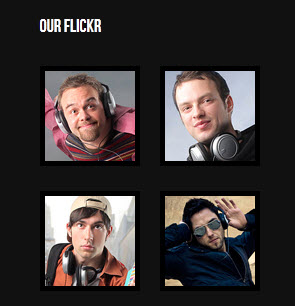
Our Flickr
Back-end settings as in Demo
HTML Code:
<div class=" col-narrow">
<div class="block block-list">
<div class="block-title"><strong> <span>Our Flickr</span> </strong></div>
<div class="block-content">
<script type="text/javascript">// <=!=[=C=D=A=T=A=[
jQuery(document).ready(function($){
//Examples of how to assign the ColorBox event to elements
$("a[rel='ja-flickr']").colorbox({});
});
// ]=]=></script>
<div class="colorbox-wrap clearfix"><a class="cboxElement" title="" href="{{media url="wysiwyg/demo4-large.jpg"}}" rel="ja-flickr"><img src="{{media url="wysiwyg/demo4.jpg"}}" alt="" /></a> <a class="cboxElement" title="" href="{{media url="wysiwyg/demo5-large.jpg"}}" rel="ja-flickr"><img src="{{media url="wysiwyg/demo5.jpg"}}" alt="" /></a> <a class="cboxElement" title="" href="{{media url="wysiwyg/demo6-large.jpg"}}" rel="ja-flickr"><img src="{{media url="wysiwyg/demo6.jpg"}}" alt="" /></a> <a class="cboxElement" title="" href="{{media url="wysiwyg/demo7-large.jpg"}}" rel="ja-flickr"><img src="{{media url="wysiwyg/demo7.jpg"}}" alt="" /></a></div>
</div>
</div>
</div>
Front-end Appearance
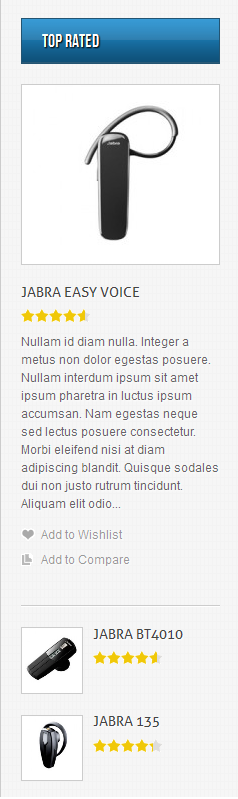
Top Rated
Back-end settings as in Demo
HTML Code:
<div class="block block-toprated">{{block type="joomlart_jmproducts/list" name="jmproducts" template="joomlart/jmproducts/list.phtml" show="1" title="Top Rated" mode="top_rated" catsid="22" max="300" quanlity="3" perrow="1" }}</div>
Front-end Appearance
HTML Code:
<!-- Bottom Spotlight - botsl -->
<reference name="botsl">
<block type="cms/block" name="position-1">
<action method="setBlockId"><block_id>position-1</block_id></action>
</block>
<block type="cms/block" name="position-2">
<action method="setBlockId"><block_id>position-2</block_id></action>
</block>
</reference>
<!-- Bottom Spotlight - botsl -->


<reference name="left">
<block type="cms/block" name="position-7">
<action method="setBlockId"><block_id>position-7</block_id></action>
</block>
</reference>
Position 8
Back-end settings as in Demo
HTML Code:
<div>{{block type="joomlart_jmproducts/list" name="jmproducts" template="joomlart/jmproducts/list.phtml" show="1" title="" mode="latest" height="175" width="175" quanlity="3" perrow="3" }}</div>
Front-end Appearance
Position 9
Back-end settings as in Demo
HTML Code:
<div class=" col-narrow"> <div class="block block-list"> <div class="block-title"><strong> <span>Services</span> </strong></div> <div class="block-content"><ol> <li><a title="Shipping Methods" href="#">Shipping Methods</a></li> <li><a title="Payment Methods" href="#">Payment Methods</a></li> <li><a title="Return Policy" href="#">Return Policy</a></li> <li><a title="Track Your Orders" href="#">Track Your Orders</a></li> <li><a title="Terms & Privacy" href="#">Terms & Privacys</a></li> <li><a title="Easy Shopping" href="#">Easy Shopping</a></li> <li><a title="Secure Payments" href="#">Secure Payments</a></li> <li><a title="FAQ" href="#">FAQ</a></li> </ol></div> </div> </div>
Front-end Appearance
Position 10
Back-end settings as in Demo
HTML Code:
div>{{block type="joomlart_jmproducts/list" name="jmproducts" template="joomlart/jmproducts/list.phtml" show="1" title="" mode="best_buy" height="175" width="175" quanlity="3" perrow="3" }}</div>
Front-end Appearance
Position 11
Back-end settings as in Demo
HTML Code:
<div>{{block type="joomlart_jmproducts/list" name="jmproducts" template="joomlart/jmproducts/list.phtml" show="1" title="" mode="latest" height="175" width="175" quanlity="3" perrow="3" }}</div>
Front-end Appearance

Position 12
Back-end settings as in Demo
HTML Code:
<div>{{block type="joomlart_jmproducts/list" name="jmproducts" template="joomlart/jmproducts/list.phtml" show="1" title="" mode="latest" height="175" width="175" quanlity="3" perrow="3" }}</div>
Front-end Appearance
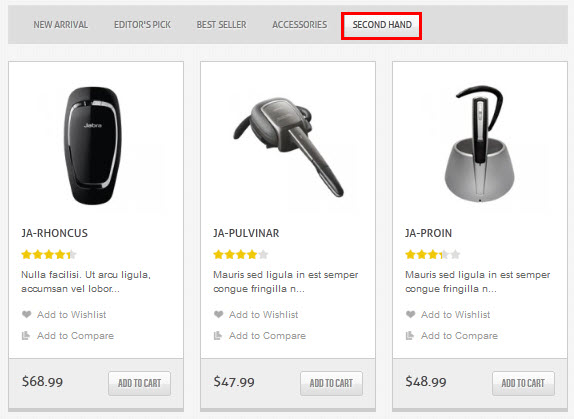
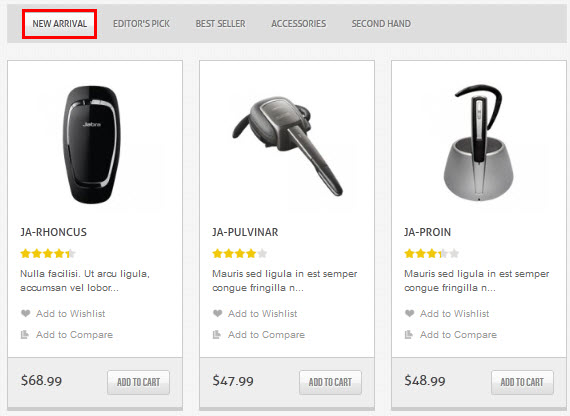
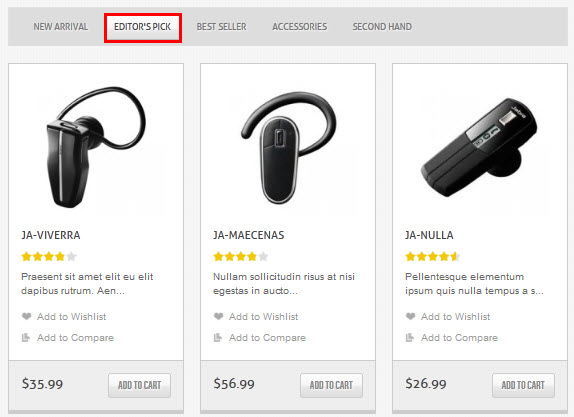
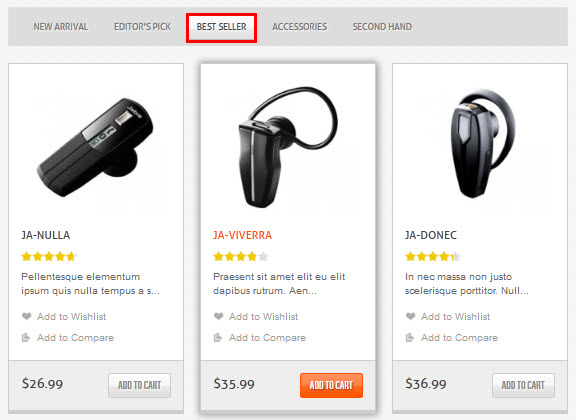
HTML Code:
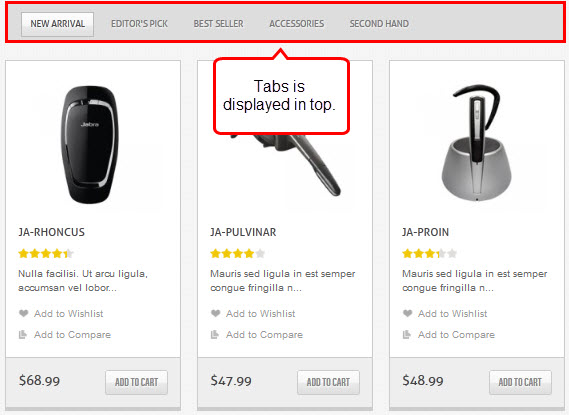
<reference name="content-mass-top">
<block type="joomlart_jmtabs/core" name="jmtabs">
<action method="addTabs_staticblock">
<title>New arrival</title>
<identifier>position-8</identifier>
<use_scrollerbar>0</use_scrollerbar>use_scrollerbar>
</action>
<action method="addTabs_staticblock">
<title>Editor's PICK</title>
<identifier>position-9</identifier>
<use_scrollerbar>0</use_scrollerbar>use_scrollerbar>
</action>
<action method="addTabs_staticblock">
<title>Best seller</title>
<identifier>position-10</identifier>
<use_scrollerbar>0</use_scrollerbar>use_scrollerbar>
</action>
<action method="addTabs_staticblock">
<title>Accessories</title>
<identifier>position-11</identifier>
<use_scrollerbar>0</use_scrollerbar>use_scrollerbar>
</action>
<action method="addTabs_staticblock">
<title>Second hand</title>
<identifier>position-12</identifier>
<use_scrollerbar>0</use_scrollerbar>use_scrollerbar>
</action>
</block>
</reference>
SlideShow Extension
Navigate to System>Configuration>SlideShow and configure default criteria as per screenshot below:
Extension Settings:
Back-end settings as in Demo
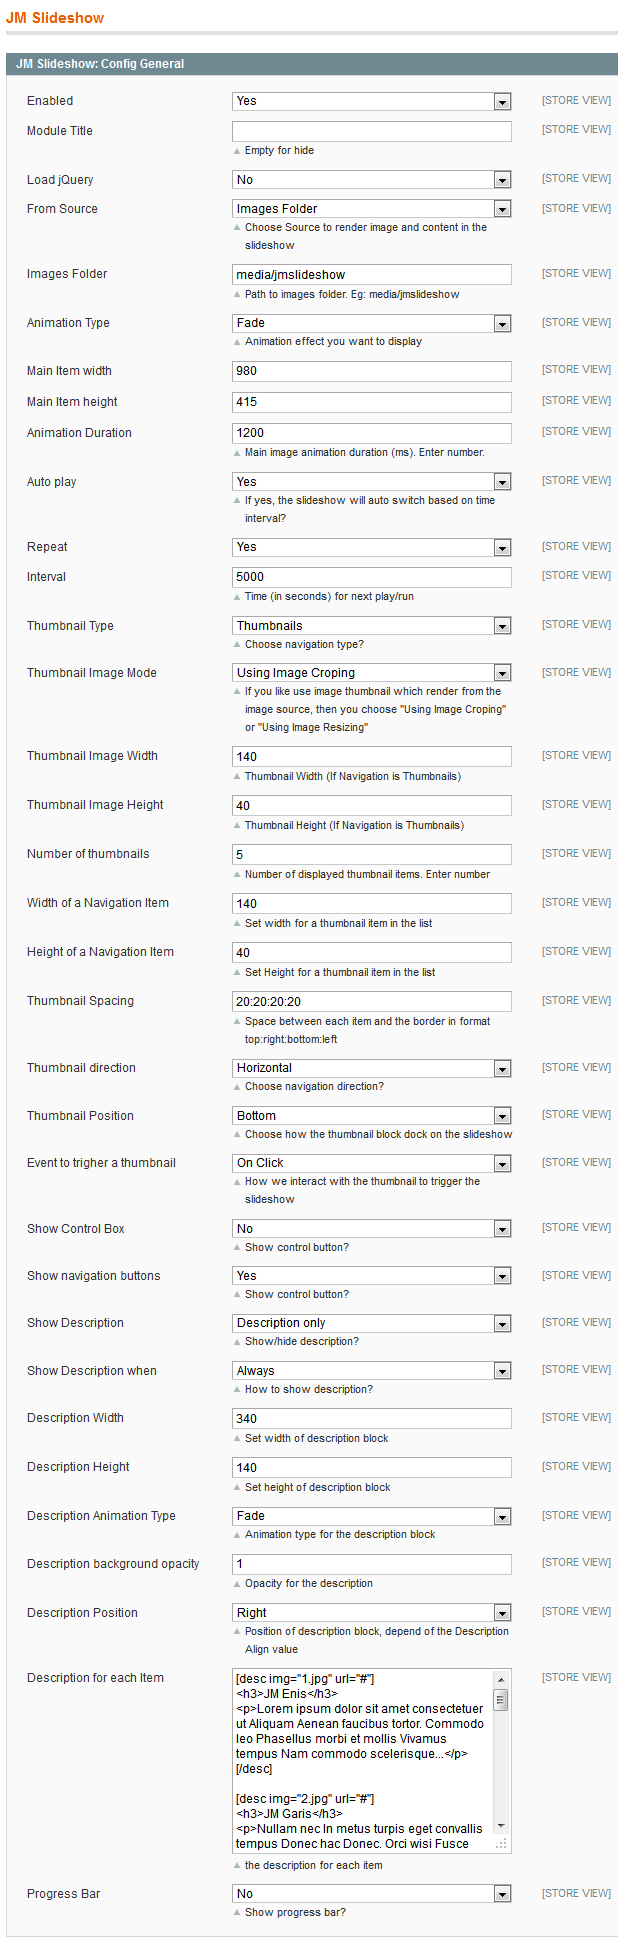 Slideshow Back-end Settings
Note: In Sterix, displayed images in the slideshow are from Image Folder: media/jmslideshow
Description for each item
HTML Code
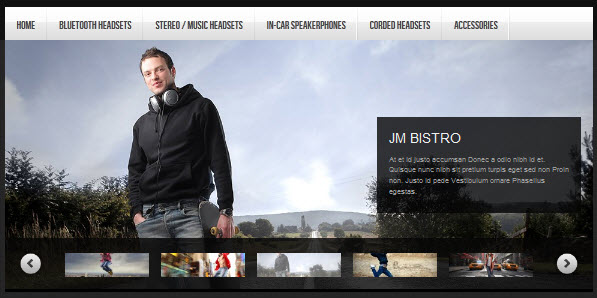
[desc img="1.jpg" url="#"]
<h3>Enis</h3>
<p>Lorem ipsum dolor sit amet consectetuer ut Aliquam Aenean faucibus tortor. Commodo leo Phasellus morbi et mollis Vivamus tempus Nam commodo scelerisque...</p>
[/desc]

[desc img="2.jpg" url="#"]
<h3>Garis</h3>
<p>Nullam nec In metus turpis eget convallis tempus Donec hac Donec. Orci wisi Fusce consectetuer quis sem et est dui...</p>
[/desc]

[desc img="3.jpg" url="#"]
<h3>Bistro</h3>
<p>At et id justo accumsan Donec a odio nibh id et. Quisque nunc nibh sit pretium turpis eget sed non Proin non. Justo id pede Vestibulum ornare Phasellus egestas.</p>
[/desc]

[desc img="4.jpg" url="#"]
<h3>Sterix</h3>
<p>Nullam nec In metus turpis eget convallis tempus Donec hac Donec. Orci wisi Fusce consectetuer quis sem et est dui...</p>
[/desc]

[desc img="5.jpg" url="#"]
<h3>Zite</h3>
<p>At et id justo accumsan Donec a odio nibh id et. Quisque nunc nibh sit pretium turpis eget sed non Proin non. Justo id pede Vestibulum ornare Phasellus egestas.</p>
[/desc]

[desc img="6.jpg" url="#"]
<h3>Painite</h3>
<p>At et id justo accumsan Donec a odio nibh id et. Quisque nunc nibh sit pretium turpis eget sed non Proin non. Justo id pede Vestibulum ornare Phasellus egestas.</p>
[/desc]

[desc img="7.jpg" url="#"]
<h3>Oganis</h3>
<p>At et id justo accumsan Donec a odio nibh id et. Quisque nunc nibh sit pretium turpis eget sed non Proin non. Justo id pede Vestibulum ornare Phasellus egestas.</p>
[/desc]
- Tip: Go to How to use Slideshow configure the parameter as you need.
HTML Code
<reference name="mass-top">
<block type="joomlart_jmslideshow/list" name="jmslideshow" template="joomlart/jmslideshow/list.phtml" />
</reference>
Front-end Appearance
Product Extension
To config Product extension, please navigate to System>Configuration>Products and configure default criteria as in screenshot below for Product List:
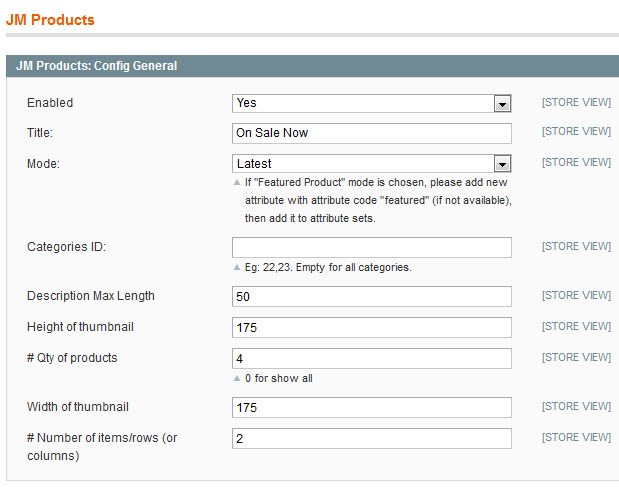
Note: To push this extension onto the front-end, go to CMS >> Pages >> Homepage.
HTML Code
<reference name="mass-top">
<block type="joomlart_jmslideshow/list" name="jmslideshow" template="joomlart/jmslideshow/list.phtml" />
</reference>
- Tip: Go to How to use Slideshow configure the parameter as you need.
HTML Code
<reference name="mass-top">
<block type="joomlart_jmslideshow/list" name="jmslideshow" template="joomlart/jmslideshow/list.phtml" />
</reference>
Front-end Appearance
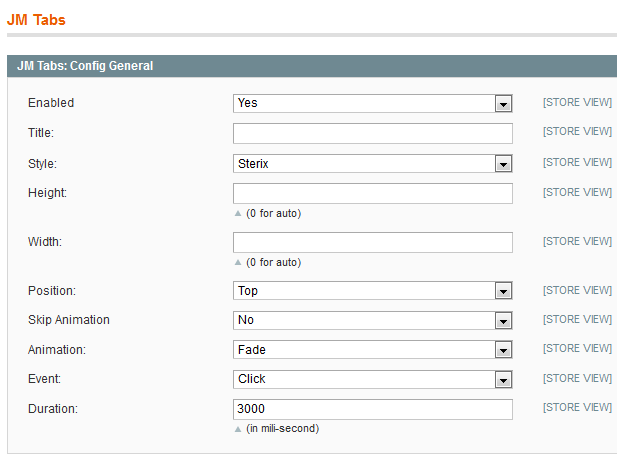
Tabs Extension
Navigate to System>Configuration>Tabs and configure default criteria as per screenshot below:
- Tip: Go to How to use Tabs configure the parameter as you need.
Front-end Appearance
How to configure Menu
Sterix uses Mega Menu. Follow the guide below to get it configured properly.
To enable Mega Menu, please navigate Back-end >> System >> Configuration >> Mega Menu

To add menu items, please navigate Back-end >> Mega Menu >> Manage Menu Item .You must create add new Menu Group.The settings below belong to English group. Other language groups have similar settings menu item.
Home Menu
Front-end appearance

Item : Home -- Menu Back-end Settings
Bluetooth Headsets Menu
Front-end appearance
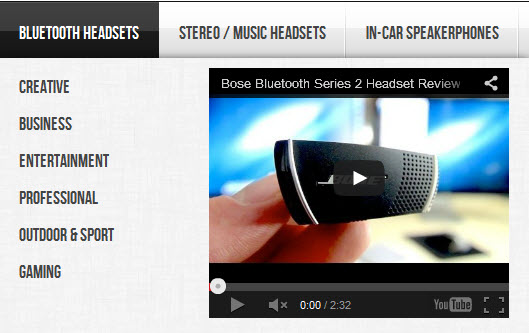
Item 1: Bluetooth Headsets Item-- Menu Back-end Settings
Item 2: Category Item -- Menu Back-end Settings
Item 3: Creative Item -- Menu Back-end Settings
Item 4: Featured Product Item -- Menu Back-end Settings
Stereo / Music Headsets Menu
Front-end appearance
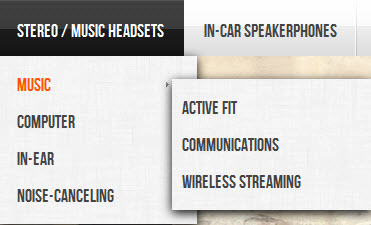
Item 1: Stereo/Music Headsets Item-- Menu Back-end Settings
Item 2: Category Item -- Menu Back-end Settings
Item 3: Music Item -- Menu Back-end Settings
Item 4: Active Fit Item -- Menu Back-end Settings
Pages Configuration
On Back-end, navigate CMS >> Pages to update page configuration
Pages listed on Back-end
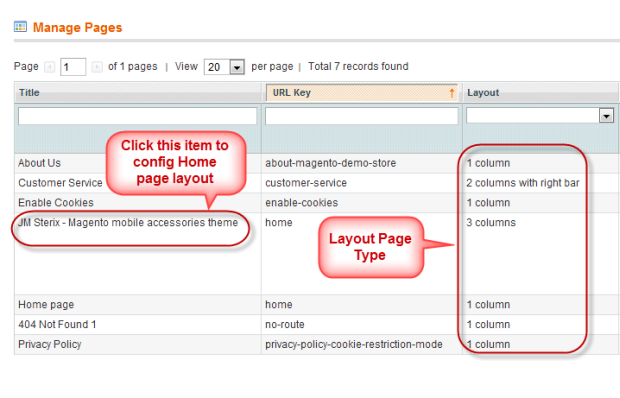
Homepage Setting
To config, please navigate to CMS >> Page and open Sterix -- Magento mobile accessories theme item to update setting as below:
- Page Information Tab Back-end Settings
- Content Tab Back-end Settings
- Design Tab Back-end Settings
- Meta Data Tab Back-end Settings
Note:
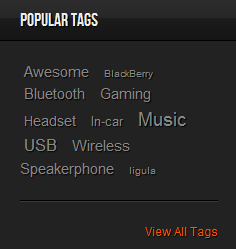
- To push Popular Tag block andNewsletter block onto Homepage as demo site, please go to CMS >> Pages >> Homepage. In Design tab, please fill in Layout Update XML parameter as below:
HTML Code:
<reference name="right">
<block type="newsletter/subscribe" name="right.newsletter" template="newsletter/subscribe.phtml" before="tags_popular_left" />
<block type="tag/popular" name="tags_popular_left" template="tag/popular.phtml"/>
</reference>
Front-end Appearance
- To remove some default block onto Homepage and see like as demo site, please go toCMS >> Pages >> Homepage. In Design tab, please fill in Layout Update XML parameter as below:
HTML Code
 <remove name="tags_popular" />
<remove name="left.newsletter" />
<remove name="right.reports.product.viewed" />
<remove name="wishlist_sidebar" />
<remove name="sale.reorder.sidebar" />
<remove name="paypal.partner.right.logo" />
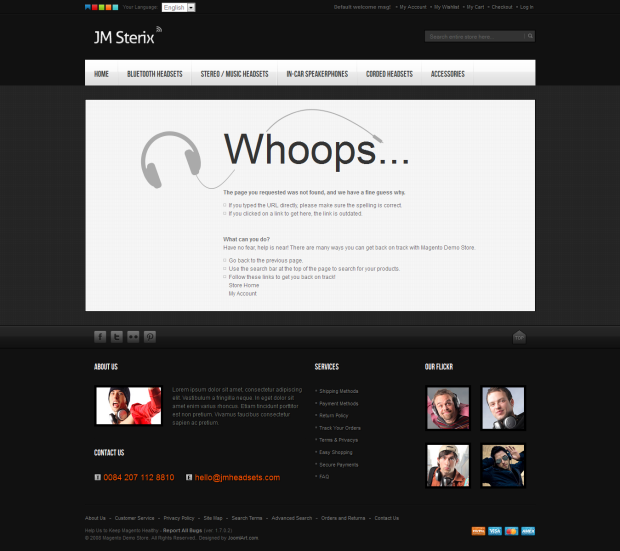
404 Not Found 1 Setting
To config, please navigate to CMS >> Page and open 404 Not Found 1 item to update setting as below:
- Page Information Tab: Back-end Settings
- Content Tab: Back-end Settings
Paste the code below on Content filed
HTML Code:
<div id="jm-error">
<div class="page-head-alt">
<h3>Whoops...</h3>
</div>
<dl><dt>The page you requested was not found, and we have a fine guess why.</dt><dd>
<ul class="disc">
<li>If you typed the URL directly, please make sure the spelling is correct.</li>
<li>If you clicked on a link to get here, the link is outdated.</li>
</ul>
</dd></dl>
<p> </p>
<dl><dt>What can you do?</dt><dd>Have no fear, help is near! There are many ways you can get back on track with Magento Demo Store.</dd><dd>
<ul class="disc">
<li><a onclick="history.go(-1);" href="#">Go back</a> to the previous page.</li>
<li>Use the search bar at the top of the page to search for your products.</li>
<li>Follow these links to get you back on track!<a href="{{store url=""}}">Store Home</a><a href="{{store url="customer/account"}}">My Account</a></li>
</ul>
</dd></dl></div>
- Design Tab: Back-end Settings
- Meta Data Tab: Back-end Settings
Front-end Appearance