Magento 2 UB Mega Menu
I. Installation Prerequisites
UB Mega Menu is native with Magento 2.x. Please make sure your system meets the Magento 2 System requirements: here.
II. Download Packages
Navigate to your profile at Ubertheme to download UB Mega Menu extension:
III. Manual Installation
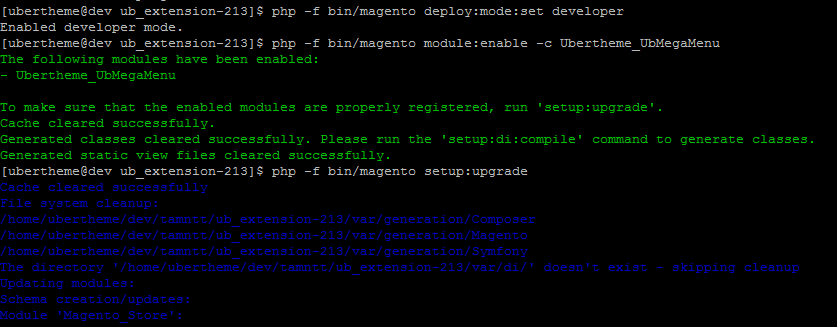
NOTE: If your deploy:mode is production, you need to switch to Developer mode first (optional). Open your Terminal window, go to Magento 2 directory and run the command below:
- php -f bin/magento deploy:mode:set developer
Step 1. (Required) Install PHP Mobile Detect Resource APIs
You have to install the PHP Mobile Detect Resource APIs using Composer by running the following command in your M2 root folder:
- composer require mobiledetect/mobiledetectlib
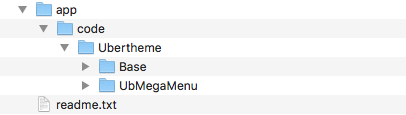
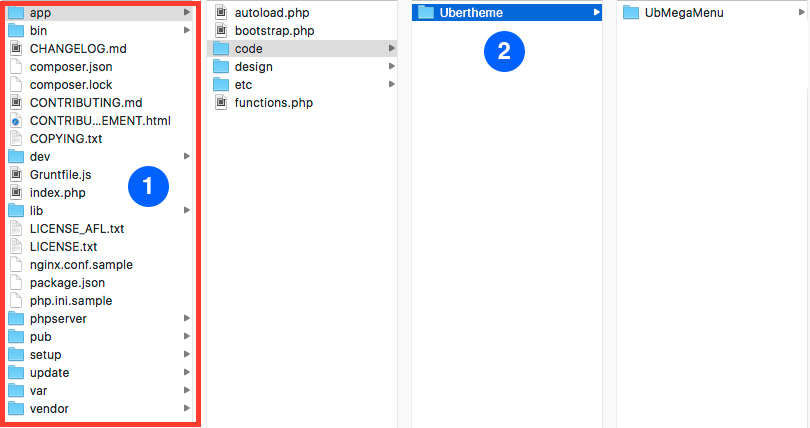
Step 2. Unzip the download package somewhere on your local PC. Then copy the ‘app’ directory and paste into root directory of your Magento 2
Step 3. Open your terminal and go to the Magento directory. In this directory, run the following commands:
- php -f bin/magento module:enable -c Ubertheme_Base
- php -f bin/magento module:enable -c Ubertheme_UbMegaMenu
- php -f bin/magento setup:upgrade
Step 4 (optional): Run code compilation using the command below. This helps to improve your site performance after installation:
- php -f bin/magento setup:di:compile

Once you finish the last command to flush the cache, you have UB Mega Menu installed and ready for your use.
IV. Magento 2 Mega Menu Configuration
Our Magento 2 Mega Menu supports 10+ styles:
- 2.1 (New in v1.2.4) Off-canvas on Desktop
- 2.2 style-default
- 2.3 style-1
- 2.4 style-2
- 2.5 style 3
- 2.6 style 4 (Full Width)
- 2.7 style 5
- 2.8 style 6
- 2.9 style 7
- 2.10 Vertical menu
- 2.11 (New in v1.2.4) Footer Menu
- 2.12 Accordion/ Drill-down (Mobile)
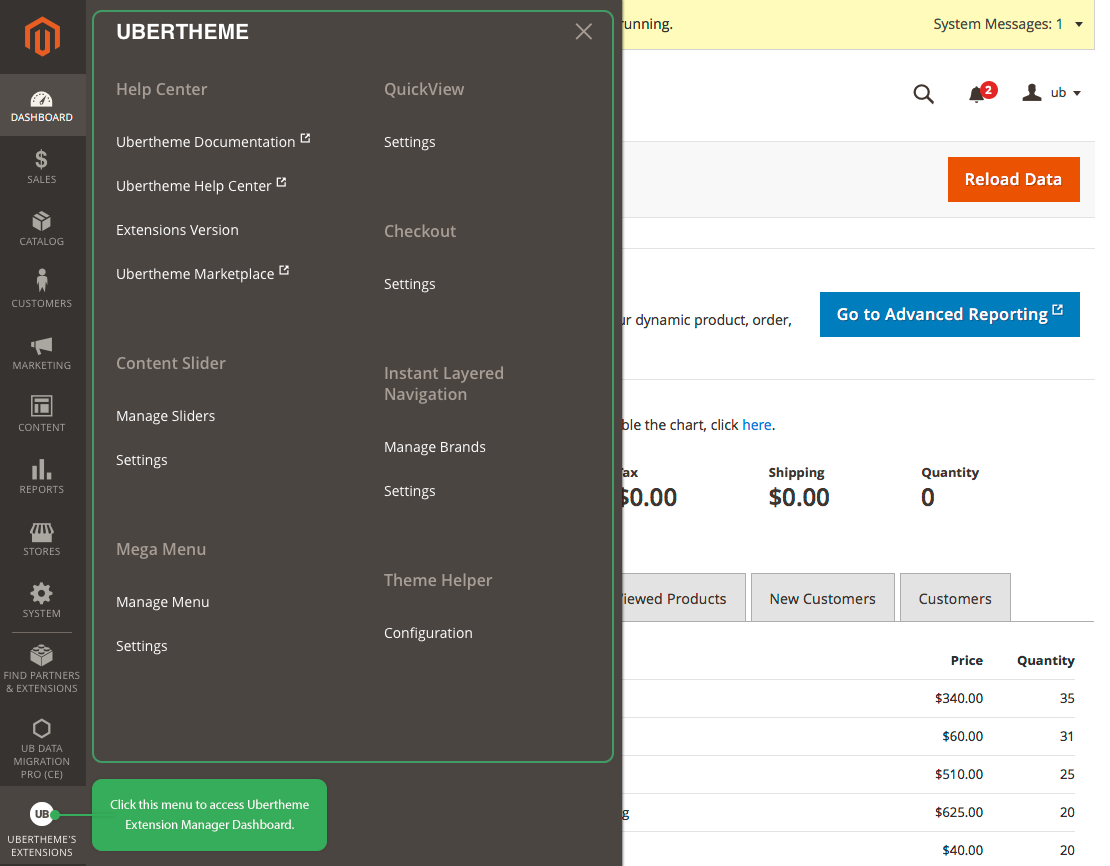
NOTE: Since UB Mega Menu version 1.1.6 and above for Magento 2.3.1+, we implement a new Ubertheme Extension Manager Dashboard as shown in the screenshot below:
1. How to call UB Mega Menu
Before going into steps to create and configure menu items as per our demo, let’s learn about general settings of our Magento 2 Mega Menu and 3 ways it supports to create a menu item.
1.1. General Magento 2 mega menu settings
In your Magento backend, go to Content | (UB Mega menu) Settings, you can see the Basic settings of UB Mega Menu. We can leave this configuration as default for now.
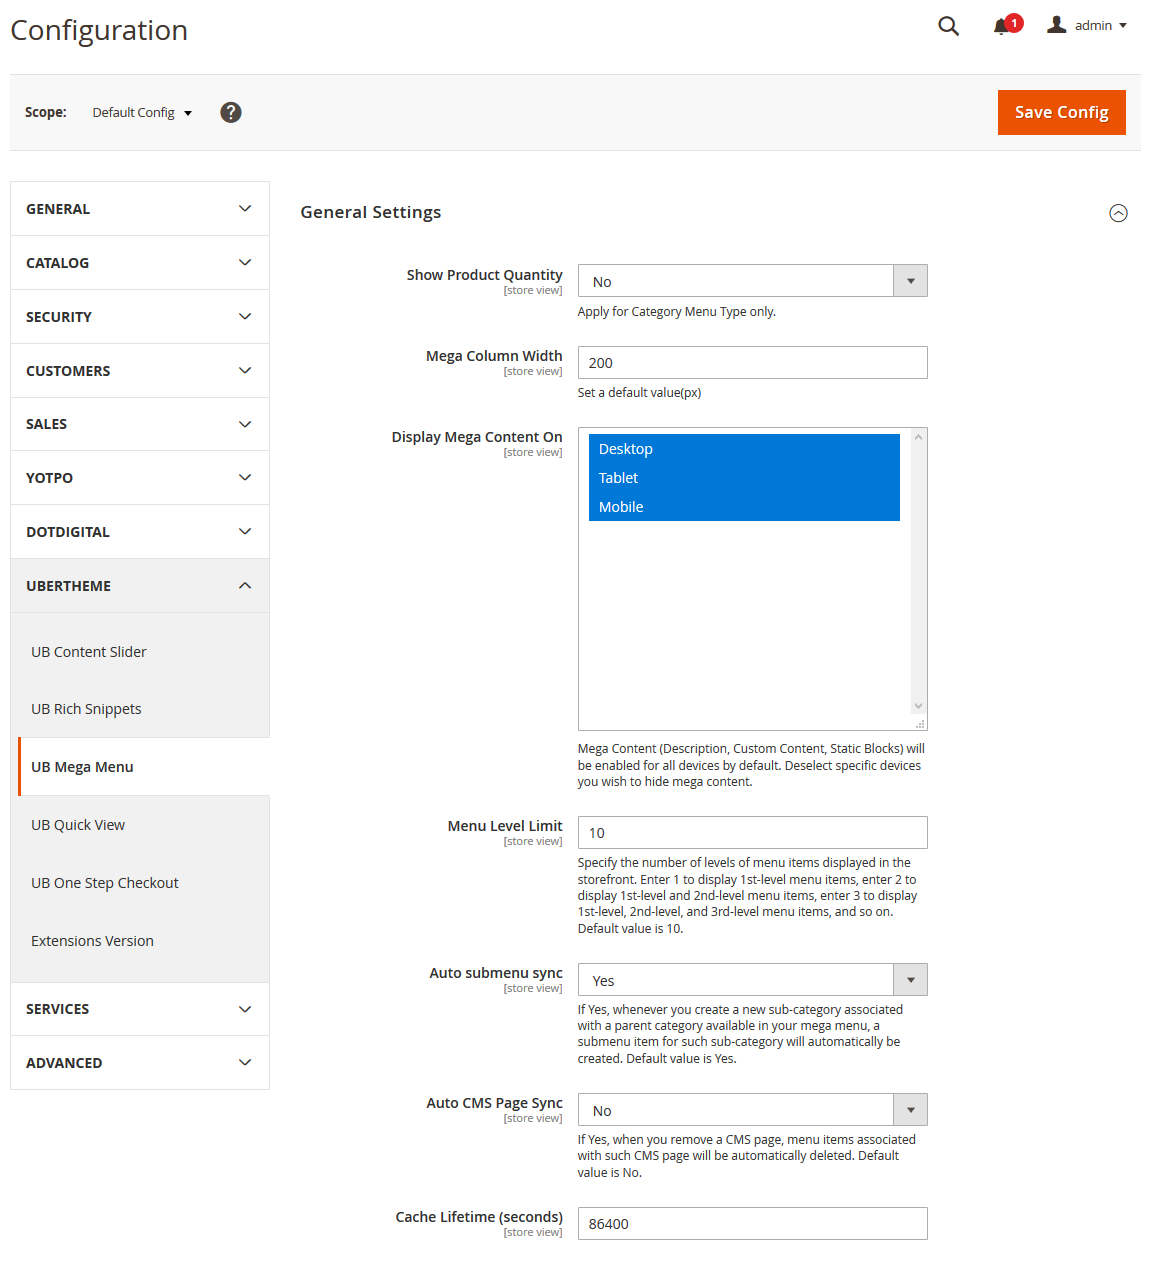
UB Mega Menu Params
| [show_number_product] | Value 0 or 1. The default is 0. |
| [default_mega_col_width] | The width of a Mega Column (px). Default is 200 |
| [mega_content_visible_in] | Example: desktop, tablet, mobile (ready from v1.0.1) |
| [end_level] | The max level of a menu item to show. The default is 10. |
| [enable_font_awesome] | Select “Yes” to enable Font Awesome. |
| [auto_sync_category_menu_item] | If Yes, whenever you create a new sub-category associated with a parent category available in your mega menu, a submenu item for such sub-category will automatically be created. The default value is Yes. |
| [auto_sync_cmspage_menu_item] | If Yes, when you remove a CMS page, menu items associated with such CMS page will be automatically deleted. The default value is No. |
| [cache_lifetime] | Enter the Cache Lifetime in seconds. Default value is 86400. (This setting is available as of UB Mega Menu v1.2.0) |
1.2 Three options to create and display UB Mega Menu menu items
1.2.1 -- Configure and display UB Mega Menu items via the Widget tool (Content/Widgets)
1.2.2 -- Call a CMS block
Code to call the menu in a CMS Block:
{{block class="Ubertheme\UbMegaMenu\Block\Menu" name="ub.mega.menu1" menu_key="YOUR_MENU_KEY_HERE"}}
Note: Make sure you replace the YOUR_MENU_KEY_HERE value with your own menu key.
1.2.3 -- Call in XML
Code to call the menu in XML:
<referenceContainer name="page.top"><block class="Ubertheme\UbMegaMenu\Block\Menu" name="ub.megamenu.leftmenu1" ifconfig="ubmegamenu/general/enable"> <arguments> <argument name="menu_key" xsi:type="string">YOUR_MENU_KEY_HERE</argument> <argument name="addition_class" xsi:type="string"></argument> </arguments></block></referenceContainer>
Note: Make sure you replace the YOUR_MENU_KEY_HERE value with your own menu key.
2. UB Mega Menu Configuration
This section provides detailed instructions to configure each style of the Magento 2 mega menu as per our demo site.
Important! You need to clear your cache in Magento after you create a new menu item or make any change following our configuration steps below.
When prompted, click the Cache Management link in the system message, and tap ‘Flush Cache Storage’ button to refresh the invalid cache. Or in your admin dashboard, you simply click System | Cache Management and flush cache.
For UB Mega Menu ver1.1.3 and later, we added a new cache enhancement that allows caching menu data on all pages, including non-cacheable pages (customer account…). Thus, it requires to use the Flush cache option to apply any change you make. You can either use the CLI command: php bin/magento cache:flush or tap the ‘Flush Cache Storage’ button as mentioned above.
(New) UB Mega Menu v1.1.7 release allows classifying access to menu groups to a single or multiple customer groups (Not Logged In, General, Wholesaler, Retailer, etc.). Refer to the section 2.2 Default Style | Step 1 — Create Menu Group below for more details.
(New) UB Mega Menu v1.2.4 release allows enabling Off-canvas on All Devices by default. Refer to section 2.1 (New in v1.2.4) Off-canvas on Desktop for more details. You can also use UB Mega Menu to manage the Footer menu, refer to section 2.11 (New in v1.2.4) Footer menu to learn more.
Important! If you upgrade UB Mega Menu from an old version to the version 1.2.4, you need to review and update the settings of each Menu Group in your M2 Backend > Menu Groups configuration.
2.1 (New in v1.2.4) Off-canvas on Desktop
In UB Mega Menu 1.2.4, we are introducing a new feature, Off-canvas on All Devices. This helps to set up the off-canvas menu (using vertical/accordion/drill-down type) on the Desktop with ease.
2.1.1. What types of menu are available as of the UB Mega Menu v1.2.4
While adding the flexibility of native off-canvas layout on Desktop, UB Mega Menu v1.2.4 still reserves all existing menu types and associated styles. So, in general, you have two options to set up the navigation:
- Default option: Off-canvas menu is enabled on Mobile and Tablet Portrait. Tablet Landscape is inherited from the Desktop’s horizontal main menu.
- Off-canvas menu is enabled on All Devices (Desktop, Tablet, Mobile).
Let’s dive into the use cases of each option:
a. Off-canvas menu on Mobile and Tablet Portrait (Default option)
To enable this option, it’s mandatory that the system configuration: Ubertheme’s Extensions > (Mega Menu) Settings > General Settings > Display Off-canvas From is set as ‘Mobile’:
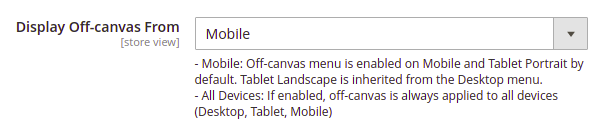
In this use case, the horizontal Top/Main menu always displays on Desktop and Tablet Landscape devices. Off-Canvas displays from Portrait Tablet and Mobile devices.
You can create multiple menu groups — main menu, vertical sidebar menu, footer menu — on your Magento 2 site. Depending on the specific position you assign the menu, there are different menu types for you to choose from as follows:
| Position: Top (Main menu) | Position: Sidebar | Position: Footer | |
|---|---|---|---|
| Desktop | Horizontal menu | Accordion/Drilldown/Vertical menu (Optional) |
Footer Menu (Optional) |
| Tablet | * Landscape: apply Desktop’s menu * Portrait: apply Mobile’s menu |
* Landscape: apply Desktop’s menu * Portrait: apply Mobile’s menu |
Footer Menu |
| Mobile | Accordion/Drilldown menu | Accordion/Drilldown menu | Footer Menu |
b. Off-canvas menu on all devices (Desktop/Tablet/Mobile)
To enable this option, it’s mandatory that the system configuration: Ubertheme’s Extensions > (Mega Menu) Settings > General Settings > Display Off-canvas From is set as “All Devices”:
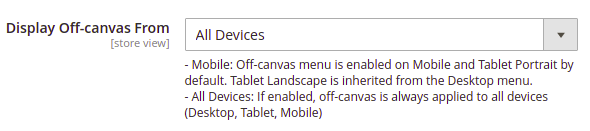
When activated, the horizontal Top/Main menu always displays the off-canvas on all devices (Desktop/Tablet/Mobile).
You can create multiple menu groups — main menu, vertical sidebar menu, footer menu — on your Magento 2 site. Depending on the specific position you assign the menu, there are different menu types for you to choose from as follows:
| Position: Top (Main menu) | Position: Sidebar | Position: Footer | |
|---|---|---|---|
| Desktop | Accordion/Drilldown/Vertical menu | Accordion/Drilldown/Vertical menu (Optional) |
Footer Menu (Optional) |
| Tablet | * Landscape: apply Desktop’s menu * Portrait: apply Mobile’s menu |
* Landscape: apply Desktop’s menu * Portrait: apply Mobile’s menu |
Footer Menu |
| Mobile | Accordion/Drilldown menu | Accordion/Drilldown menu | Footer Menu |
2.1.2 How to enable Off-canvas menu on all devices (Desktop, Tablet, Mobile)
(This feature is available from UB Mega Menu v.1.2.4 and later only)
Step 1: System configuration
In your Magento 2 admin, navigate to Ubertheme’s Extensions > (Mega Menu) Settings > General Settings > set Display Off-canvas From as “All Devices”:
Step 2: Create a menu group
Navigate to Ubertheme’s Extensions > (Mega Menu) Settings, then click Add New Menu and configure as follows:
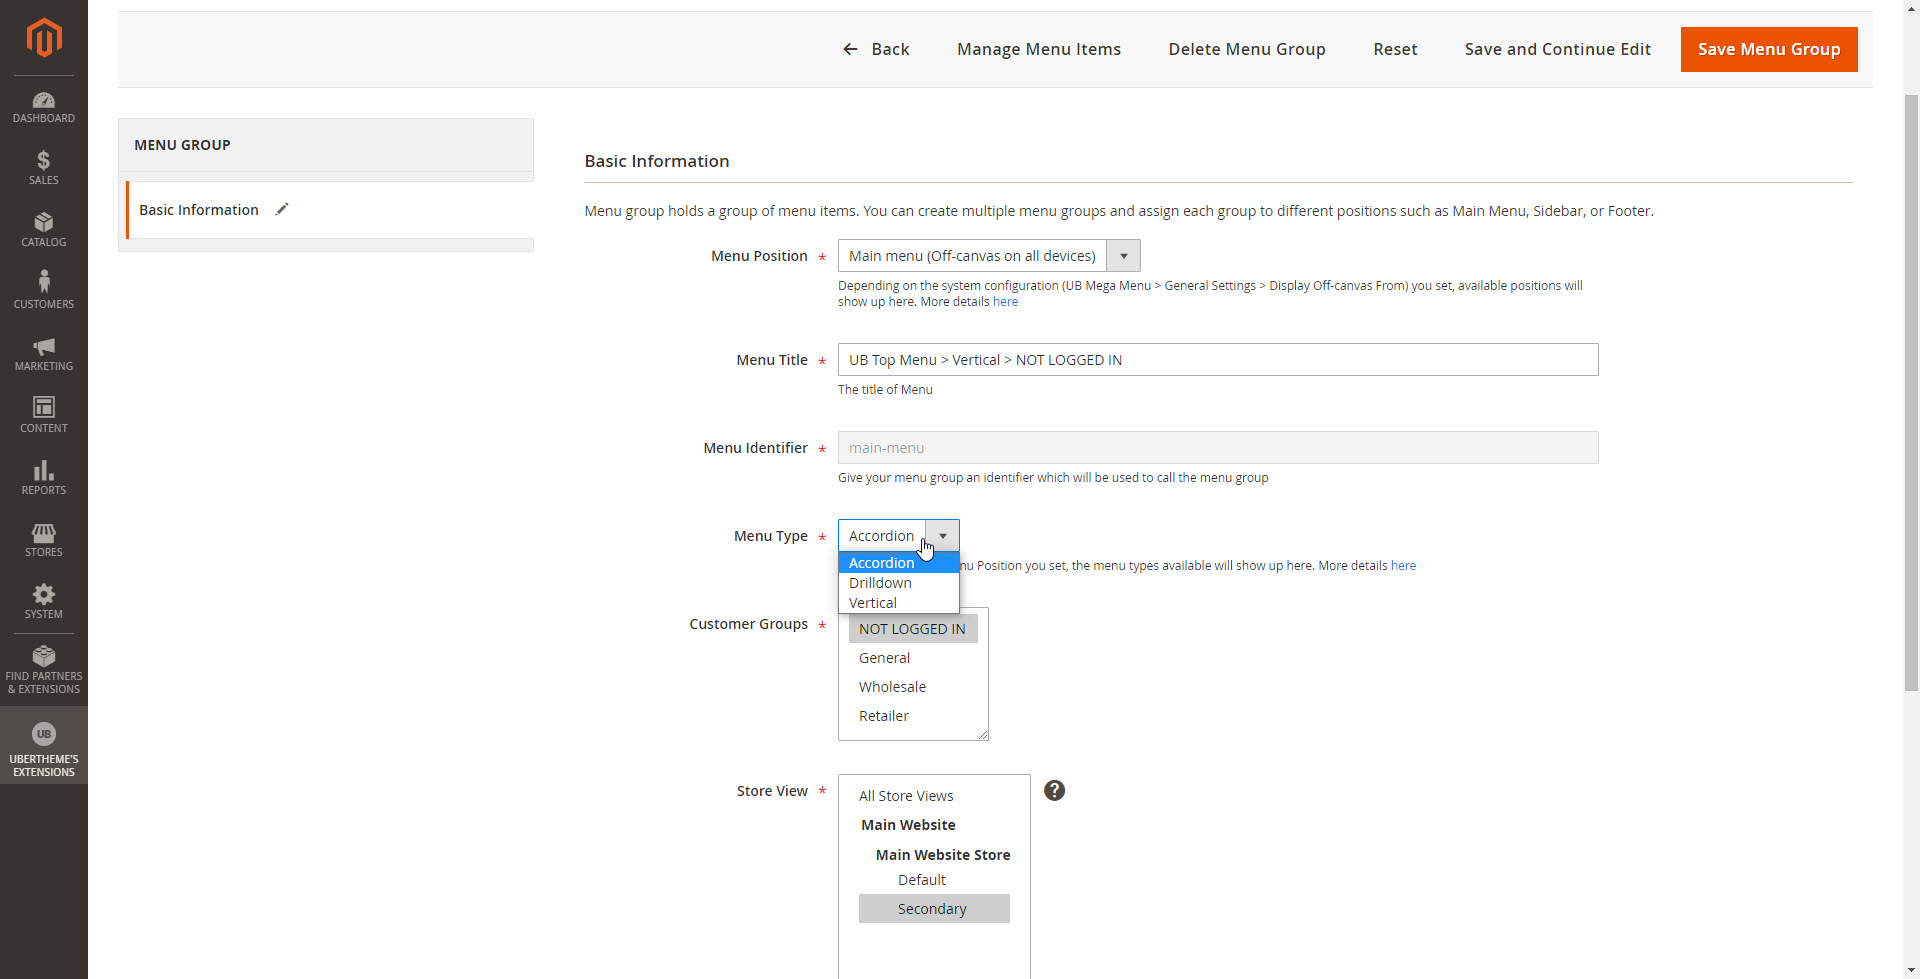
- Menu Position: By default, UB Mega Menu covers the following Menu Positions:
- Main Menu: position the Top/Main menu at the top of the page. Depending on the system configuration (Ubertheme’s Extensions > (Mega Menu) Settings > General Settings > Display Off-canvas From) you set, one of the following positions will show up here:
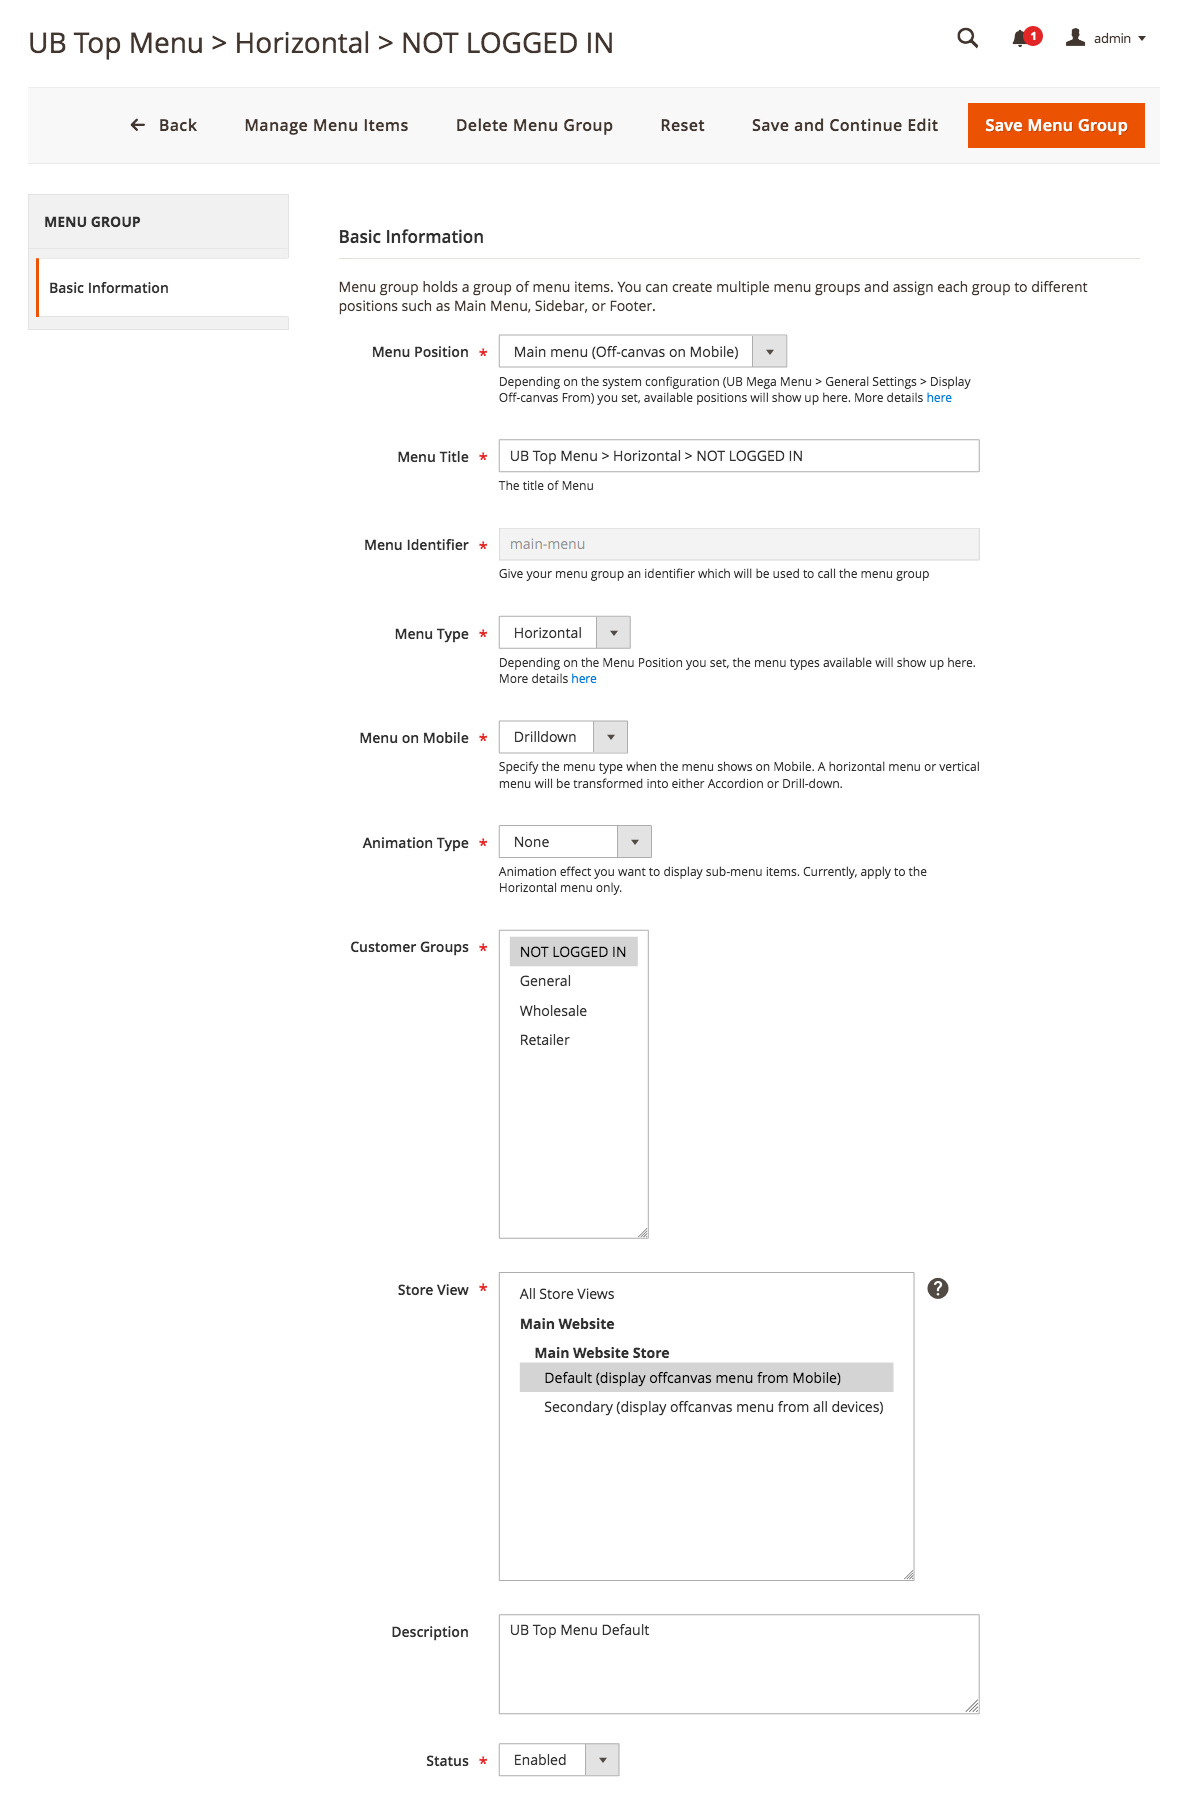
- Main menu (Off-canvas on Mobile): the main menu is displayed as a Horizontal menu on Desktop and as an off-canvas menu on Mobile/Tablet Portrait.
- Main menu (Off-canvas on all devices): If enabled, the off-canvas menu is always applied to all devices (Desktop, Tablet, Mobile).
- Sidebar: position the menu on the sidebar of the page.
- Footer: position the menu at the bottom of the page.
- Other: position the menu elsewhere apart from the Main Menu, Sidebar, Footer positions. If enabled, an additional CSS style of the menu might be needed.
- Main Menu: position the Top/Main menu at the top of the page. Depending on the system configuration (Ubertheme’s Extensions > (Mega Menu) Settings > General Settings > Display Off-canvas From) you set, one of the following positions will show up here:
- Menu Identifier:
By default, when you create a menu group and assign it to the ‘Main Menu’ position, it is automatically set to themain-menumenu key. And only this main menu can be transformed into the off-canvas menu.
For other secondary menu groups (sidebar, footer), you need to specify your own menu identifier respectively. - Menu Type
Depending on the Menu Position you set, the menu types available will show up here. By default, UB Mega Menu covers the following menu types:- Horizontal: default top horizontal mega menu.
- Accordion: a pull-down menu where clicking the parent item expands the sub-menus below it.
- Drill-down: shows only the submenus of the last selected menu item. Navigating back using the menu ‘Back’ button.
- Vertical: a vertical menu in the left sidebar with the sub-menus that expand right. The vertical menu is available for Desktop and Landscape Tablets only.
- Footer Menu: position the menu at the bottom of the page. Using UB Mega Menu to set up and manage the links to pages you don’t want to feature in the main menu like Terms of Service, Return Policies, or FAQ, etc.
- Menu on Mobile: Specify the menu type (Accordion/Drilldown) when the menu shows on Mobile and Tablet Portrait. A horizontal menu or vertical sidebar menu on Tablet Landscape and Desktop will be transformed into either Accordion or Drill-down.
- Animation Type: Animation effect you want to display sub-menu items. Currently, apply to the Horizontal menu only.
- None
- Venitian
- Pop
- Linear
- Fade in Up
- Fade in Down
- Slide In Up
- Slide Out Up
Step 3: Create menu items
You simply follow similar steps of section 2.2 Default Style to create associated menu items of the menu group you’ve just created above.
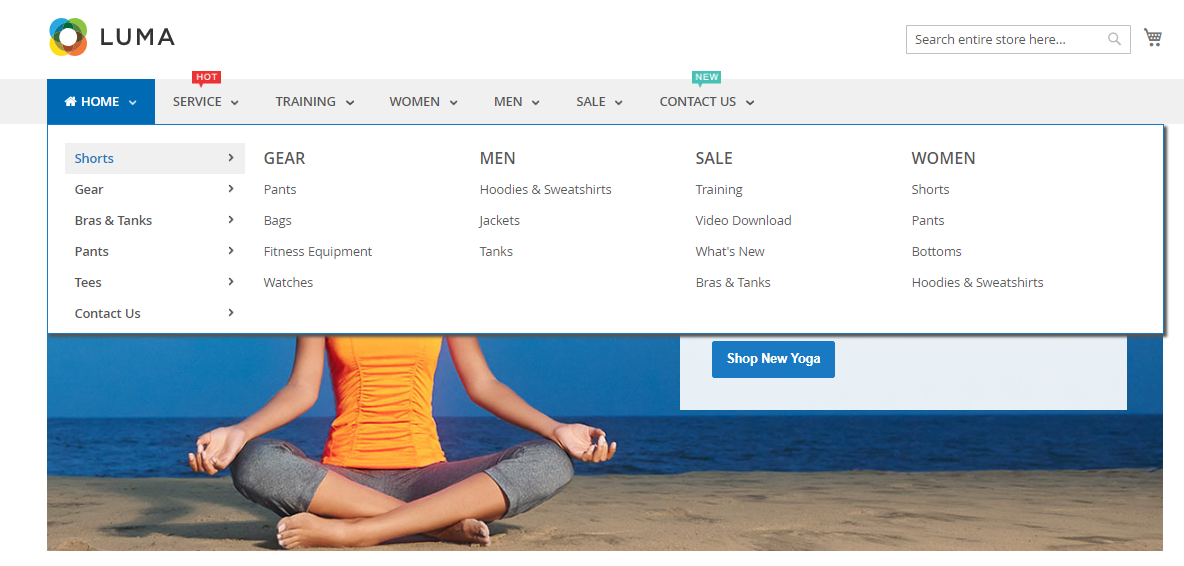
2.2 Default style
Step 1 -- Create a menu group
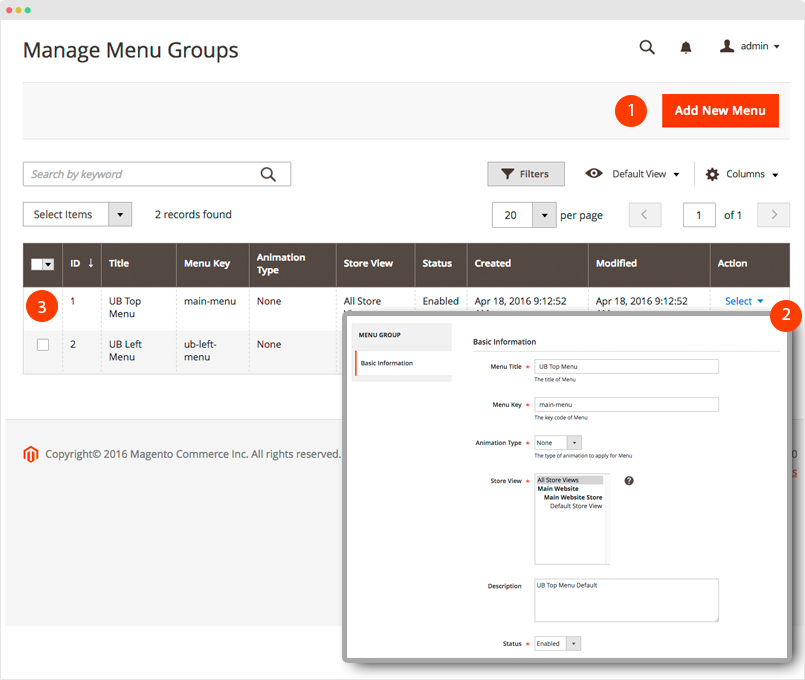
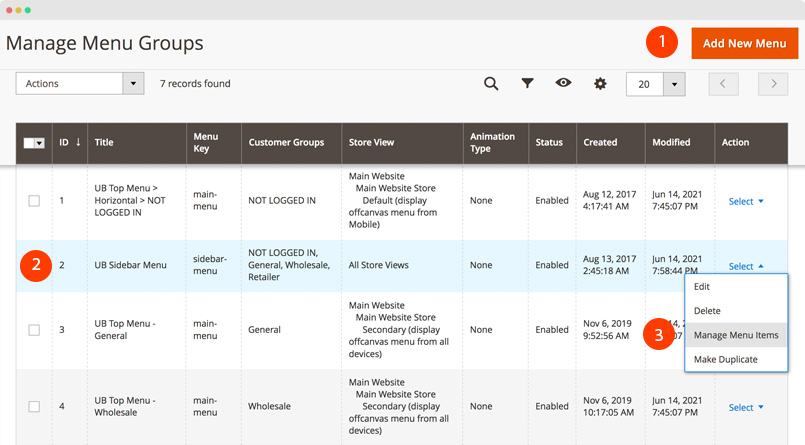
In the Magento backend, navigate to Ubertheme’s Extensions > (Mega Menu) Manage Menu (If you’re using UB Mega Menu v1.1.5 or older, navigate to Content | (UB Mega Menu) Manage Menu).
Then click Add New Menu. In the popup, you can configure as per this screenshot (Make sure you insert the menu key as main-menu).
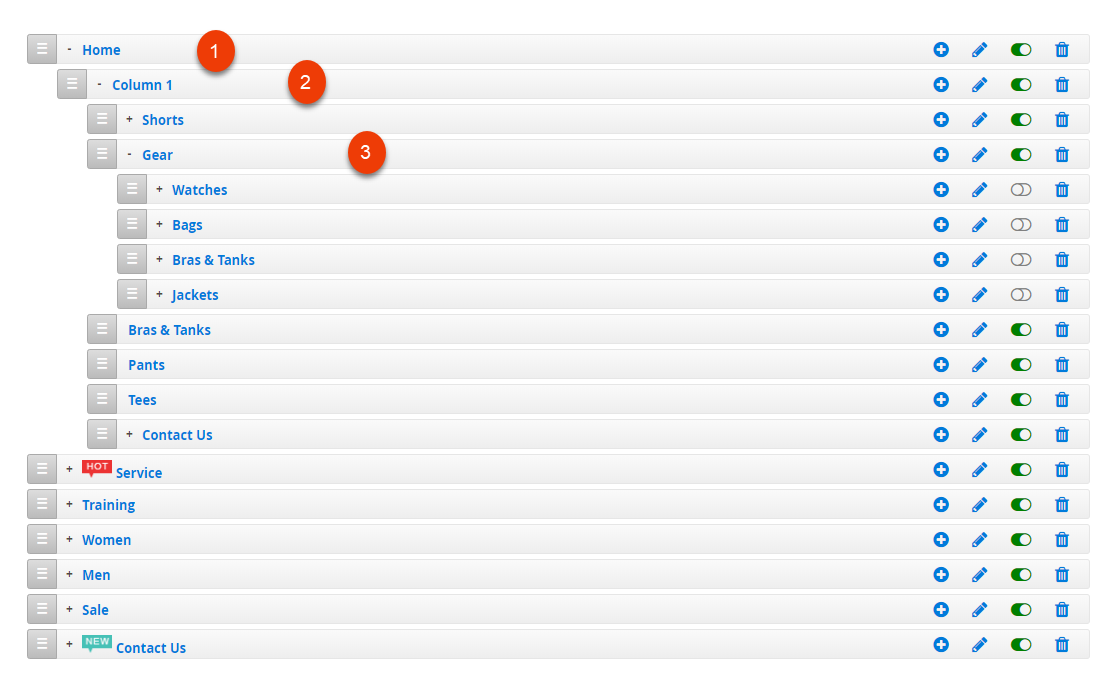
main-menu menu key. And only this main menu can be transformed into the off-canvas menu. In v1.2.4, the Menu Group Edit form has a few new configuration fields such as Menu Position, Menu Type, etc. Please refer to section 2.1 (New in v1.2.4) Off-canvas on Desktop for more details.Once done, you should see the new menu group visible as an illustration (3) in the following screenshot:
Assign menu groups to a specific group of customers and store view:
(This feature is available from UB Mega Menu v.1.1.7 and later only)
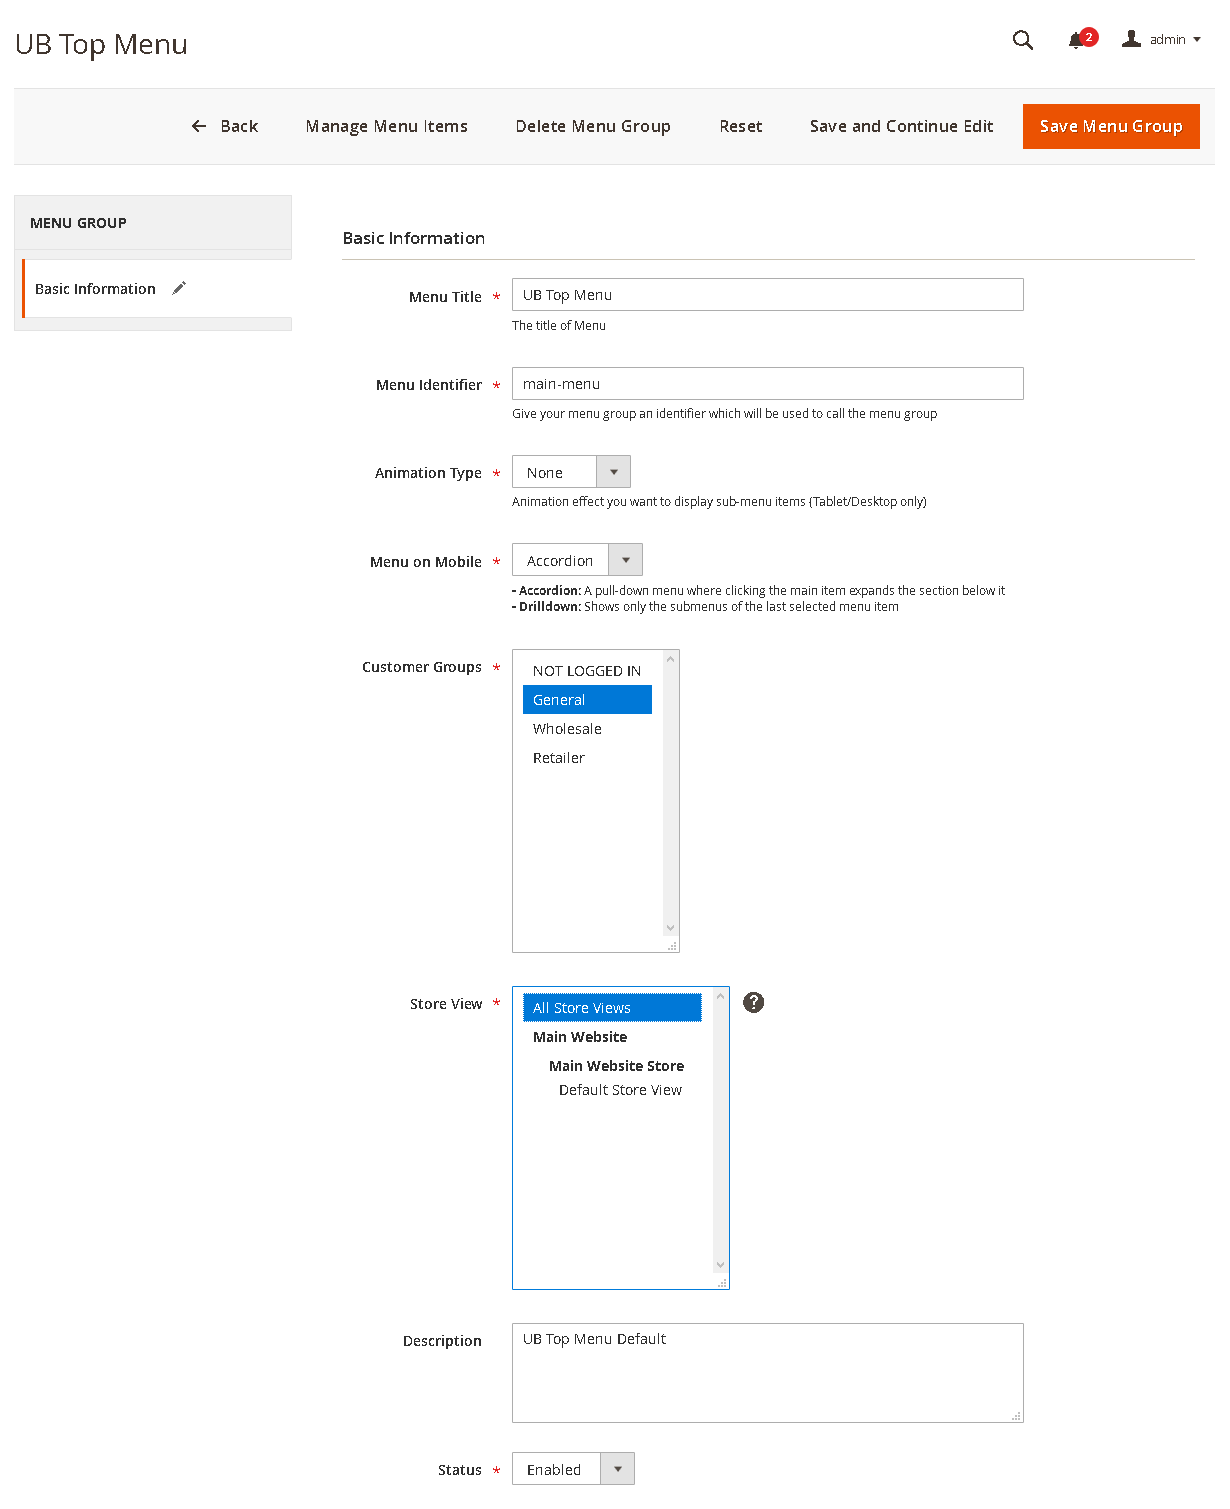
Once you click Add New Menu under the Manage Menu Groups section, you will see a new configuration field -- Customer Groups -- right above Store View field.
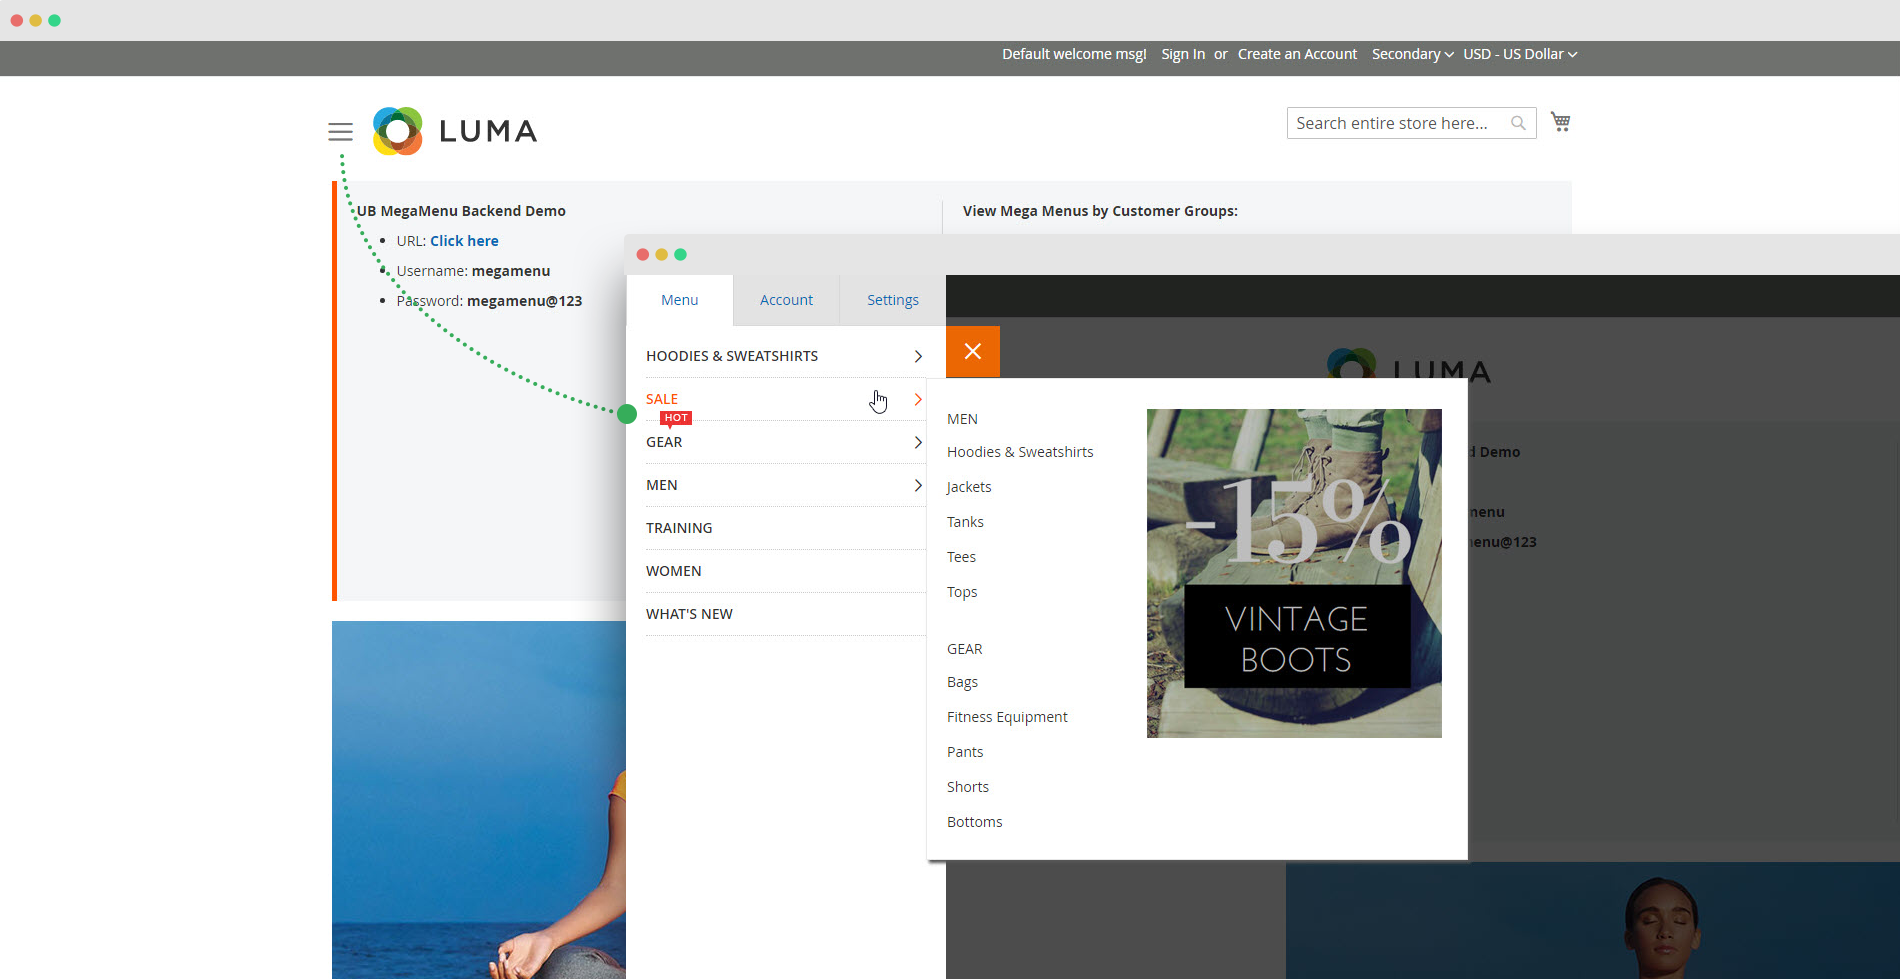
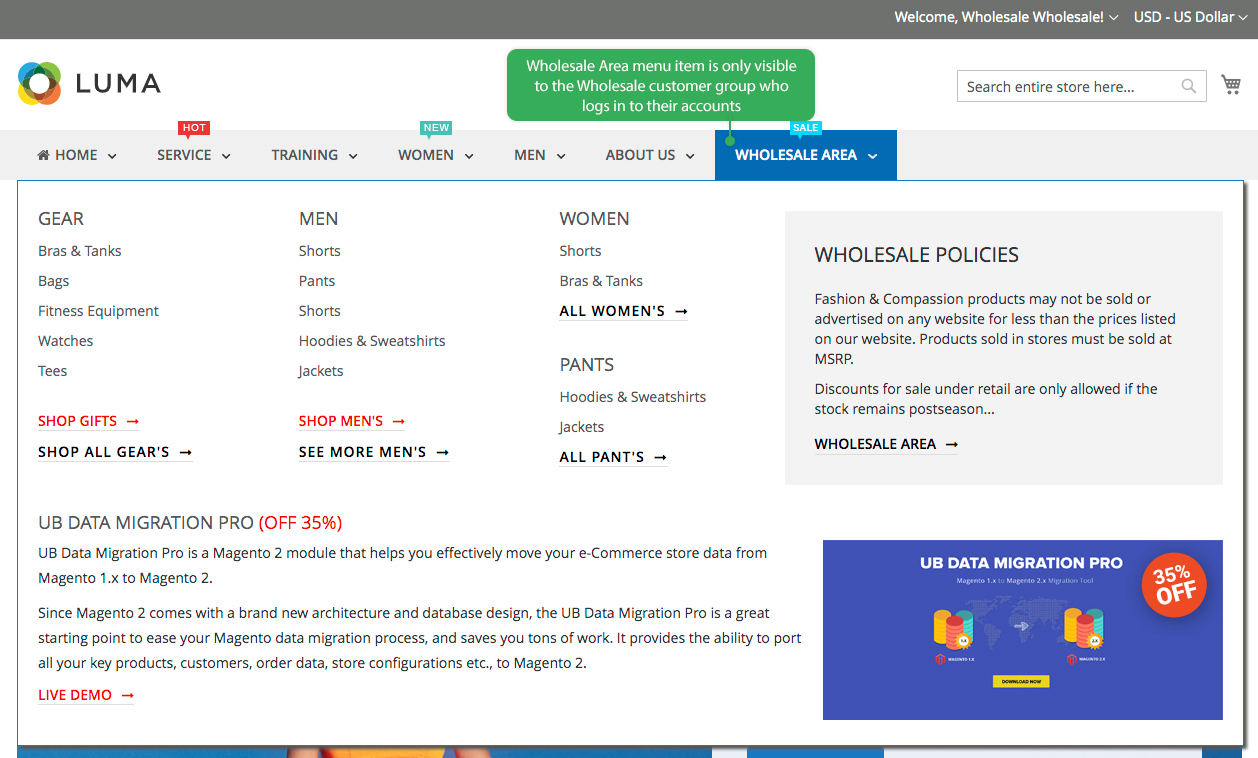
- How does it work: You can specify the customer group that can see a specific menu group, within the specific store view. For instance, you want to set up the menus in a way that discounted offers or featured menus only appear for Wholesale customers while they log in to their accounts.
- Demo: You can log in UB Mega Menu demo here (you will find different Customer Group credentials available to log in for testing). Depending on the customer group you log in (General, Retailer, or Wholesaler), you will see different discounts available under the General /Retailer / Wholesale Area menu items for each group of customers respectively. Below is an example of a customer of Wholesale customer group who logged in to his account -- the Wholesale Area menu item is visible for the Wholesale customer group only:
If you log in to the demo of UB Mega Menu’s backend (visit the same demo link above), you should see that we assigned different menu groups to different Customer groups as follows:
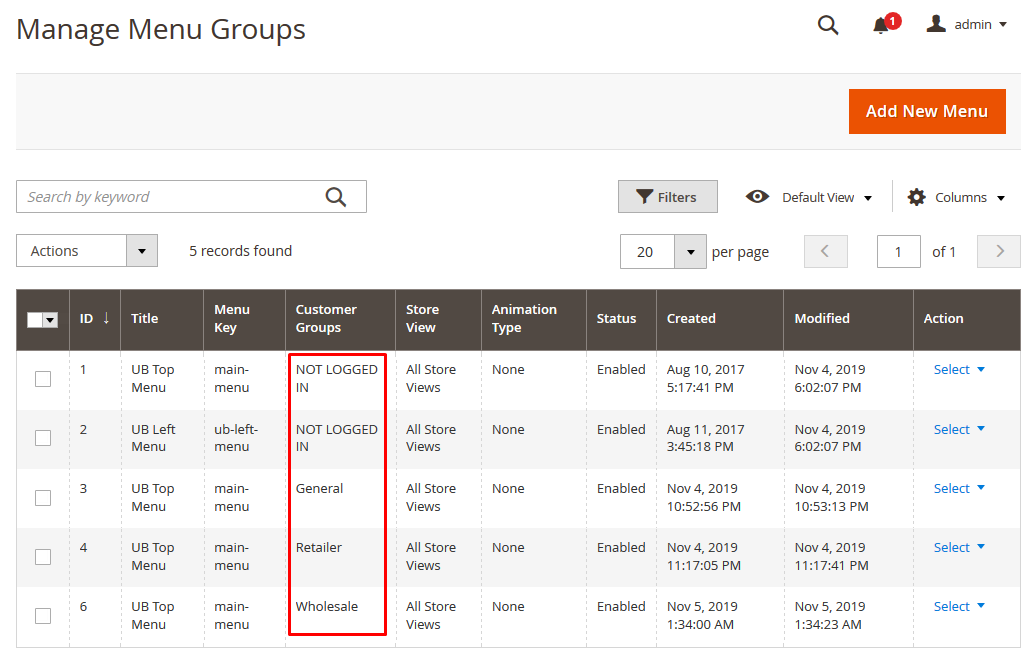
- Requirement: For each menu group, make sure you configure with a unique combination of 3 sections: menu key & customer group & storeview:
NOTE: For UB Mega Menu v1.2.4 and later, make sure you also set Menu Position and Menu Type respectively. Refer to section 2.1 (New in v1.2.4) Off-canvas on Desktop for more details.
After assigning a menu group to a specific customer group, you start creating associated menu items for that menu group as normal.


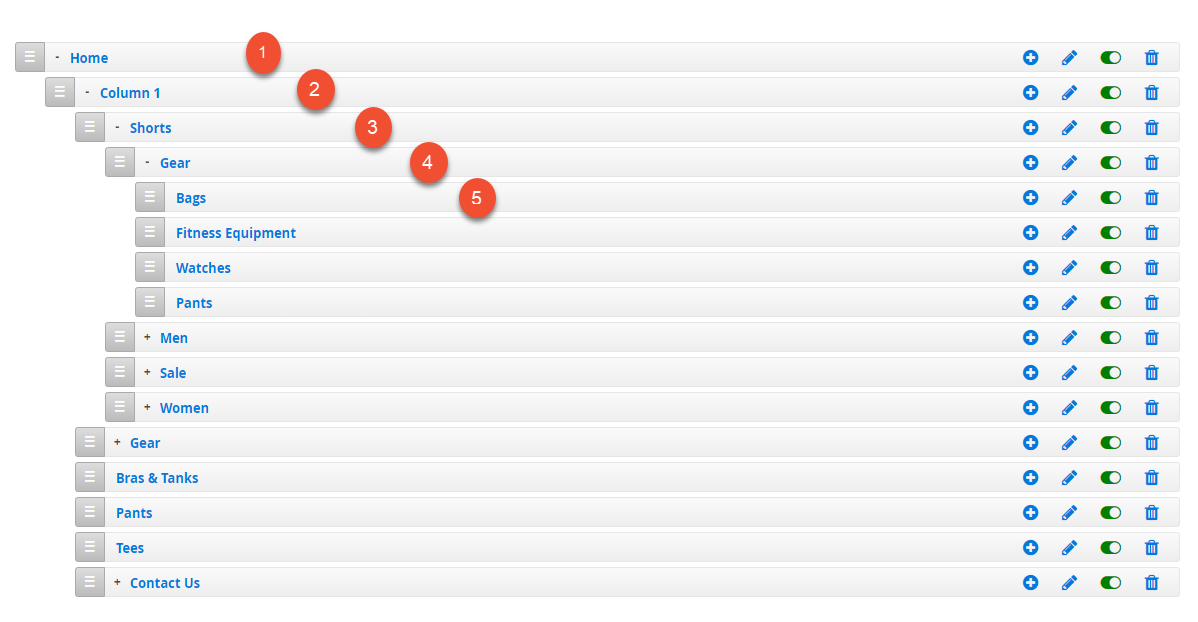
Step 2 -- Create Magento 2 mega menu item
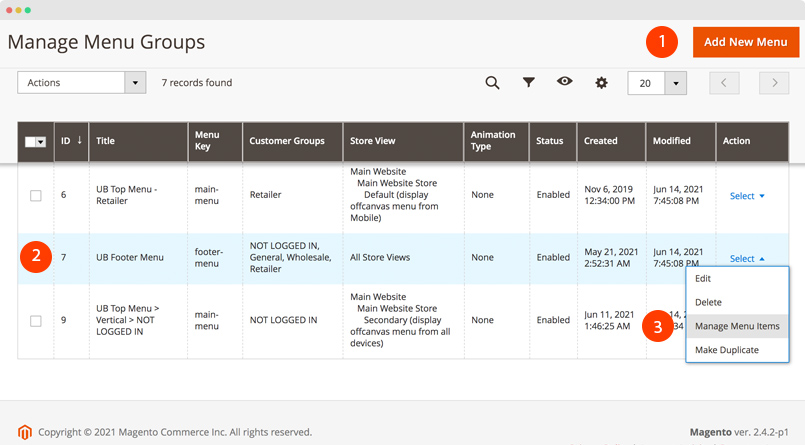
Supposed that you have some sample products in place already, now we start to create menu items for the mega menu. In the same Menu Group panel, go to Select | Manage Menu Items:

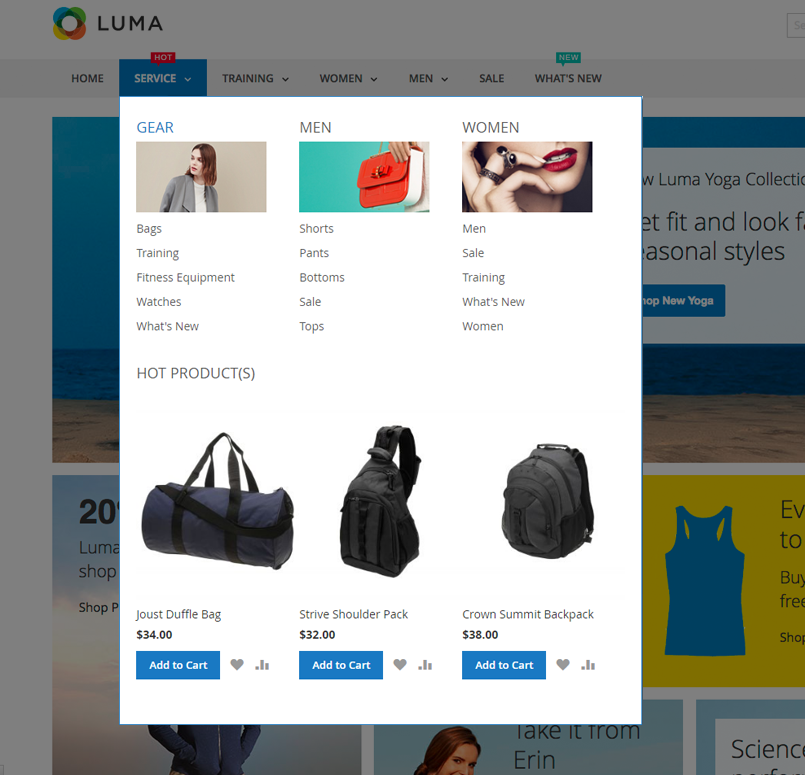
Step 2.1 -- Create Service and its sub-menu items:
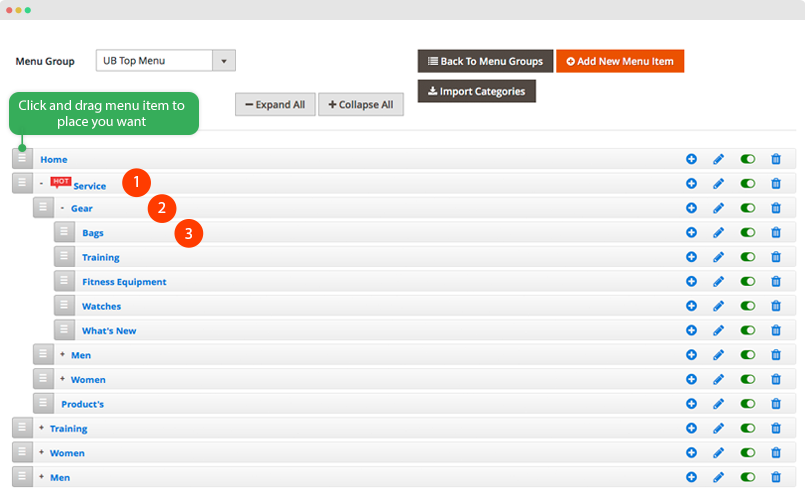
NOTE: When you create UB Mega Menu for the first time, you will not see any menu item in place yet. The above-mentioned screenshot just gives you an illustration about the menu hierarchy after you create those menu items.
Click Add New Menu Item button to create each of menu item, and follow configuration below:
- Service: Configuration steps -- menu setting 1 > menu setting 2
NOTE: When you create multiple columns, you need to set the width of each column in px. For instance:
col1=200

col2=200

col3=200

col4=600
And wrapper of the column width (px), for instance: 600
Make sure in the Setting 2 step, you insert custom CSS classstyle-default - Gear: Configuration steps -- menu setting 1 > menu setting 2
NOTE: When you check the setting 2, in the field Description click Show / Hide Editor button, then click Insert Image button and upload the image at your choice. Once you upload an image (eg. clothing.jpg) successfully, the image param should follow this format:<div><img src=”{{media url=”wysiwyg/ubmegamenu/clothing.jpg”}}” alt=”Magento 2 Mega Menu” /> /></div> - Bags: Configuration steps -- menu setting 1 > menu setting 2
- Apply similar setting of Bags for other sub-menu items of Gear
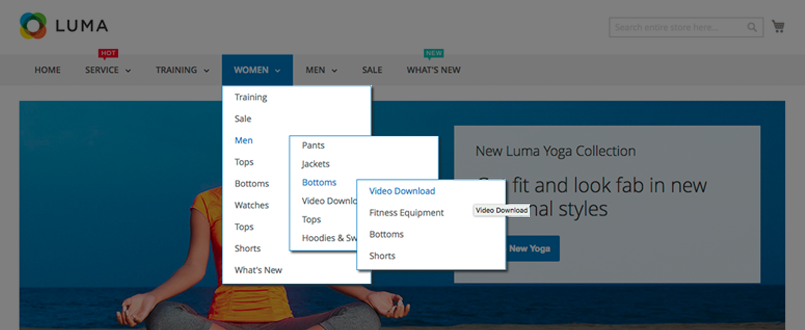
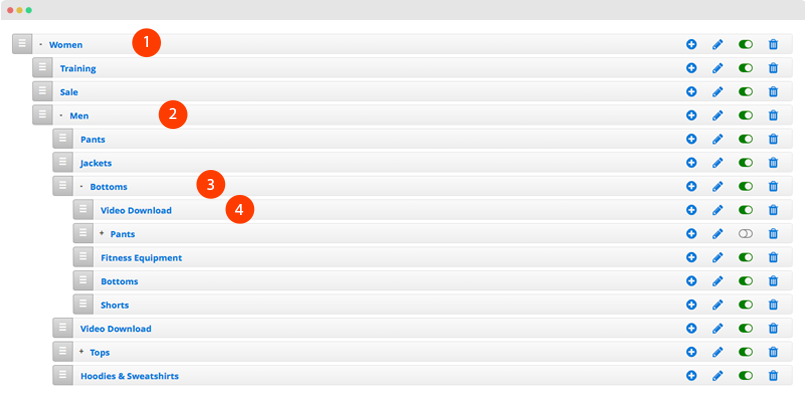
Step 2.2 -- Create Men, Women and their sub-menu items
Follow similar steps and settings as per the Gear menu and its sub-menu items.
Step 2.3 -- Create Hot Product
Product’s Configuration steps -- Setting 1 > Setting 2 > Setting 3
NOTE:
In the Setting 2 step above, navigate to Custom Content | Click Show / Hide Editor button, and click Insert Widget button. Then follow the setting as per the Setting 3 screenshot.
Alternatively, in Setting 2, navigate to the field Custom Content, click Show / Hide Editor button, and insert the sample snippet below which will call a sample Hot Products widget. Please note the sample code applies for a fresh Magento instance with sample data only.
<p>{{widget type="Magento\CatalogWidget\Block\Product\ProductsList" title="Hot Products" show_pager="0" products_count="3" template="product/widget/content/grid.phtml" conditions_encoded="a:1:[i:1;a:4:[s:4:`type`;s:50:`Magento|CatalogWidget|Model|Rule|Condition|Combine`;s:10:`aggregator`;s:3:`all`;s:5:`value`;s:1:`1`;s:9:`new_child`;s:0:``;]]"}}</p>
2.3 Style-1
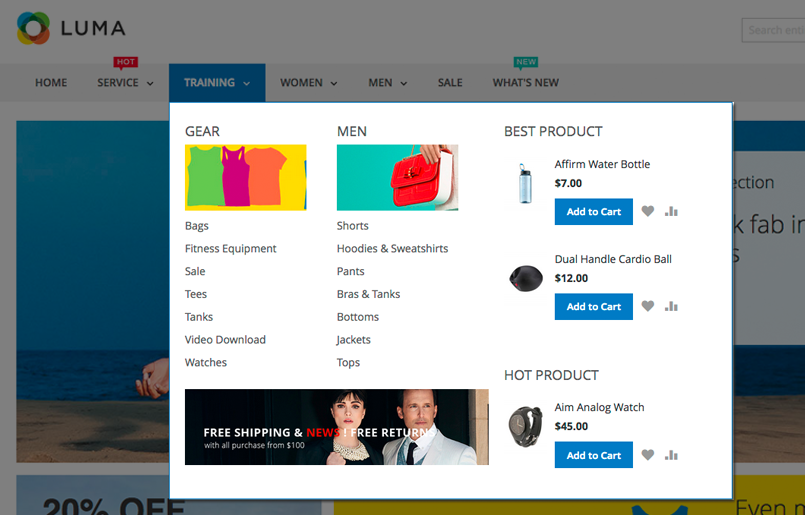
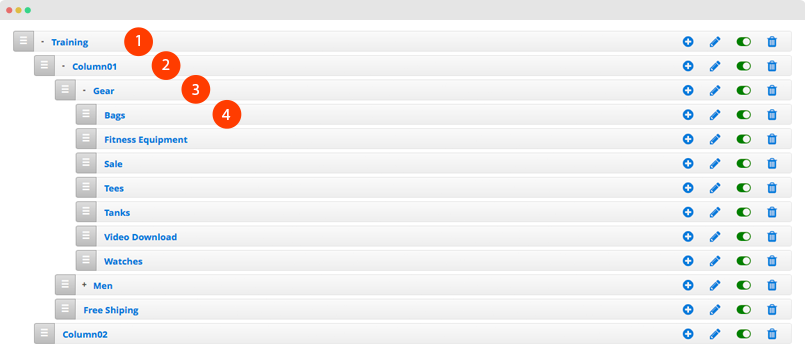
Step 1 -- Create Training and its sub-menu items:
Click Add New Menu Item button to create each of menu item, and follow configuration below:
-
- Training: Configuration steps -- menu setting 1 > menu setting 2
NOTE: When you create multiple columns, you need to set the width of each column in px. For instance:
col1=400

col2=300
And wrapper of the column width (px), for instance: 700
Make sure in the Setting 2 step, you insert custom CSS classstyle-1 - Column01: Configuration steps -- menu setting 1 > menu setting 2
NOTE: When you create multiple columns, you need to set the width of each column in px. For instance:
col1=200

col2=200

col3=400
And wrapper of the column width (px), for instance: 400 - Gear: Configuration steps -- menu setting 1 > menu setting 2
NOTE: When you check the setting 2, in the field Description click Show / Hide Editor button, then click Insert Image button and upload the image at your choice. Once you upload an image (eg. traning.jpg) successfully, the image param should follow this format:
- Training: Configuration steps -- menu setting 1 > menu setting 2
- Bags: Configuration steps -- menu setting 1 > menu setting 2
- Apply similar setting of Woman bags for other sub-menu items of Clothing
Step 2.2 -- Create Men and their sub-menu items
Follow similar steps and settings as per the Gear menu and its sub-menu items.
Step 2.3 -- Insert Free Shiping Banner into Mega Menu
Create Free Shiping item (by clicking Add New Menu Item) as a sub-menu of Training > Column01 following configuration steps: Setting 1 > Setting 2
Step 2.4 -- Create Hot Product and Best Seller menu items
Column02: Configuration steps -- Setting 1 > Setting 2 > Setting 3
NOTE: In the Setting 2 step, navigate to Custom Content | Click Show / Hide Editor button, and click Insert Widget button. Then follow setting as per the Setting 3 screenshot to load Hot Product widget. You can do the same to load the Best Seller widget.
Alternatively, in the Setting 2 screenshot above, in the field Custom Content, click Show / Hide Editor button, then insert the sample snippet below which will call both samples Hot Product and Best Products widgets. Please note the sample code applies for a fresh Magento instance with sample data only.
<p>{{widget type="Magento\CatalogWidget\Block\Product\ProductsList" title="Best Product" show_pager="0" products_count="2" template="product/widget/content/grid.phtml" conditions_encoded="a:2:[i:1;a:4:[s:4:`type`;s:50:`Magento|CatalogWidget|Model|Rule|Condition|Combine`;s:10:`aggregator`;s:3:`all`;s:5:`value`;s:1:`1`;s:9:`new_child`;s:0:``;]s:4:`1--1`;a:4:[s:4:`type`;s:50:`Magento|CatalogWidget|Model|Rule|Condition|Product`;s:9:`attribute`;s:12:`category_ids`;s:8:`operator`;s:2:`==`;s:5:`value`;s:1:`8`;]]"}}</p>
<p>{{widget type="Magento\CatalogWidget\Block\Product\ProductsList" title="Hot Product" show_pager="0" products_count="1" template="product/widget/content/grid.phtml" conditions_encoded="a:2:[i:1;a:4:[s:4:`type`;s:50:`Magento|CatalogWidget|Model|Rule|Condition|Combine`;s:10:`aggregator`;s:3:`all`;s:5:`value`;s:1:`1`;s:9:`new_child`;s:0:``;]s:4:`1--1`;a:4:[s:4:`type`;s:50:`Magento|CatalogWidget|Model|Rule|Condition|Product`;s:9:`attribute`;s:12:`category_ids`;s:8:`operator`;s:2:`==`;s:5:`value`;s:1:`4`;]]"}}</p>
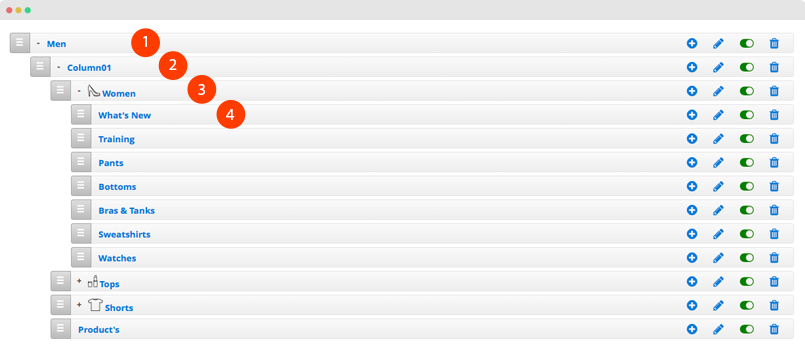
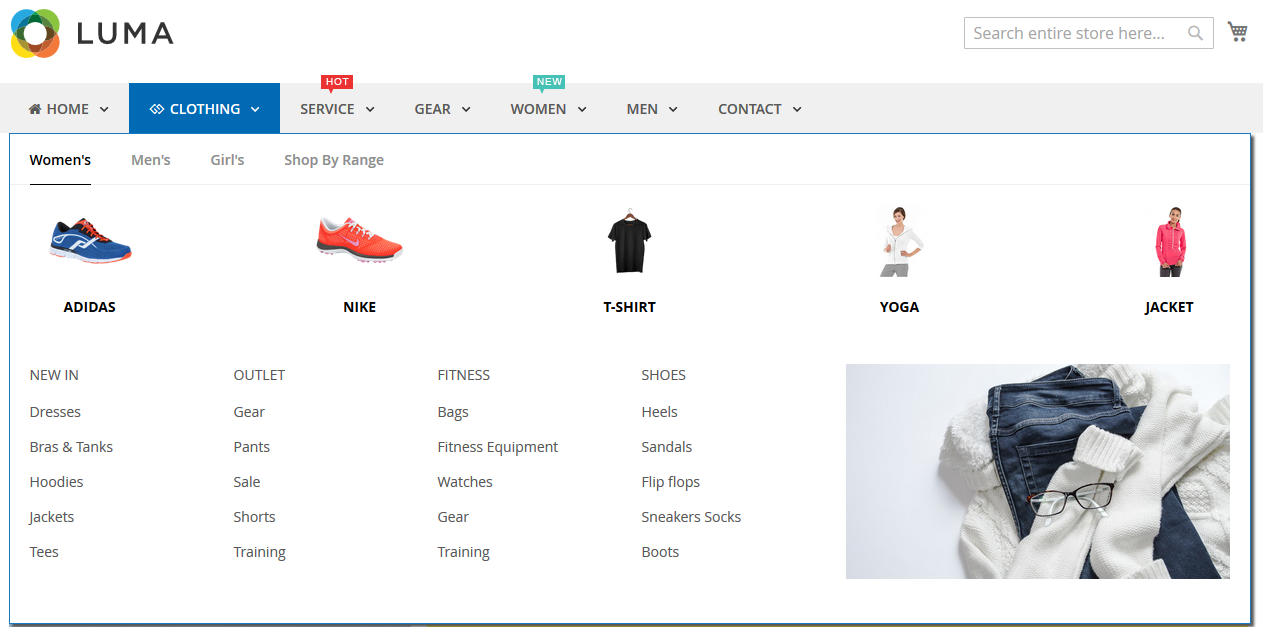
2.4 Style-2
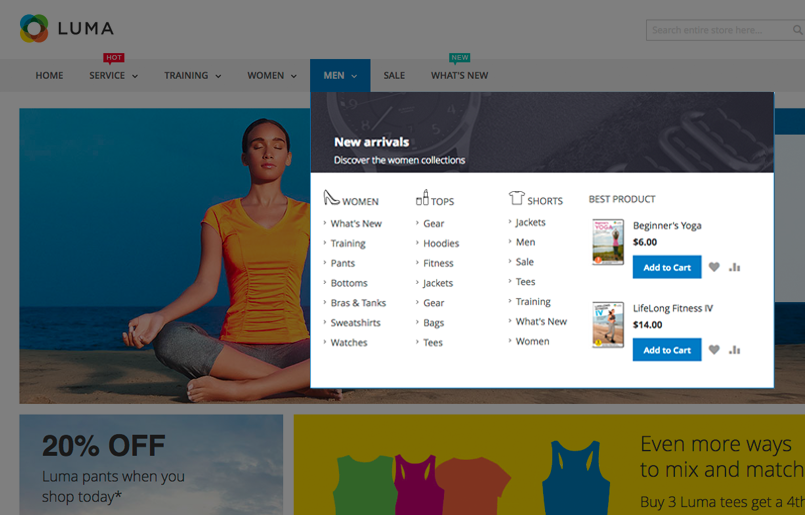
Step 1 -- Create Clothing and its sub-menu items
We do similar steps as per Style-1 to create menu items.
Click Add New Menu Item button to create each of menu item, and follow configuration below:
-
- Men: Configuration steps -- Setting 1 > Setting 2
NOTE: Make sure you add CSS classstyle-2in the setting #2 step.
And wrapper of the column width (px), for instance: 700 - Column01: Configuration steps -- Setting 1 > Setting 2
NOTE:
-- when you create multiple columns, you need to set the width of each column in px. For instance:col1=140
col2=140
col3=140
col4=280
-- And wrapper of the column width (px), for instance: 700
-- When you check the setting 2, in the field Description click Show / Hide Editor button, then click Insert Image button and upload the image at your choice. Once you upload image successfully, the image param should follow this format:<div class="full-banner"><img src="{{media url="wysiwyg/ubmegamenu/banner-01.jpg"}}" alt="Magento 2 mega menu" /> <h3>New arrivals</h3> <h4>Discover the women collections</h4> </div> - Women: Configuration steps -- Setting 1 > Setting 2
- What’s New: Configuration steps -- Setting 1 > Setting 2
- Apply similar settings of What’s New in for other sub-menu items of
- Men: Configuration steps -- Setting 1 > Setting 2
Tops and Shorts menu items follow the same steps.
Step 2 -- Create Product’s menu item
This item is actually a Magento 2 widget (Catalog New Product List) being loaded into mega menu. Click Add New Menu Item again, to create Best Product item and follow these configuration steps: Setting 1 > Setting 2 > Setting 3
NOTE:
Alternatively, in the Setting 2 screenshot above, in the field Custom Content, click Show / Hide Editor button, then insert the sample snippet below which will call a sample Best Products widget. Please note the sample code applies for a fresh Magento instance with sample data only.
<p>{{widget type="Magento\CatalogWidget\Block\Product\ProductsList" title="Best Products" show_pager="0" products_count="2" template="product/widget/content/grid.phtml" conditions_encoded="a:2:[i:1;a:4:[s:4:`type`;s:50:`Magento|CatalogWidget|Model|Rule|Condition|Combine`;s:10:`aggregator`;s:3:`all`;s:5:`value`;s:1:`1`;s:9:`new_child`;s:0:``;]s:4:`1--1`;a:4:[s:4:`type`;s:50:`Magento|CatalogWidget|Model|Rule|Condition|Product`;s:9:`attribute`;s:12:`category_ids`;s:8:`operator`;s:2:`==`;s:5:`value`;s:1:`3`;]]"}}</p>
2.5 Style 3 (One-column)
We do similar steps as per Style-1 to create menu items.
Click Add New Menu Item button to create each of menu item, and follow configuration below:
2.6 Style 4 (Full Width)
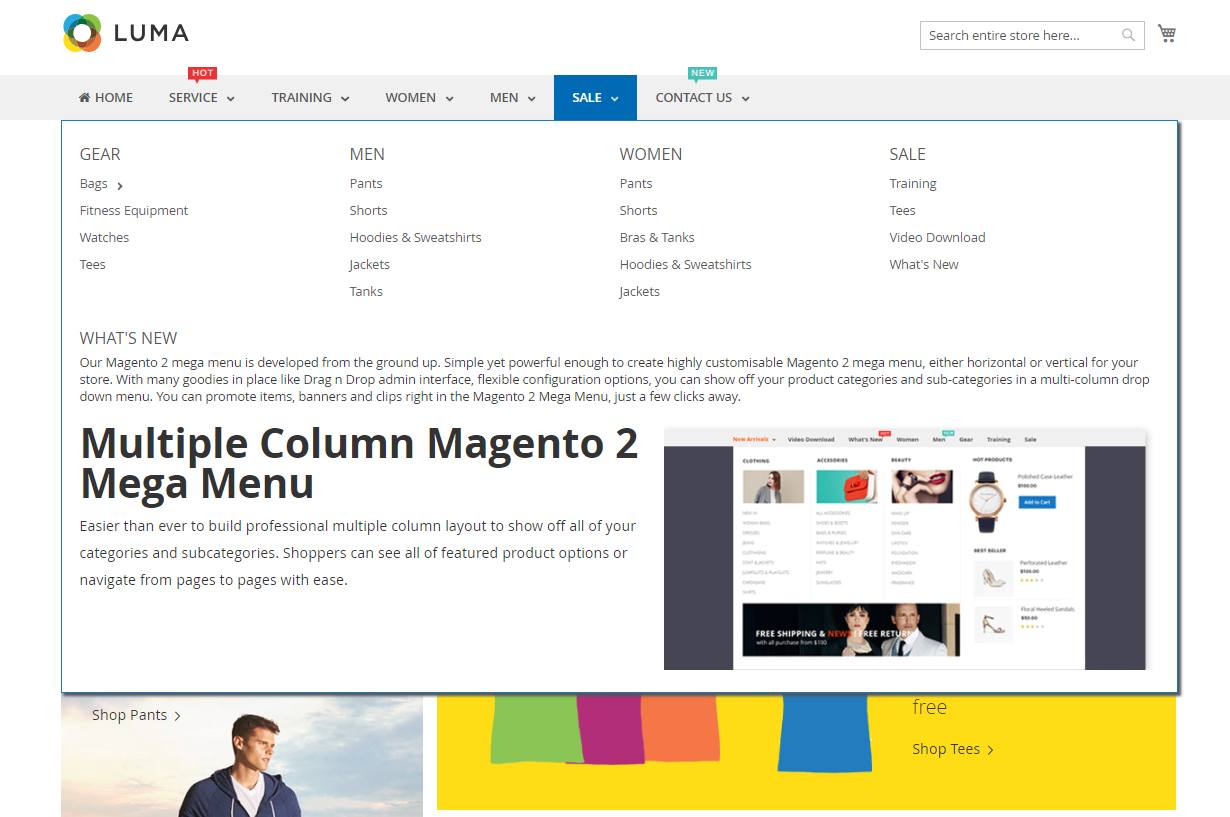
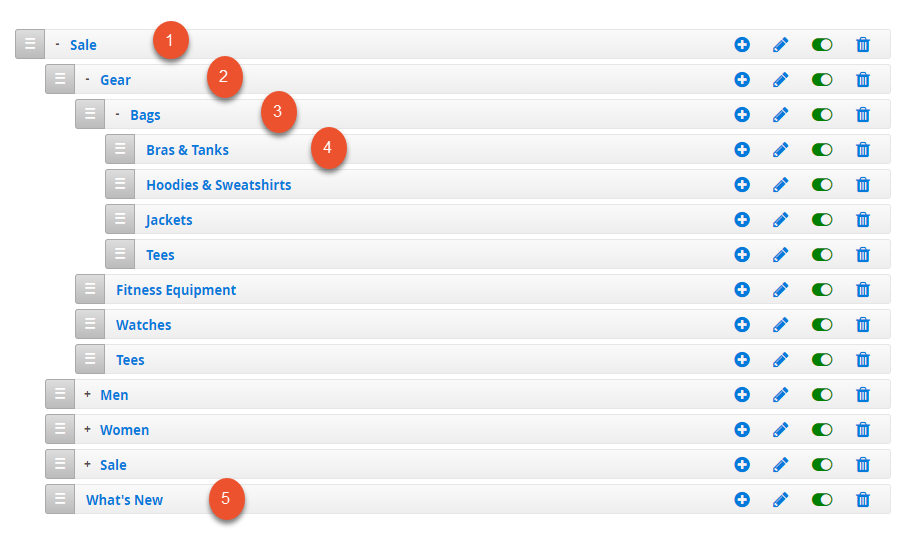
Step 1 -- Create Sale and its sub-menu items
We do similar steps as per Style-1 to create menu items.
Click Add New Menu Item button to create each of menu item, and follow configuration below:
- Sale: Configuration steps -- Setting 1 > Setting 2
NOTE: Full-width mega menu is a new feature introduced in UB Mega Menu ver 1.1.2. You will see a new setting ‘Set Base Width’ with two values:
- Fixed Width (px)
- Dynamic Width (%)
In order to set the mega menu to full width, you need to set the Base Width as ‘Dynamic Width (%)’ first. Then, you specify the individual column widths:
- If you have 1 column in your mega menu, your column width equals to 100%
- If you have 5 columns in your mega menu and set the ‘Grid Column Submenu’ blank, each column width equals to 20%.
- If you want to set column width individually, enter the percentage value for each respective column under the ‘Grid Column Submenu’ field. For instance:
- col1=25
- col2=25
- col3=25
- col4=25
- col5=100
With this configuration, your mega menu will end up with a full-width mega menu where the first 4 columns will be located on the first row and the fifth column on the second row with max 100% width.
- Gear: Configuration steps -- Setting 1 > Setting 2
- Bags: Configuration steps -- Setting 1 > Setting 2
- Bras & Tanks: Configuration steps -- Setting 1 > Setting 2
- Apply similar settings for the rest of sub-menu items
Step 2 -- Create What’s New menu item
Click Add New Menu Item again, to create What’s New item and follow these configuration steps: Setting 1 > Setting 2
NOTE:
Alternatively, in the Setting 2 screenshot above, in the field Custom Content, click Show / Hide Editor button, then insert the sample snippet below. Keep in mind that this sample code applies to a fresh Magento instance with sample data only.
<div class="intro-megamenu">
<div class="intro">Our Magento 2 mega menu is developed from the ground up. Simple yet powerful enough to create highly customisable Magento 2 mega menu, either horizontal or vertical for your store. With many goodies in place like Drag n Drop admin interface, flexible configuration options, you can show off your product categories and sub-categories in a multi-column drop down menu. You can promote items, banners and clips right in the Magento 2 Mega Menu, just a few clicks away.</div>
<div class="func-01"><img src="{{media url="wysiwyg/ubmegamenu/image03.jpg"}}" alt="Multiple Column Magento 2 Mega Menu" />
<p class="title">Multiple Column Magento 2 Mega Menu</p>
<p>Easier than ever to build professional multiple column layout to show off all of your categories and subcategories. Shoppers can see all of featured product options or navigate from pages to pages with ease.</p>
</div>
</div>
2.7 Style 5 -- Tab Style (Vertically stacked category dropdown)
This is a new menu type introduced in UB Mega Menu v1.1.3. On mouse hover, each primary category expands as a mega menu with corresponding level-2 and level-3 subcategories. The mega menu is visually divided into two columns (one for main categories and another column is for their sub-categories).
We follow similar steps as per the Style-1 to create menu items.
Click Add New Menu Item button to create each of menu item, and apply the following configurations:
- Home: Configuration steps -- Setting 1 > Setting 2
NOTE:
-- Make sure you set ‘Set Base Width’ as Dynamic Width(%) and Wrapper Width: 100.
-- In the Setting 2 step, you insert the custom CSS classstyle-tabs. - Column 1: Configuration steps -- Setting 1 > Setting 2
- Shorts: Configuration steps -- Setting 1 > Setting 2
NOTE:
-- Make sure in the Setting 2 step, you insert the custom classtab-head(This extra class is just for JS function, not defined in the LESS file). - Gear: Configuration steps -- Setting 1 > Setting 2
- Bags: Configuration steps -- Setting 1 > Setting 2
- You simply apply similar settings for the rest of sub-menu items
2.8 Style 6 -- Tab Style (Horizontally stacked category dropdown)
This is a new menu type introduced in UB Mega Menu v.1.2.0.
Setting up the menu structure for Style 6 -- Horizontally stacked category dropdown is similar to the style 5 (Tab Style -- Vertically stacked Category Dropdown).
Just keep in mind that you fill in the style-tabs-hz extra class like this screenshot, instead of using the style-tabs like the style 5.

2.9. Style 7 -- Tab Style (Adding thumbnails to UB Mega Menu)
There are two options to add a thumbnail to a menu item:
- Using the Category image as the thumbnail of a menu item.
- Adding a custom image via the Custom Content field of the menu item.
2.9.1. Using a category image as the thumbnail
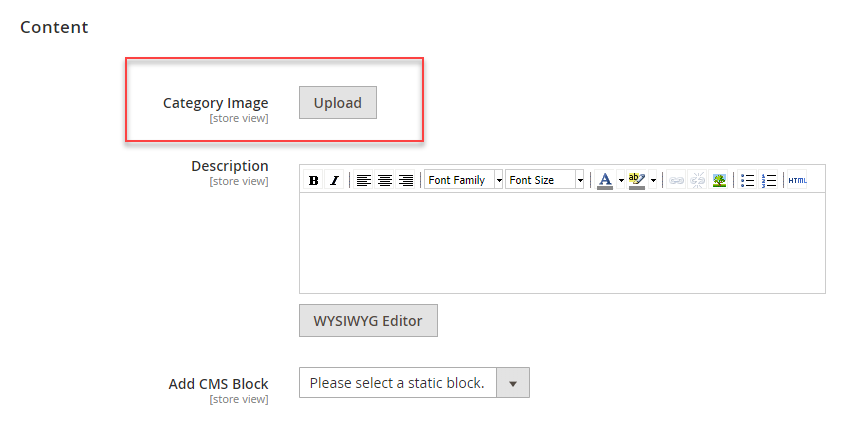
To display the thumbnails of menu items using the category image, please follow the steps below:
Step 1: Go to CATALOG | Categories, click the Upload button to upload an image that you want to use for the category.
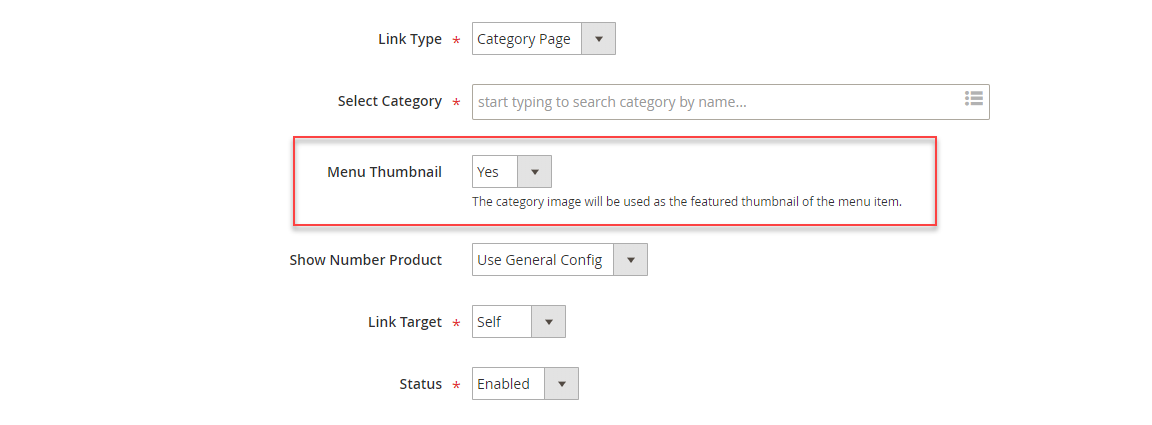
Step 2: Create a menu item with the Catagory Page type, select the category that you configure in Step 1, and enable “Menu Thumbnail” to show the thumbnail.
2.9.2. Adding thumbnails via the Custom Content field
You follow similar steps as per Style-1 to create menu items.
Click Add New Menu Item button to create each of menu item, and follow the configuration below:
- Home: Configuration steps -- Setting 1 > Setting 2
NOTE:
-- Make sure you set ‘Set Base Width’ as Dynamic Width(%) and Wrapper Width: 100.
-- In the Setting 2 step, you insert the custom CSS classstyle-tabs. - Column 1: Configuration steps -- Setting 1 > Setting 2
- Gear: Configuration steps -- Setting 1 > Setting 2
NOTE:
Make sure in the Setting 2 step of the Gear menu item, you insert the custom class tab-head (This extra class is just for JS function, not defined in the LESS file).
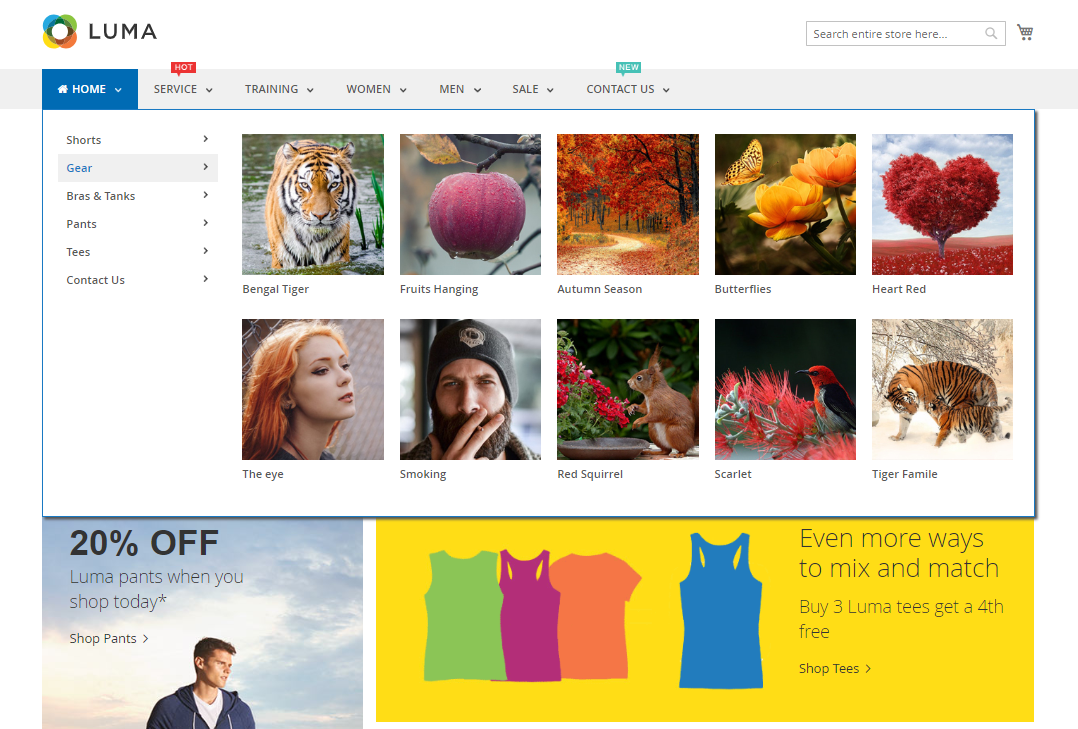
And in the Custom Content field, click Show / Hide Editor button, then insert the sample snippet below. Custom Content field will define the images that you want to display as the thumbnails of the submenu items. Change with your own images that you want to display in the menu:
<div class="mega-with-thumb">
<ul class="mega-menu">
<li class="mega"><a class="mega" href="{{config path="web/unsecure/base_url"}}gear.html"><img src="{{media url="wysiwyg/ubmegamenu/thumb/thumb01.jpg"}}" alt="" /><span class="menu-title">Bengal Tiger</span></a></li>
<li class="mega"><a class="mega" href="{{config path="web/unsecure/base_url"}}women/tops-women.html"><img src="{{media url="wysiwyg/ubmegamenu/thumb/thumb02.jpg"}}" alt="" /><span class="menu-title">Fruits Hanging</span></a></li>
<li class="mega"><a class="mega" href="{{config path="web/unsecure/base_url"}}women/tops-women/tanks-women.html"><img src="{{media url="wysiwyg/ubmegamenu/thumb/thumb03.jpg"}}" alt="" /><span class="menu-title">Autumn Season</span></a></li>
<li class="mega"><a class="mega" href="{{config path="web/unsecure/base_url"}}women/bottoms-women/pants-women.html"><img src="{{media url="wysiwyg/ubmegamenu/thumb/thumb04.jpg"}}" alt="" /><span class="menu-title">Butterflies</span></a></li>
<li class="mega"><a class="mega" href="{{config path="web/unsecure/base_url"}}women/tops-women/tees-women.html"><img src="{{media url="wysiwyg/ubmegamenu/thumb/thumb05.jpg"}}" alt="" /><span class="menu-title">Heart Red</span></a></li>
<li class="mega"><a class="mega" href="{{config path="web/unsecure/base_url"}}training.html"><img src="{{media url="wysiwyg/ubmegamenu/thumb/thumb06.jpg"}}" alt="" /><span class="menu-title">The eye</span></a></li>
<li class="mega"><a class="mega" href="{{config path="web/unsecure/base_url"}}women.html"><img src="{{media url="wysiwyg/ubmegamenu/thumb/thumb07.jpg"}}" alt="" /><span class="menu-title">Smoking</span></a></li>
<li class="mega"><a class="mega" href="{{config path="web/unsecure/base_url"}}women/tops-women.html"><img src="{{media url="wysiwyg/ubmegamenu/thumb/thumb08.jpg"}}" alt="" /><span class="menu-title">Red Squirrel</span></a></li>
<li class="mega"><a class="mega" href="{{config path="web/unsecure/base_url"}}women/bottoms-women.html"><img src="{{media url="wysiwyg/ubmegamenu/thumb/thumb09.jpg"}}" alt="" /><span class="menu-title">Scarlet</span></a></li>
<li class="mega"><a class="mega" href="{{config path="web/unsecure/base_url"}}women/bottoms-women/shorts-women.html"><img src="{{media url="wysiwyg/ubmegamenu/thumb/thumb10.jpg"}}" alt="" /><span class="menu-title">Tiger Famile</span></a></li>
</ul>
</div>
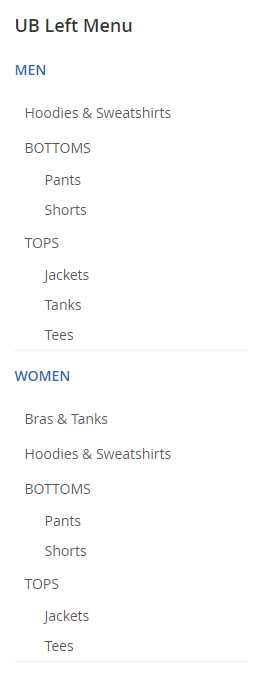
2.10 Style 8 (Vertical Sidebar menu)
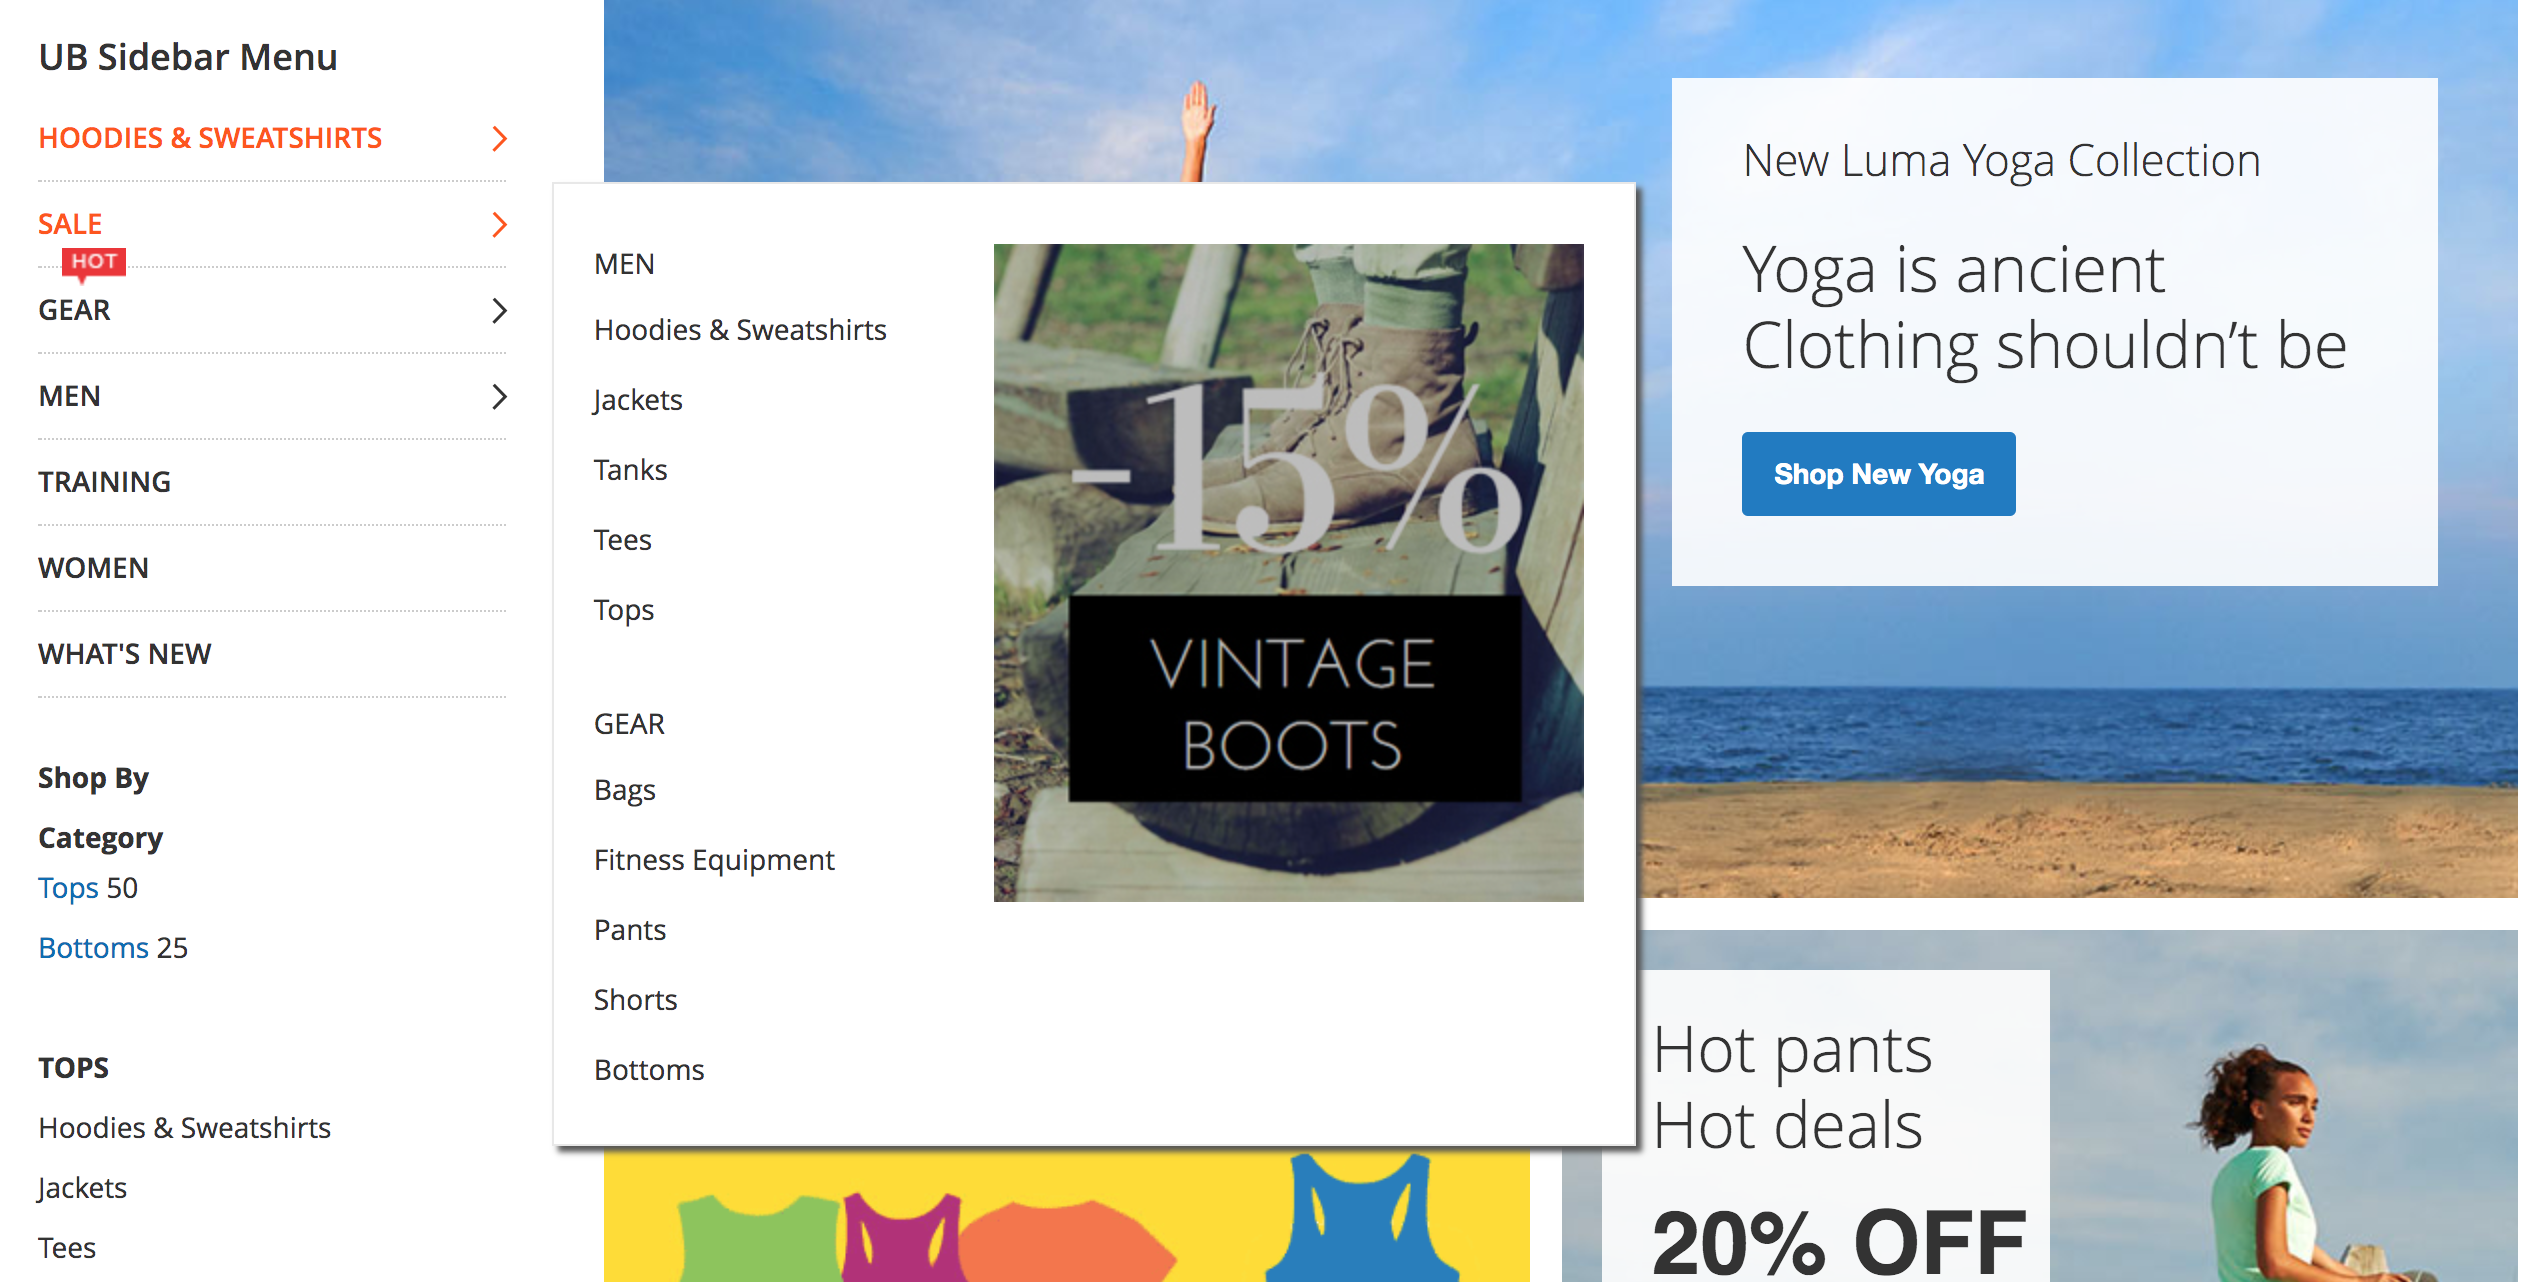
Some stores might need a vertical sidebar menu, instead of the top main menu. It’s possible for the UB Mega menu to create the sidebar one column menu (vertical).
Step 1: Create a menu group with the menu key sidebar-menu for the vertical menu, then add the menu items as you wish:
The configuration of the sample vertial sidebar menu group on our demo is similar to this screenshot.
(If you are new to Magento, scroll back to section 2.2 Default Style to learn on steps to create a menu group and its menu items.)
Step 2:
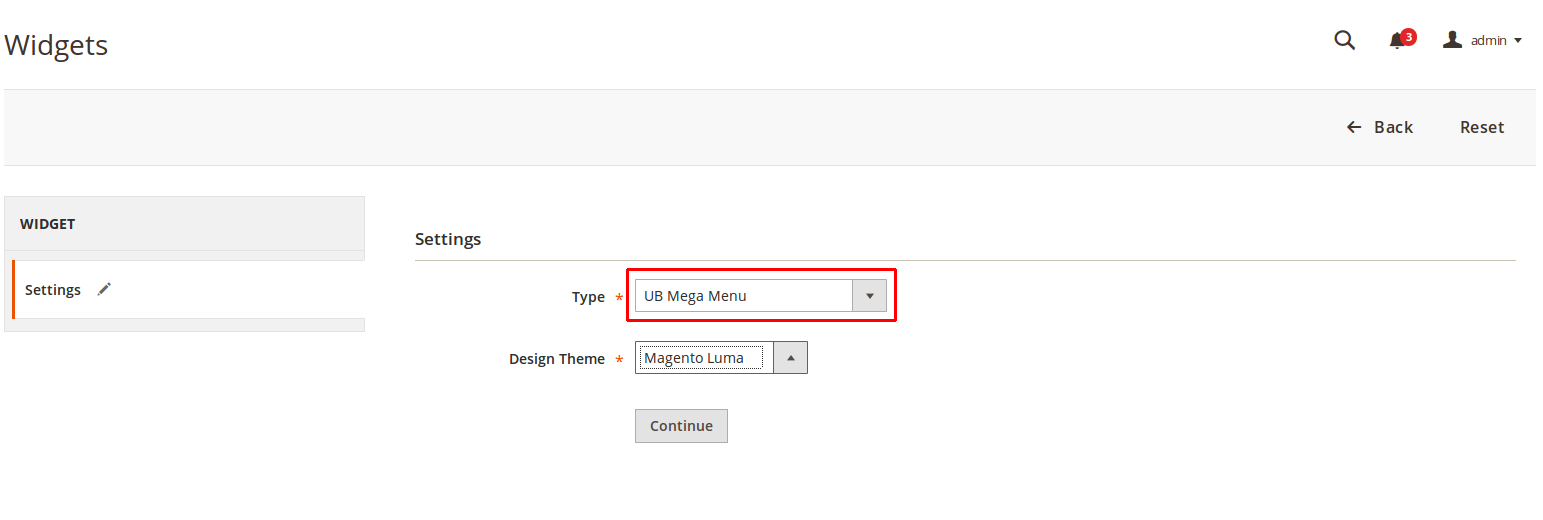
In your Magento admin, navigate to Content | Widget, then click Add Widget, and configure as follows:
UB Sidebar Mega Menu (In UB Mega Menu v1.2.3 and older, you set the Container as UB Vertical Mega Menu)

Once done, you should have the vertical menu available in your storefront’s sidebar.
NOTE:
The UB Mega Menu v.1.1.5 supports a new extra class flattened-menu. Once the flattened-menu is added to the first level menu item, the vertical menu should look like this:
In order to use this newly added extra class: flattened-menu, please note the following required conditions:
- Applied to Vertical menu only
- Applied to the first level menu item only
- Make sure you set Enable Group Item of the first level menu item to Yes (Menu item settings > Mega Settings > Enable Group Item: Yes)
2.11 (New in v1.2.4) Footer Menu
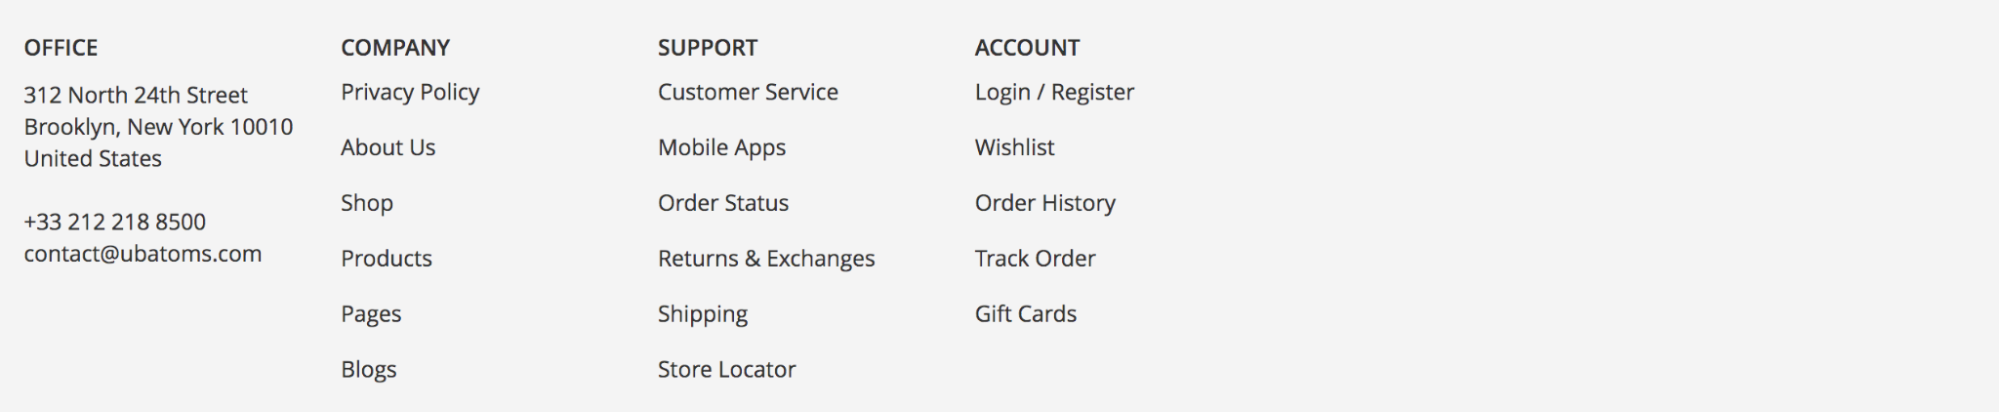
It’s possible to use the UB Mega Menu to create and manage your Footer menu.
Step 1: Create a menu group for the footer menu (for example, with a menu key footer-menu). Make sure you set Menu Position as Footer and Menu Type as Footer Menu. Then add the menu items as you wish:
(If you are new to our module, scroll back to section 2.2 Default Style to learn on steps to create a menu group and its menu items.)
Step 2:
In your Magento admin, navigate to Content | Widget, then click Add Widget, and configure as follows:
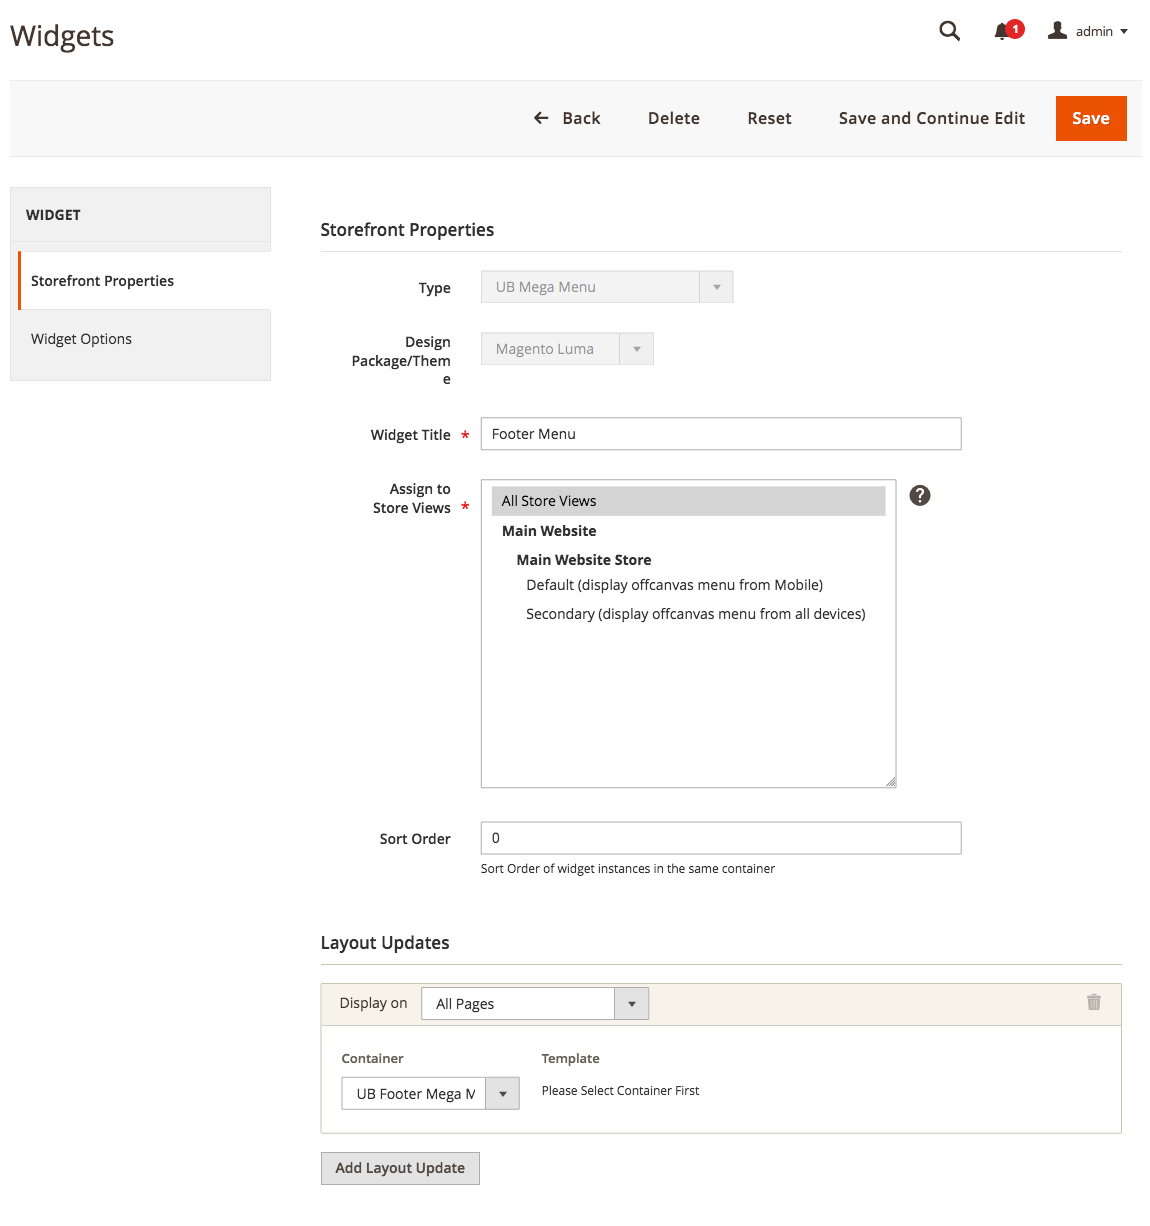
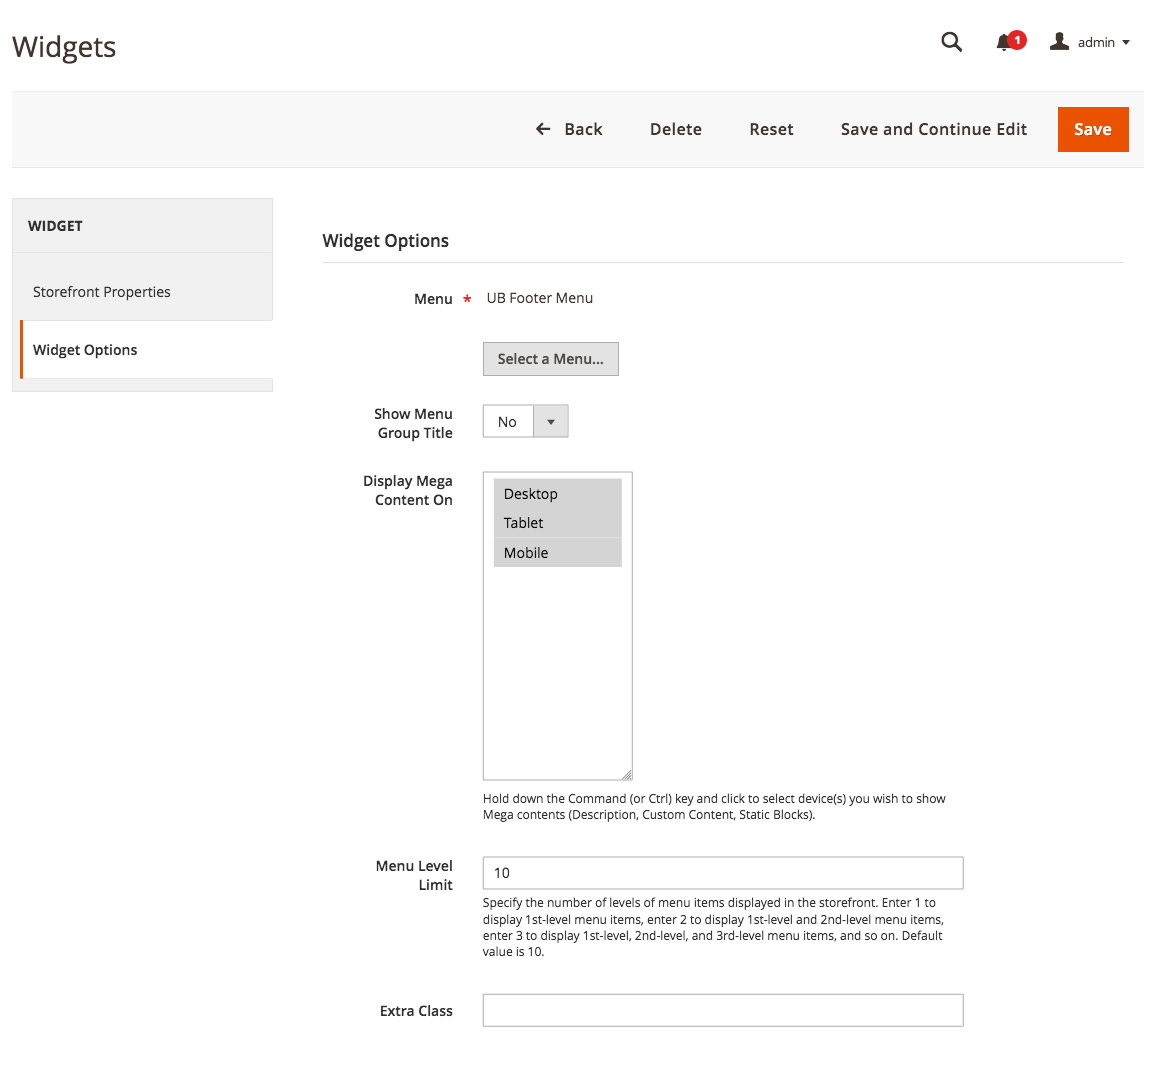
Once done, you should have the Footer menu in your storefront’s footer area.
2.12 Mobile Menu (Accordion/Drill-down)
By default, UB Mega Menu enables Accordion menu on mobile devices. In UB Mega Menu v1.1.9 and later, you can switch to another menu approach -- Drilldown menu if you choose to:
- Accordion: a pull-down menu where clicking the main item expands the section below it
- Drill-down: shows only the submenus of the last selected menu item
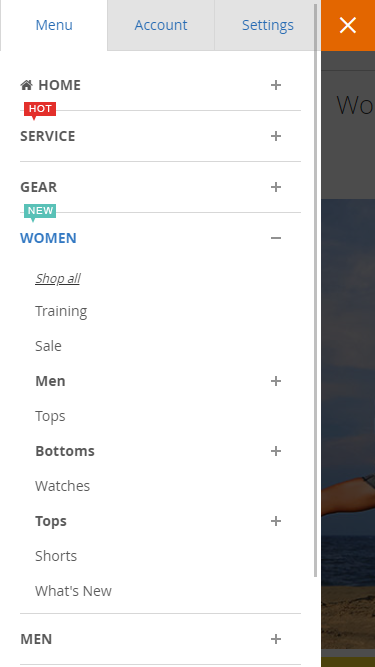
Default UB Mega Menu’s Accordion menu
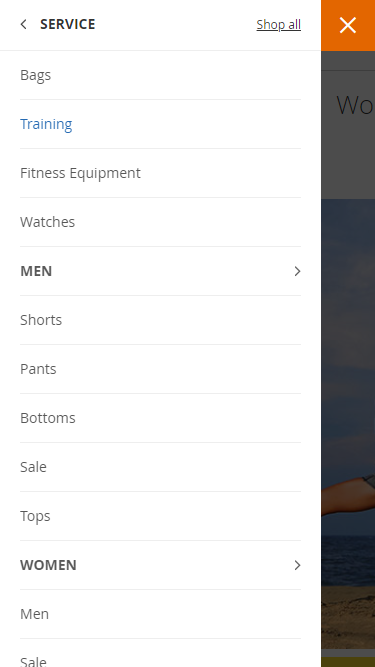
UB Mega Menu drill-down menu
To specify the menu for mobile devices, navigate to Ubertheme’s Extensions | (UB Mega Menu) Manage Menu, then click to Edit your Menu group and set Menu on Mobile with the option you want:
NOTE: The UB Mega Menu v.1.1.9 enables a sticky drill-down menu (on Mobile only) by default. You can turn the sticky feature off by adding an extra class sticky-disabled as follows:
For the Top Menu:
- Step 1: Copy the app\code\Ubertheme\UbMegaMenu\view\frontend\layout\default.xml file and paste to the app\design\frontend\YOUR_BRANCH\YOUR_THEME_NAME\Ubertheme_UbMegaMenu\layout directory.
- Step 2: Open the app\design\frontend\YOUR_BRANCH\YOUR_THEME_NAME\Ubertheme_UbMegaMenu\layout\default.xml, navigate to the line 15 and replace:
<argument name="addition_class" xsi:type="string"></argument>
with:
<argument name="addition_class" xsi:type="string">sticky-disabled</argument>
For the Vertical Menu:
- In your Magento 2 Admin, navigate to Content | (Element) Widget, click Add Widget, then set the Type in Storefront Properties with UB Mega Menu. Then tab the Widget Options and fill in the Extra Class with
sticky-disabledclass name.
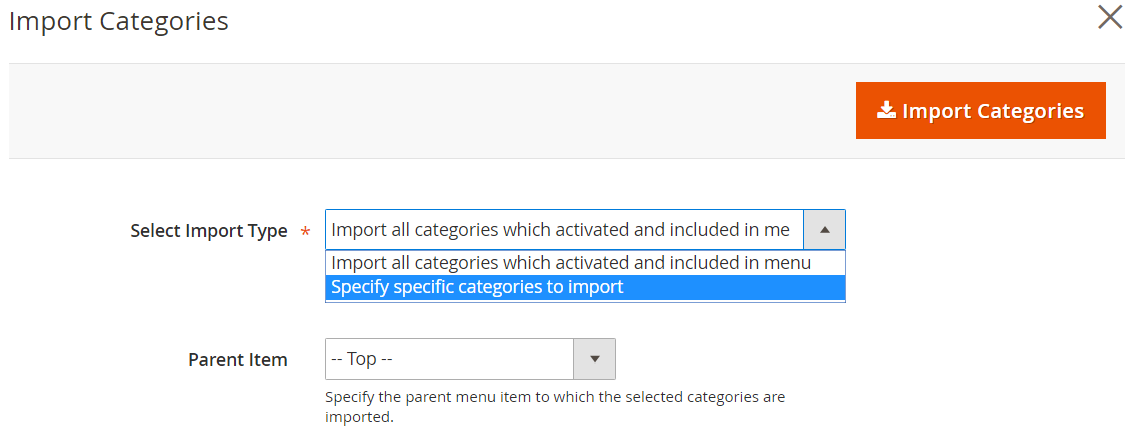
V. Import Categories into the menu
Import categories into UB Mega Menu
Supposed that you have existing product categories, you can simply import all categories or a few specific categories into your Magento 2 mega menu. If you select to import all categories, UB Mega Menu (starting from version 1.0.3) allows to import categories and sub-categories recursively. That means, your whole category tree is fully imported and reserved.
NOTE: Only Categories with ‘Enable Category’ and ‘Include in Menu’ enabled are imported.
The import steps are as simple as follows:
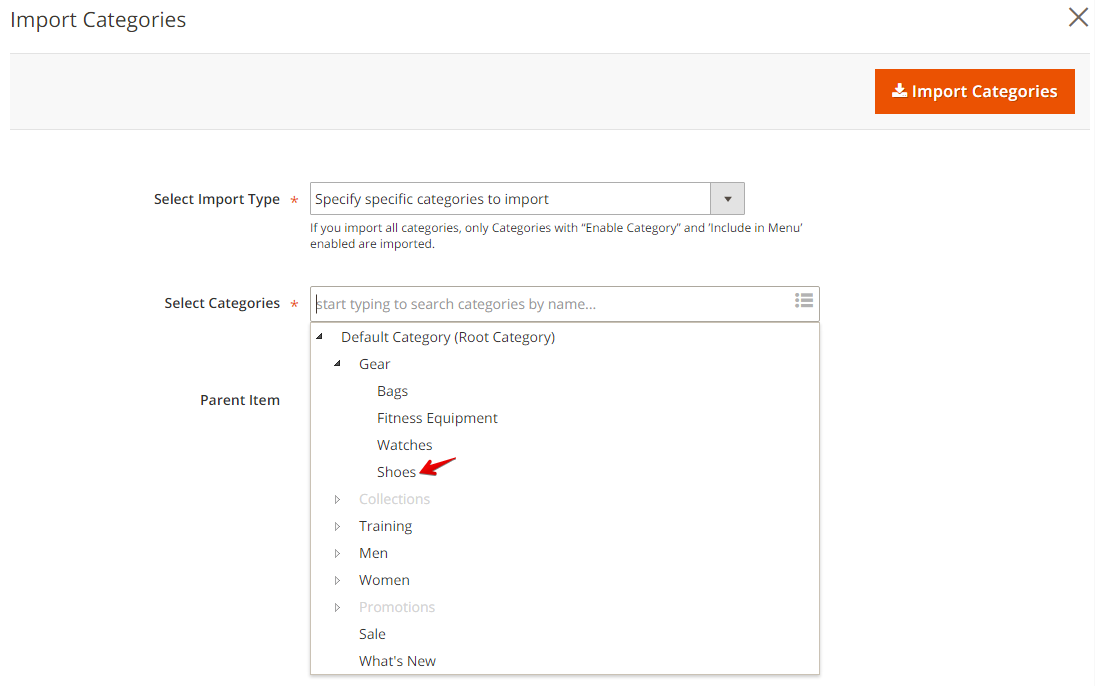
In the same Menu Group panel, go to Select | Manage Menu items. In the Menu item panel, click Import Categories, you’ll be directed to a popup window. In the ‘Select Import Type’ field, specify the option you wish to import.
In case you import a few specific categories, simply fill in and select the name of categories you wish, then proceed import as per the screenshot below.
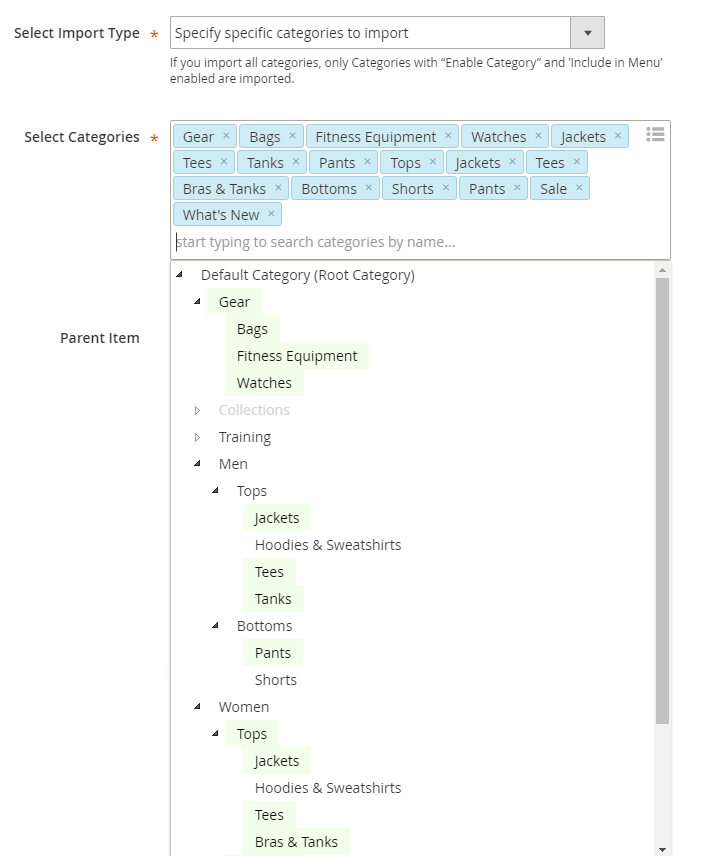
Then (optional) assign the parent menu item to which the selected categories are imported and click the ‘Import Categories’ button. Once done, your categories tree should be in place. See the sample below for reference:
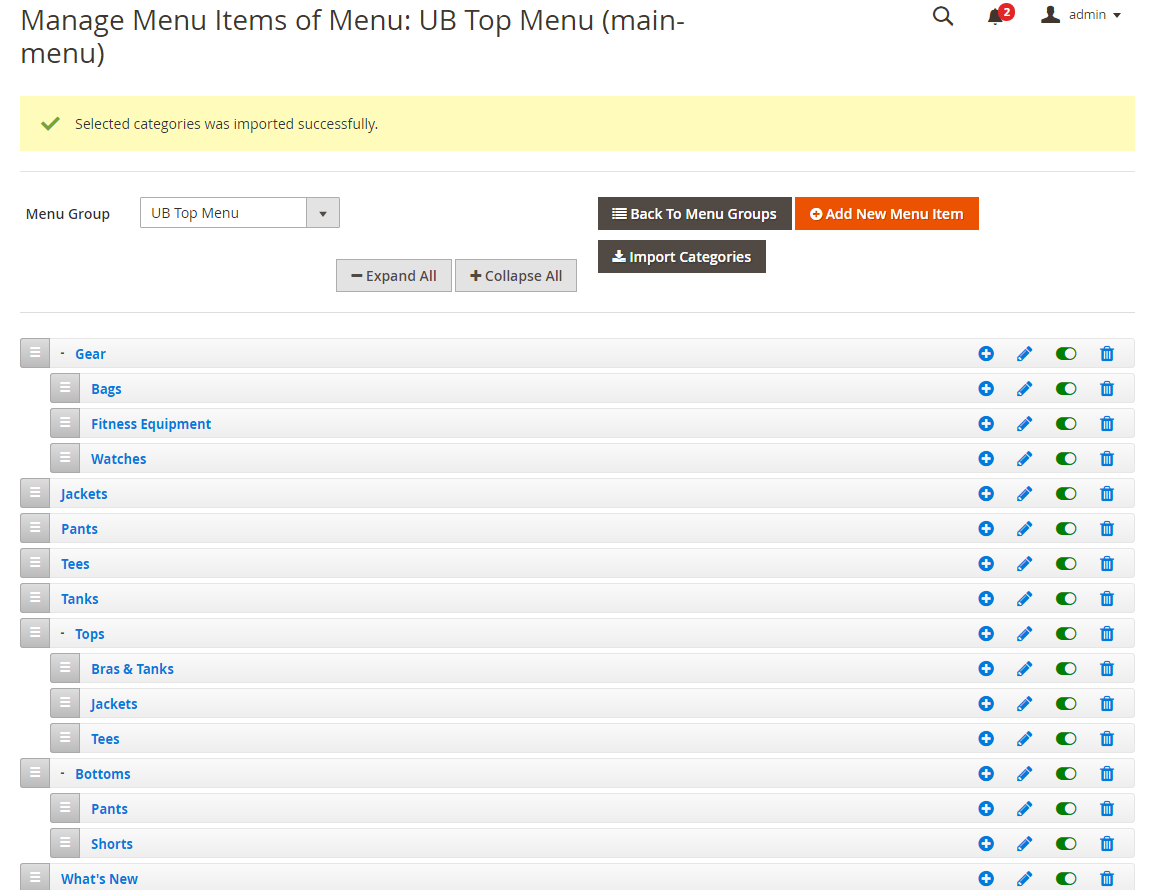
Then you should go to your admin dashboard, click System | Cache Management, and tap the ‘Flush Cache Storage’ button to flush the cache. Now open up the menu on your frontend, you should see them in place:
EXTRA NOTE:
(New improvements in UB Mega Menu 1.0.4 and later)
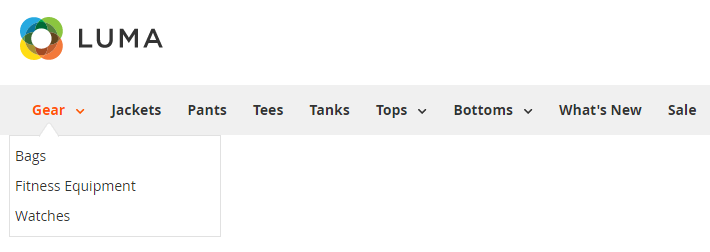
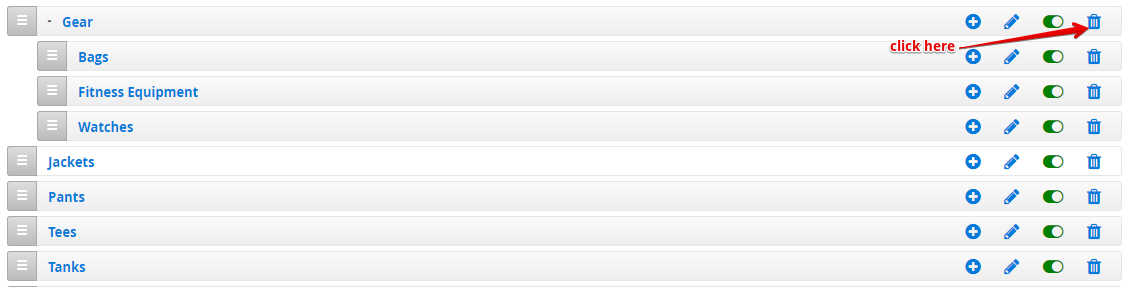
During your development process, chances are that you might need to add or delete a huge list of menu items. UB Mega menu now allows you to remove (recursive) menu and sub-menu items easily. For instance, if you delete the Gear menu item as shown in the screenshot below, all its sub-menu items will be removed too. You can delete every single sub-menu item though.
Or when you change the URL key or add a new sub-category, it will be automatically synced to the menu. And a menu item will no longer exist if its linked category is deleted.
Below you can find an example of a newly added sub-category:
- In your Magento admin, navigate to Category | Add Subcategory and create a new Sub-category (eg. Shoes under Gear category), then click Save button.
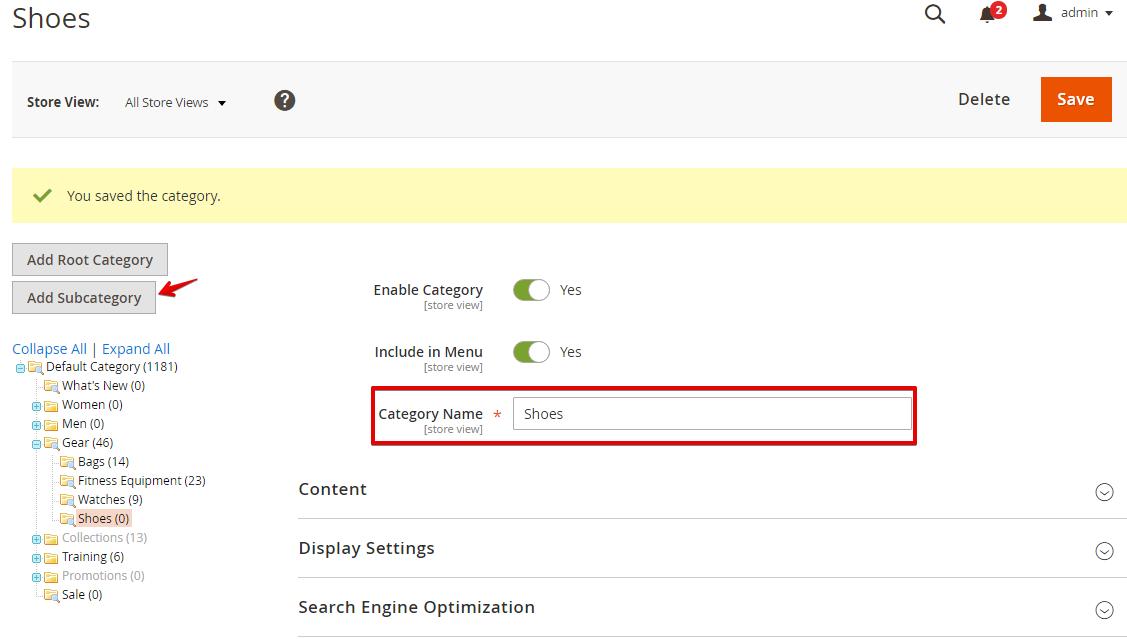
- Supposed that the Gear category menu item is already in place, then the new subcategory Shoes should be automatically synced to your Gear menu item.
V. Manual Un-Installation
If you want to have Magento 2 Mega Menu extension uninstalled, please follow steps below:
- Step 1: [Important] Remove related widgets if they were created
Go to your Backend | Content | Widget, delete all created widgets with Widget Type UB Mega Menu
- Step 2: Disable UB Mega Menu module and clean associated database tables
-- Open your terminal, go to your Magento2 folder <your magento install path> and run the following CLI commands:
php -f bin/magento maintenance:enable

php -f bin/magento deploy:mode:set developer

php -f bin/magento module:disable -c Ubertheme_UbMegaMenu

rm -rf app/code/Ubertheme/UbMegaMenu
-- Open your Mysql cpanel (eg. PHPMyAdmin), and run the following SQL:
NOTE: Make sure you replace with your own <table_prefix>:
DELETE FROM `<table_prefix>setup_module` WHERE `module` = 'Ubertheme_UbMegaMenu';

DROP TABLE `<table_prefix>ubmegamenu_item`;

DROP TABLE `<table_prefix>ubmegamenu_group_store`;

DROP TABLE `<table_prefix>ubmegamenu_group`;
- Step 3: Once done, run the following commands:
NOTE: You can still keep the developer mode if you continue development process. Otherwise, run the following commands to switch to production mode:
php bin/magento deploy:mode:set production