[Magento 2] UB One Step Checkout
Introduction
UB One Step Checkout is a premium extension for Magento 2 that allows you place all checkout steps on one page. It gives you full control on checkout fields, simply drag and drop to manage your address variations. Address autosuggestion plus many other rich features will get shoppers through your checkout quicker and easier.
This userguide will describe the extension installation process and how to configure all the key features of UB One Step Checkout.
I. Installation Prerequisites
UB One Step Checkout is native with Magento 2.x. Please make sure your system meets the Magento 2 System requirements: here.
II. Download Packages
Navigate to your profile at Ubertheme to download UB One Step Checkout extension:
III. Installation
NOTE: If your deploy:mode is production, you need to switch to Developer mode first (optional). Open your Terminal window, go to Magento 2 directory and run the following commands:
- php -f bin/magento maintenance:enable
- php -f bin/magento deploy:mode:set developer
- Step 1. (Required) Install PHP Mobile Detect Resource APIs
You have to install the PHP Mobile Detect Resource APIs using Composer by requiring the mobiledetect/mobiledetectlib in your project. You can check out How to install PHP Mobile Detect Resource APIs here.
- Step 2. Unzip the download package

- Step 3. Copy and paste the folder app of the package to your web root. You should see the path PATH_TO_YOUR_MAGENTO_2/app/code/Ubertheme/Checkout as on the following screenshot:

- Step 4. Open the command window, then go to web root folder and run the following commands:
NOTE: the command php -f bin/magento module:enable -c Ubertheme_Base is required for UB One Step Checkout v1.0.7 and above.
- php -f bin/magento module:enable -c Ubertheme_Base
- php -f bin/magento module:enable -c Ubertheme_Checkout
- php -f bin/magento setup:upgrade

- Step 5. If you did switch from the production mode to developer mode before installing our UB One Step Checkout, you need to switch back to production mode by running the following commands:
- php -f bin/magento deploy:mode:set production -s
- Step 6: Run the deploy command to regenerate static files:
- php -f bin/magento setup:di:compile (This command is optional which helps to improve your site performance after installation)
- php -f bin/magento setup:static-content:deploy -f
- php -f bin/magento maintenance:disable
Now the UB One Step Checkout extension has been installed on your Magento 2 instance.
IV. UB One Step Checkout Configuration
- General Settings
- Design
- Default Values
- Shipping Address
- Billing Address
- Advance Settings
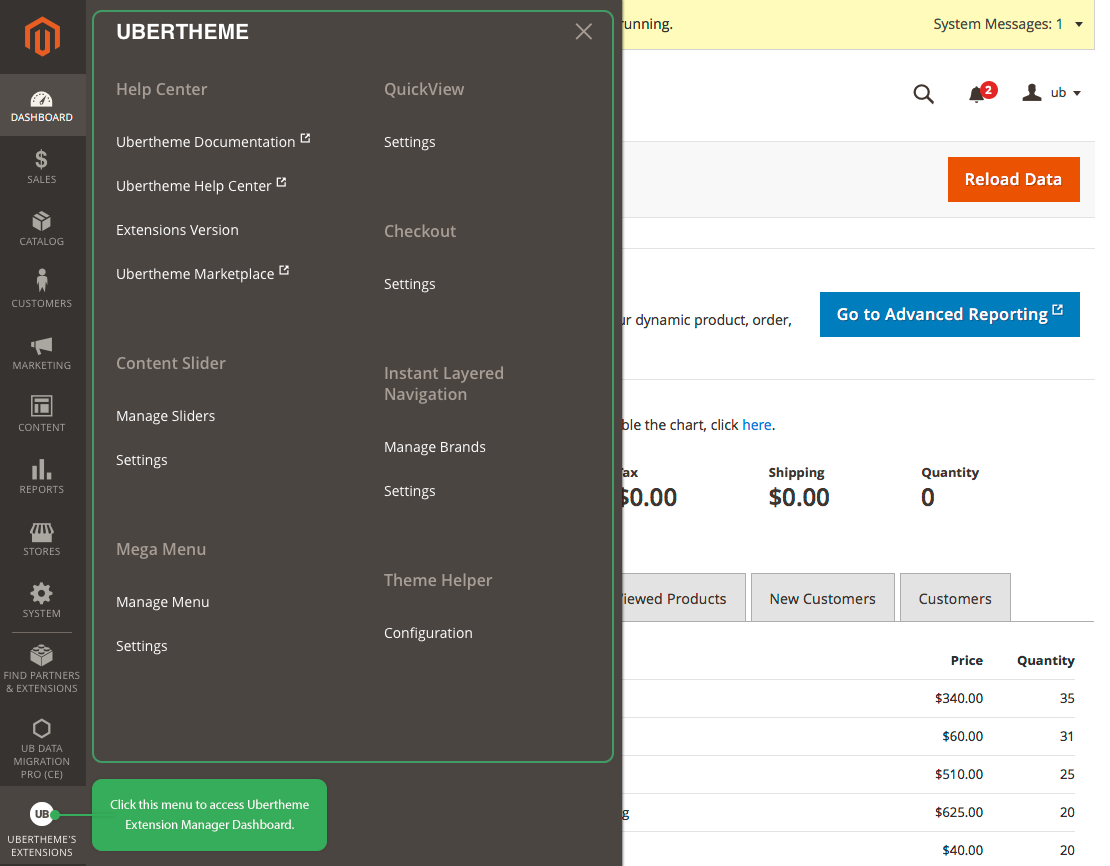
NOTE: Since UB One Step Checkout version 1.0.7 and above for Magento 2.3.1+, we implement a new Ubertheme Extension Manager Dashboard as shown in the screenshot below:
1. General Settings
To start using UB One Step Checkout after installation, you need to a take a few quick steps to make sure all is configured properly. Also, not all of the features are enabled by default.
In your Magento backend, go to Stores | Configuration | Ubertheme| UB One Step Checkout, here’s where you should start:
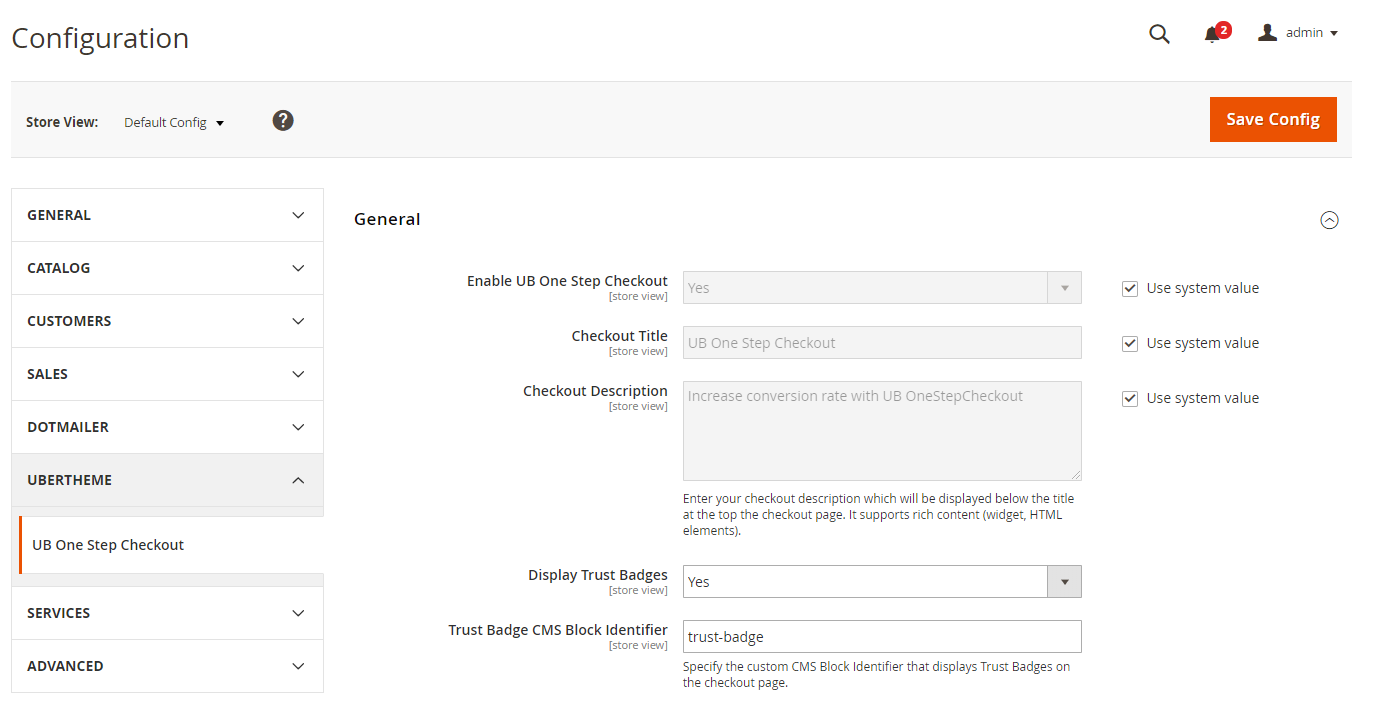
- Enable UB One Step Checkout: If set to Yes, UB One Step Checkout is enabled.
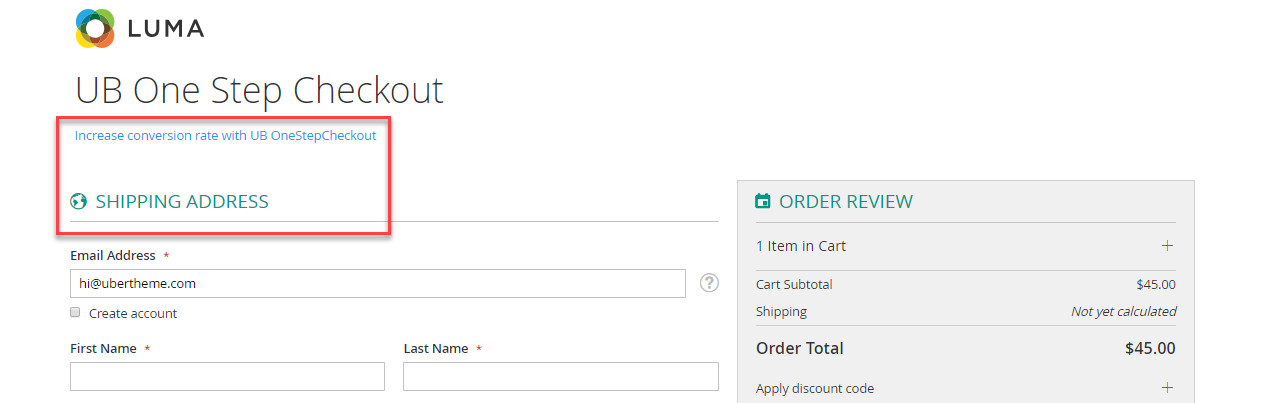
- Checkout Title: Specify a custom title for your one step checkout page
- Checkout Description: Specify a description for your checkout page, for instance important information about taxes, payment etc. It supports rich content (widget, HTML elements).
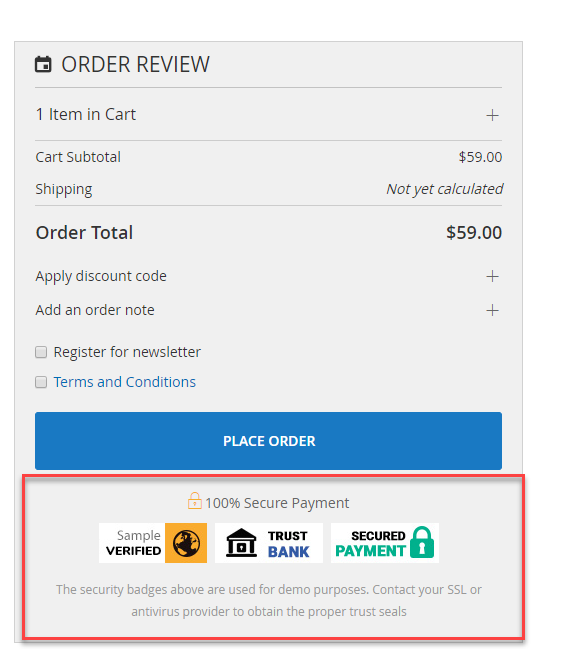
- Display Trust Badges: If set to Yes, show the Trust badges in the Order Review section on the checkout page.
-
Trust Badge CMS Block Identifier : If you enable the Trust badge block, you need (1) to create a CMS block for Trust Badges, then (2) fill in the CMS Block Identifier of such custom block here to display Trust Badges on the checkout page. To create a Trust Badges block, go to Content | Blocks, click Add New Block following this sample. 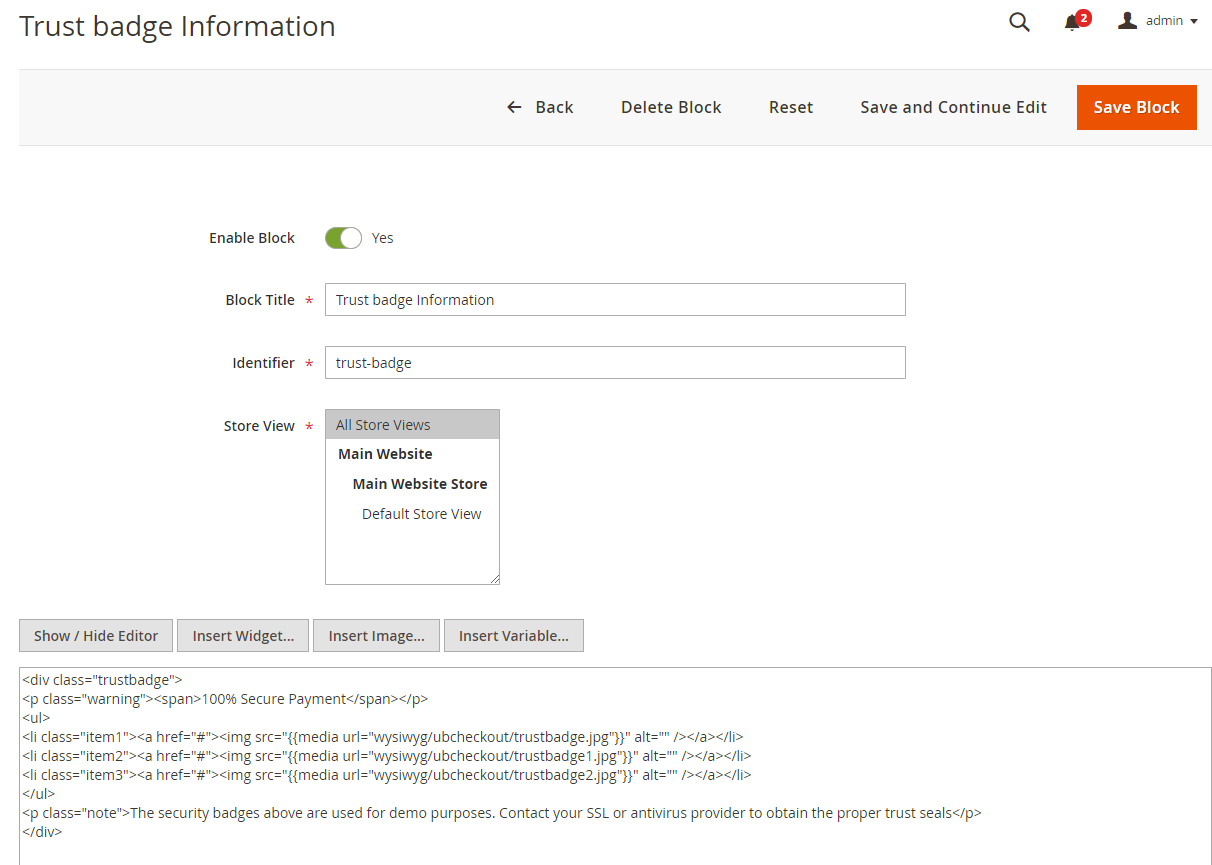
Here’s the shortcode example of the Trust Badges block on our demo (please replace with your own trust badge images and update the path to those files accordingly):
<div class="trustbadge">
<p class="warning"><span>100% Secure Payment</span></p>
<ul>
<li class="item1"><a href="#"><img src="{{media url="wysiwyg/ubcheckout/trustbadge.jpg"}}" alt="Magento 2 one step checkout - Sample trust badge 1" /></a></li>
<li class="item2"><a href="#"><img src="{{media url="wysiwyg/ubcheckout/trustbadge1.jpg"}}" alt="Magento 2 one step checkout - Sample trust badge 2" /></a></li>
<li class="item3"><a href="#"><img src="{{media url="wysiwyg/ubcheckout/trustbadge2.jpg"}}" alt="Magento 2 one step checkout - Sample trust badge 3" /></a></li>
</ul>
<p class="note">The security badges above are used for demo purposes. Contact your SSL or antivirus provider to obtain the proper trust seals</p>
</div>
Front-end Appearance:
2. Design Settings
- Default 2-column layout
- Default 3-column layout
- Custom 2-column layout
- Custom 3-column layout
Important:
- If you already have a Magento 2 theme and want all your store pages and checkout page to look the same (to use the same theme), then you can select either Default 2-column or Default 3-column layouts.
- If you want to use our pre-designed custom layouts, then go with Custom 2-column layout or Custom 3-column layouts.

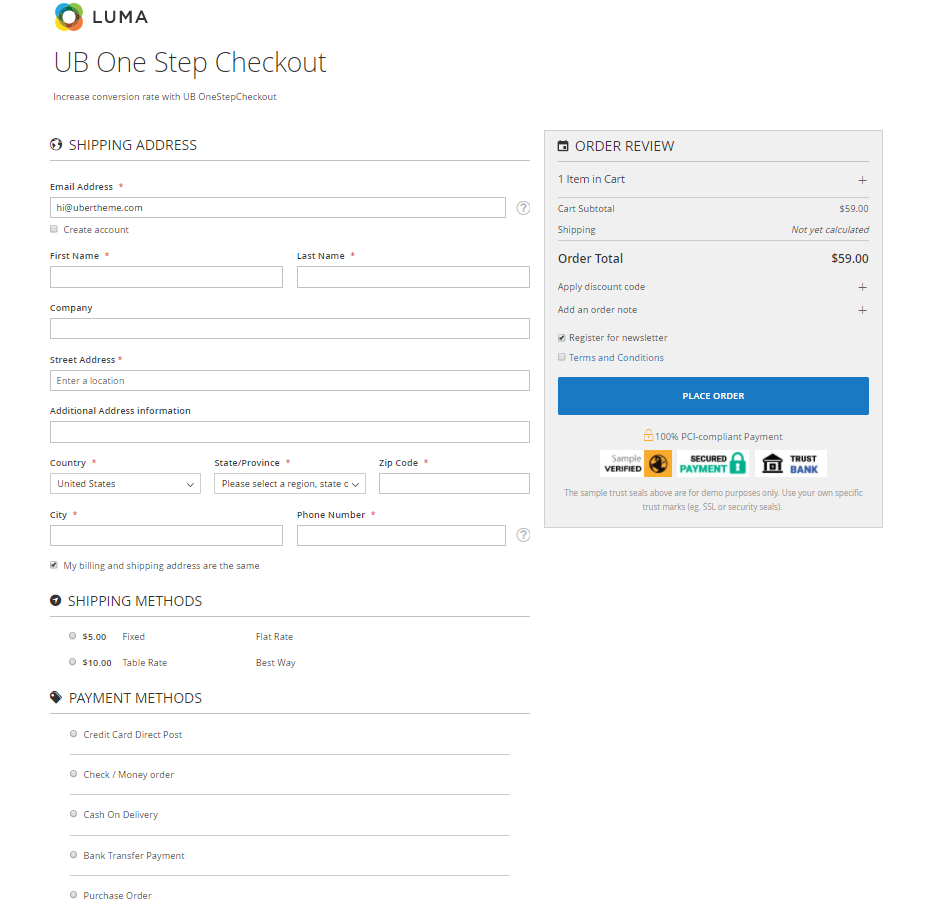
- Checkout Page Layout : Flexible checkout page layout -- the number of columns: two and three columns. Refer to our note above to see when to use Default 2 / 3-column vs. Custom 2 / 3-Column layout.
- Default 2 columns:
- Default 3 columns:
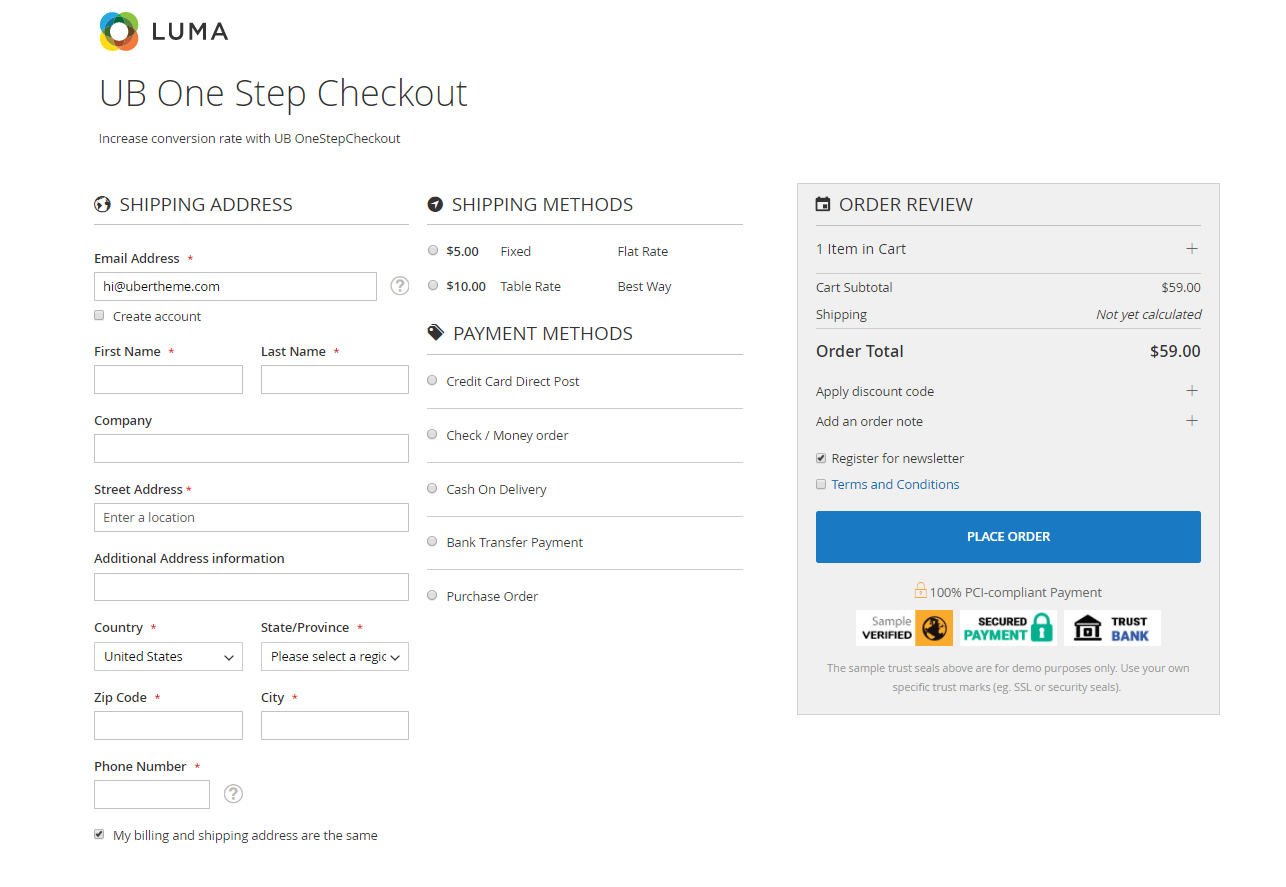
- Custom 2 columns:
- Custom 3 columns:
- Default 2 columns:
- Checkout Title Color: Define the custom color of your checkout page’s title. Simply uncheck the ‘Use system value’, fill in your color value or use the popup Color Picker:
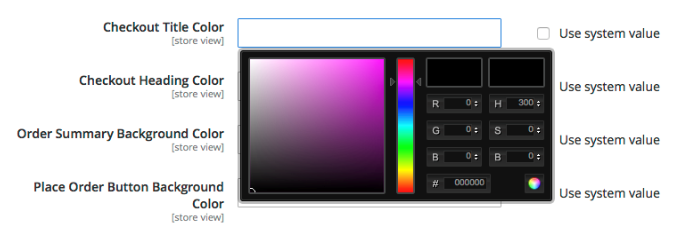
- Checkout Heading Color: Define the custom color of your checkout page’s heading.
- Order Summary Background Color: Define the custom color of your checkout page’s Order Summary Background.
- Place Order Button Background Color: Define the custom color of your checkout page’s Place Order Button Background.
- Custom CSS: Add your custom CSS styles here to override and extend the checkout page your way. If added, you just need click Save Config button, and clear all Magento and browser’s caches to apply your custom modifications.

NOTE:
Default value for the color of title, heading, background etc, are inherited from your theme, either Luma or your 3rd party theme.
The following is a simple example to customize the color of checkout page’s title and description:
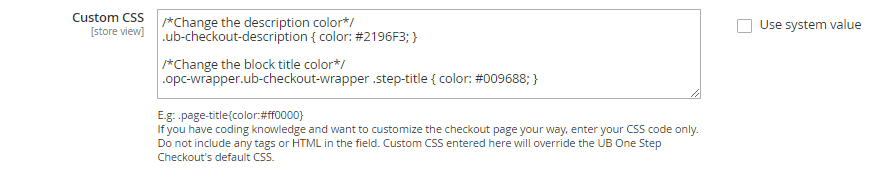
Shortcode to change the color of the checkout page’s description and title:
 /*Change the description color*/
.ub-checkout-description { color: #2196F3; }

/*Change the block title color*/
.opc-wrapper.ub-checkout-wrapper .step-title { color: #009688; }
Front-end Appearance:
3. Default Values
The Default value settings are optional. You can specify those values that will be preselected on the checkout page by default.

- Country: Set the default value of the Country field
- State/Province: Set the default value of the State/Province field
- City: Set the default value of the City field
- Shipping Method: Set the default value of the Shipping Method field
- Payment Method: Set the default value of the Payment Method field
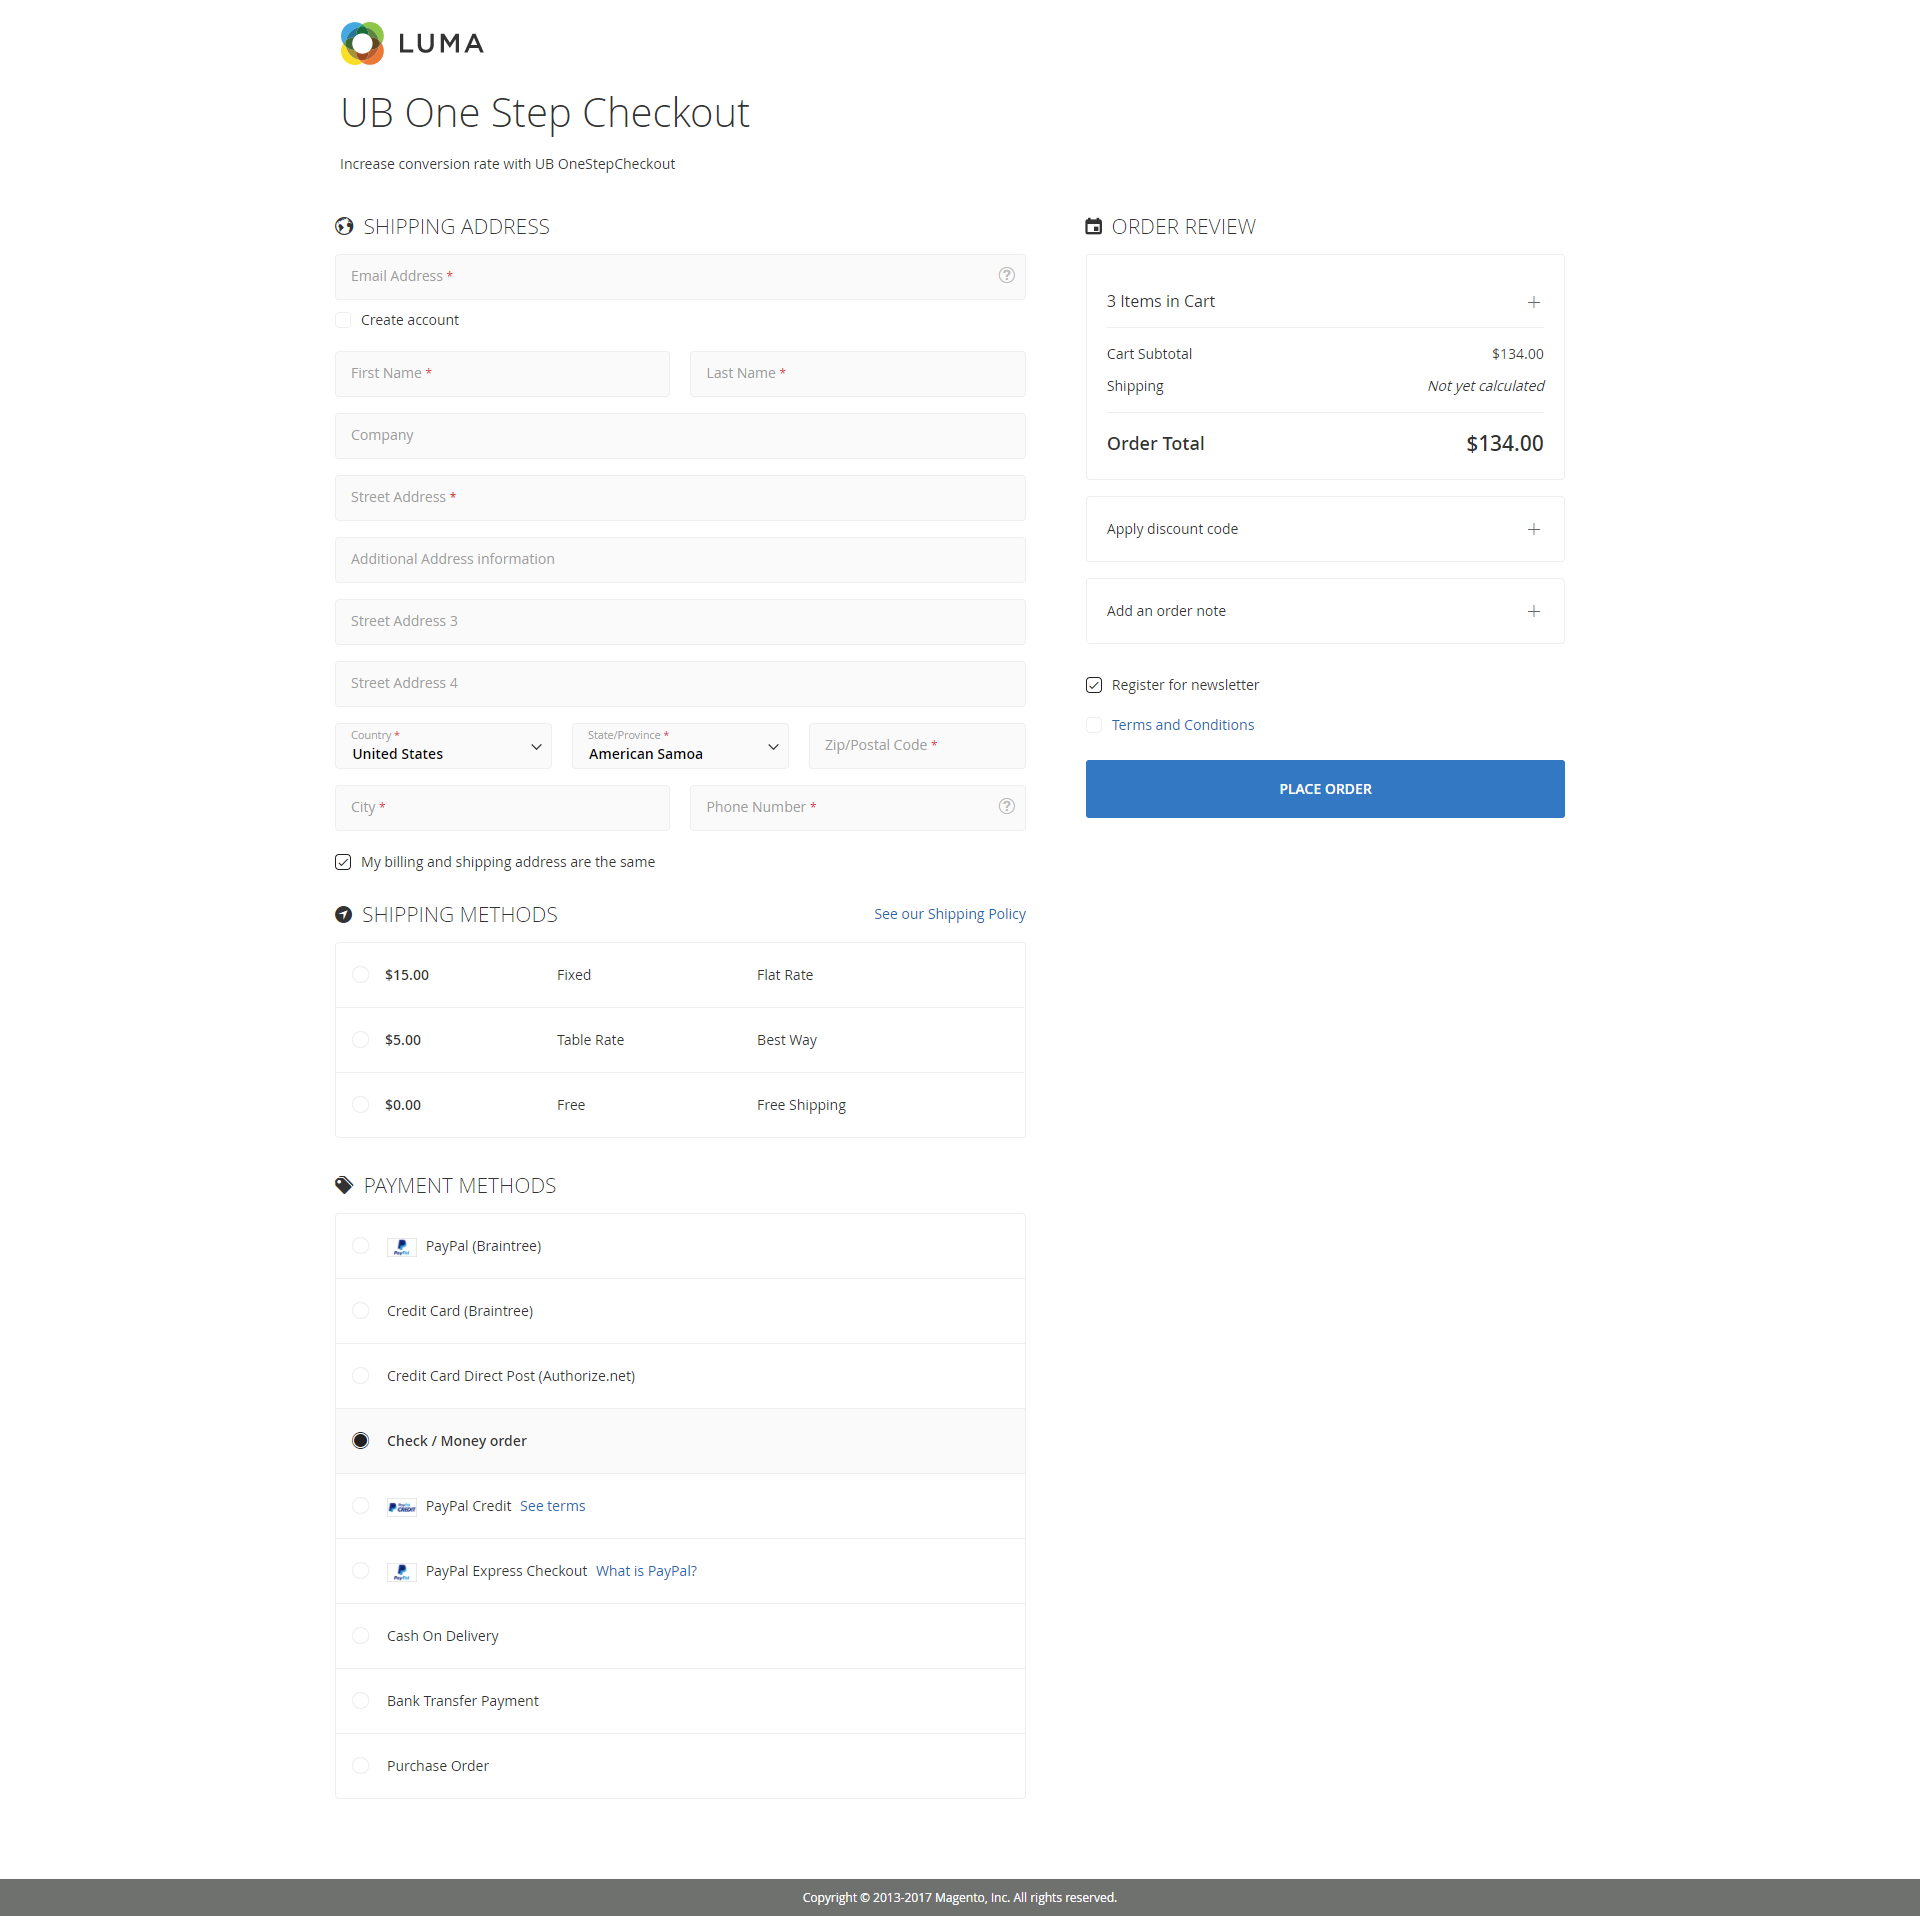
4. Shipping Address Settings
Shipping addresses have a commonly understood structure, however you might need to set up multiple variations of the address block. Street number comes before street name? Need a full-width input field that provides an adequate amount of room for longer answer?
No problem. UB One Step Checkout allows you to set up multiple variations in address fields. You can easily enable/disable, check required fields and rearrange the positions of fields. You can rename label fields, change width of each field.

As per the screenshot above, you can see all the fields required by Magento 2 are not allowed to modify, including:
- First Name
- Last Name
- Street Address
- Country
- State / Province
- Zip/Postal Code
- City
- Phone Number
For the rest, you have full control to set up your way. Simply define your own fields’ labels and width; specify which fields to be required or enabled.

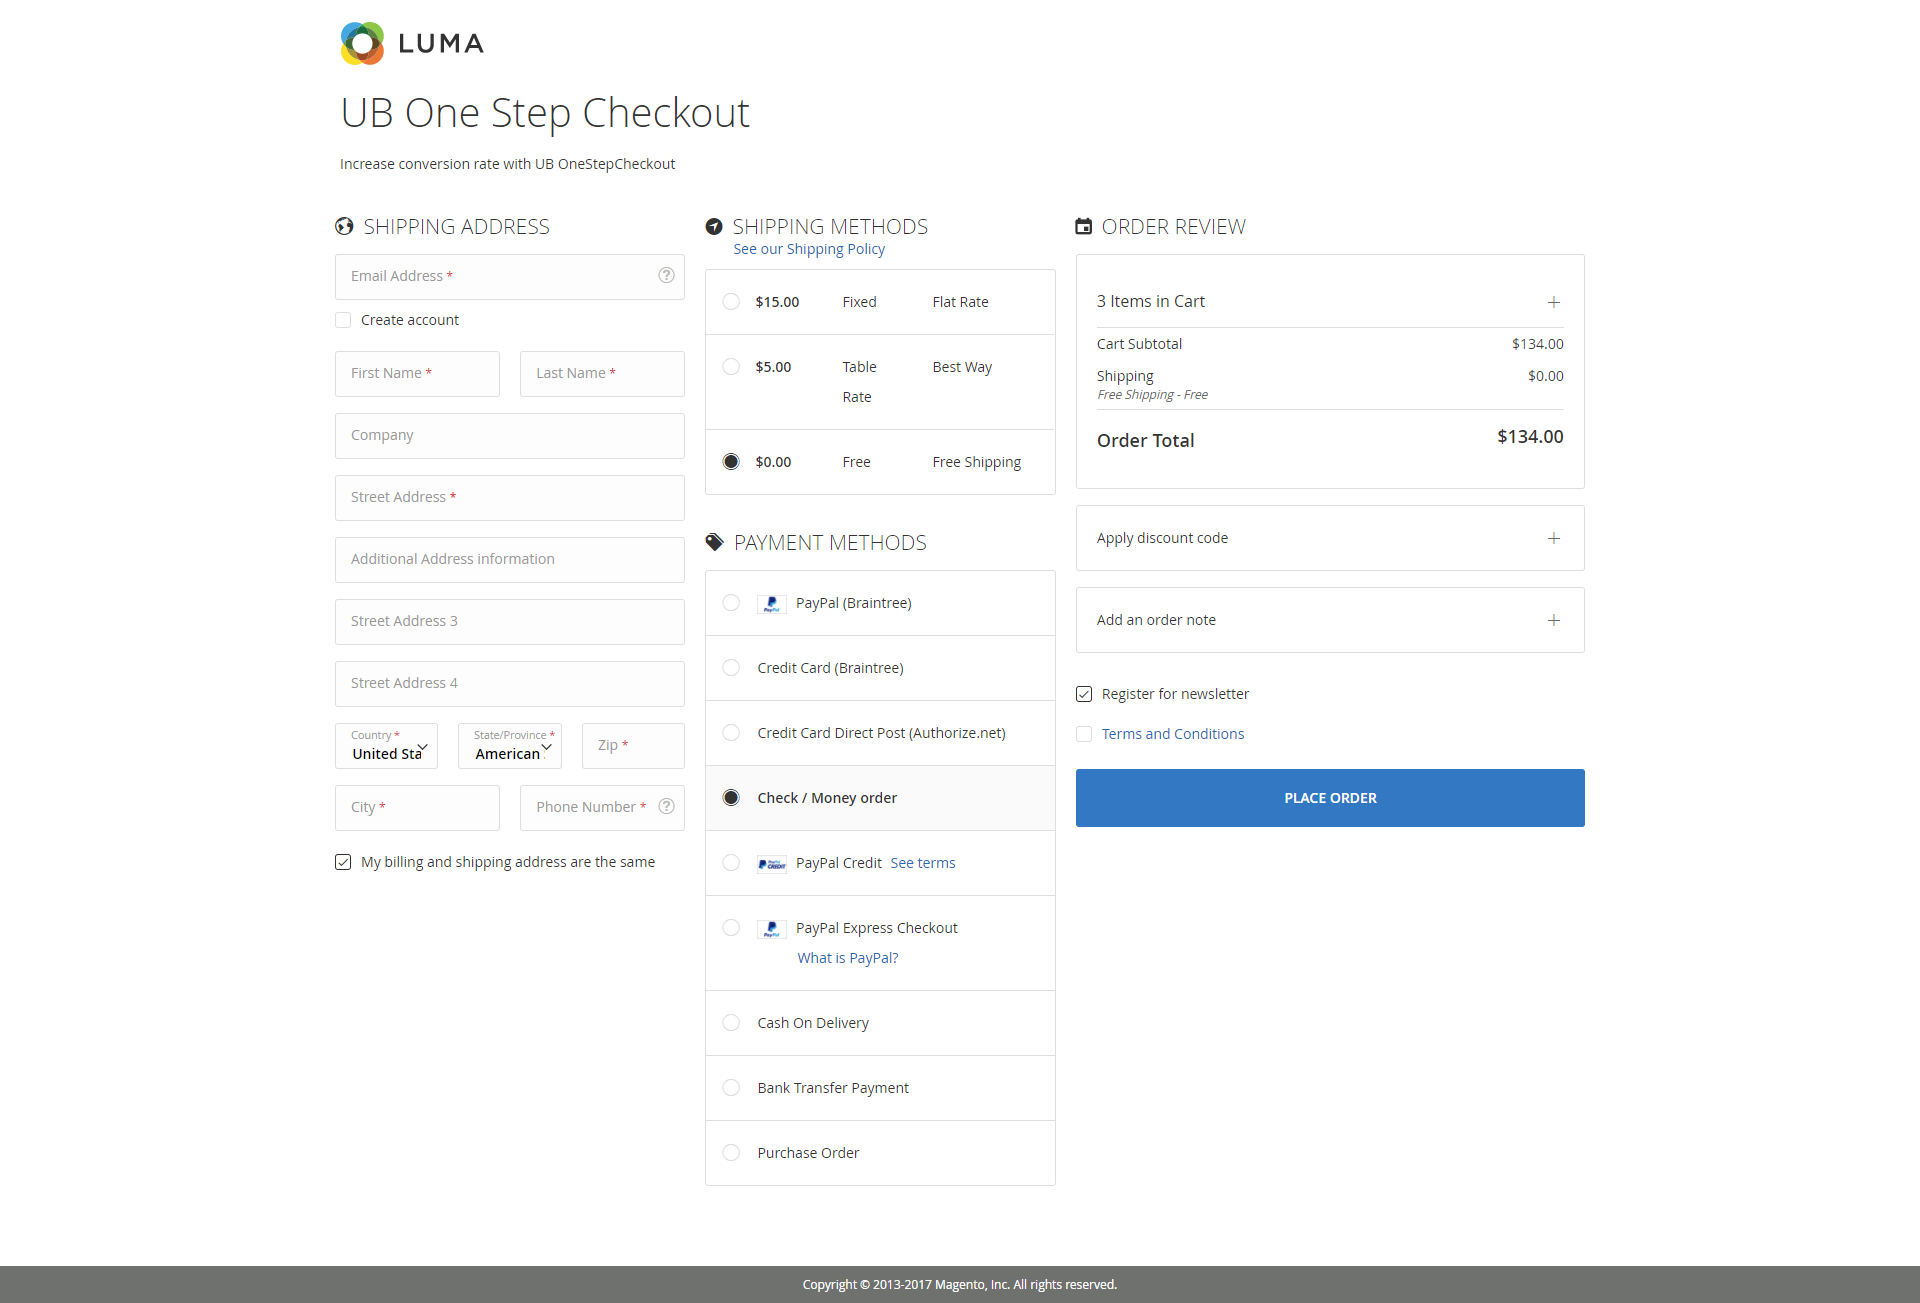
Drag and drop to reposition each single address field:

NOTE: Configure multiple fields in one row
You can control the number of fields (columns) within a row. The width works proportionally and you can set fractures of the whole column width which contains 4 portions. Available options for Width:
- 1 Column
- ½ Column
- ⅓ Column
- ¼ Column
Example: If you set the width ½ column for the Country field and ½ column for the State/Provine field, then you will have both Country and State/Province fields in a row. If you set the Company field with 1 column, then it will strive to be 100% of row width.
5. Billing Address Settings
You can flexibly manage the Billing Address in the same way like the Shipping Address.
By default, UB One Step Checkout sets the billing information to be the same as the shipping information. Simply set No to the ‘Billing and Shipping fields are the same’, and configure the Billing address to meet your requirements, if you choose to.

6. Advanced Settings
We will add more set of features to UB One Step Checkout, including Advanced Setting section. For now, you can find some starting functionalities below:
6.1 GeoIP
GeoIP2 API integration in UB One Step Checkout allows to detect customer address automatically based on the IP address. To enable the GeoIP2 option, please follow steps below:
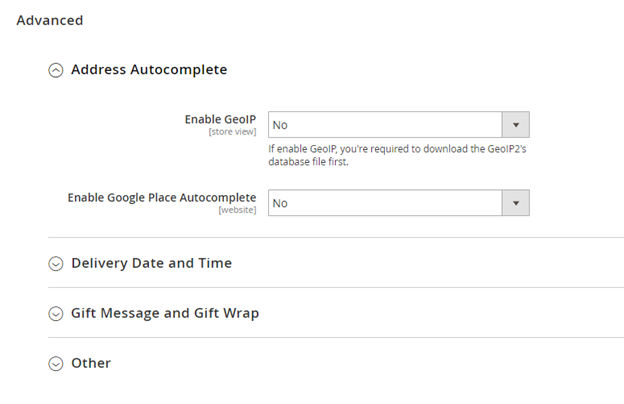
- Step 1: Go to Store | (Settings) Configuration | Ubertheme | UB One Step Checkout, navigate to Advanced | Address Autocomplete section, set ‘Yes’ to Enable GeoIP.
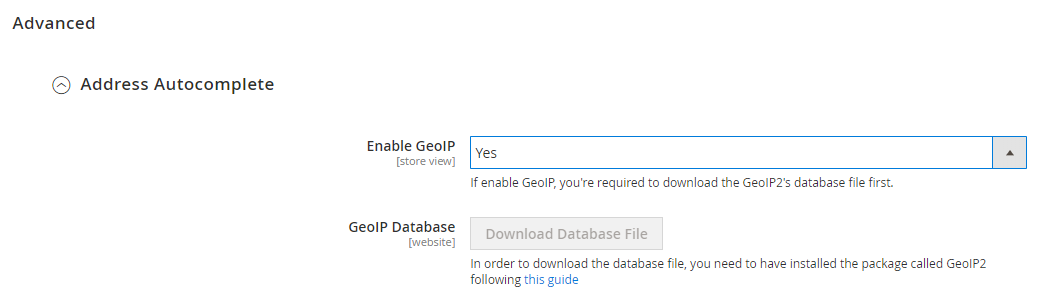 IMPORTANT: You’re required to download the GeoIP2’s database file before the GeoIP address detection is ready for use.
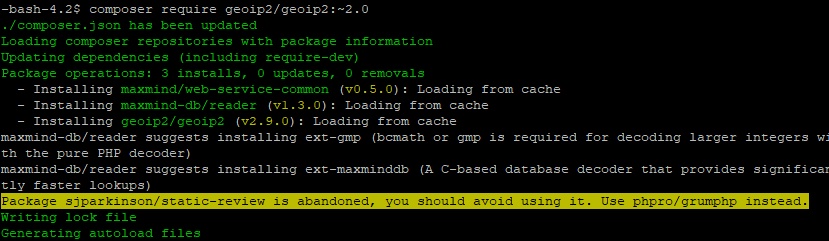
 - Step 2: In order to download GeoIP2’s database file, you need to have installed the package called GeoIP2 first. Follow these steps:
- Open the terminal (Unix-based) or command prompt (Windows)
- Go to the root directory of your Magento installation
- Run the command: composer require geoip2/geoip2:~2.0
 NOTE: Magento uses Composer to manage dependencies and upgrades in Magento Open Source. If you’re new to Composer, please read more via Magento guideline and how to install Composer here.


Once done, refresh your Admin panel, you should see the Download Database File button enabled.

- Step 3: Click the Download Database File button, you will see the result as on the screenshot below:

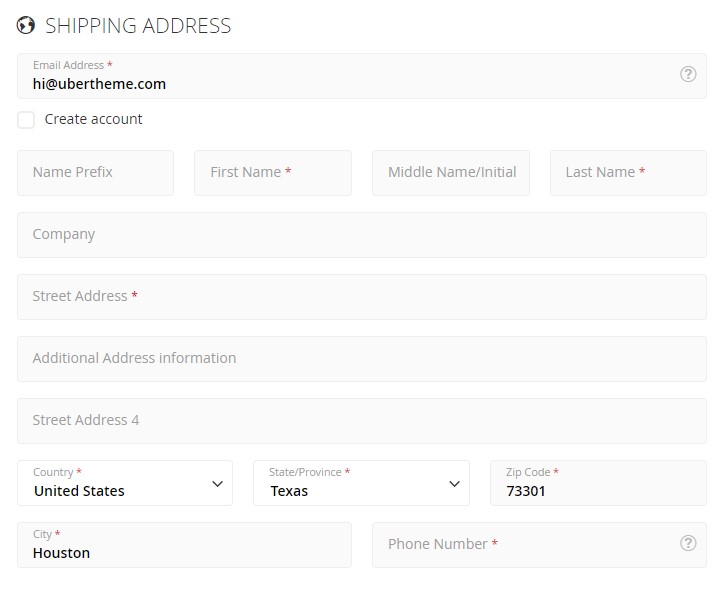
Now back to your storefront, once you add an item to cart and checkout for testing, GeoIP will automatically fill in the country, state, zip code and city based on your specific IP address.
6.2 Address Autocomplete
- Enable Google Address Autocomplete: Set “Yes” to enable Enable Google Address Autocomplete.
- Google Place API Key: fill in the Google Place API key to activate Google Address Autocomplete functionality. Learn how to get the API key here.

With Address Autocomplete enabled, the pick list of place predictions will be shown when the customer enters the address details. And the API will automatically find and fill the state, city respectively when the customer selects an address from the list of suggestions.

6.3 Delivery Date and Time
6.3.1 Delivery Date & Time
If you enable the Date and Time settings, the customers can choose their preferred Delivery date and time for the order on the checkout page.
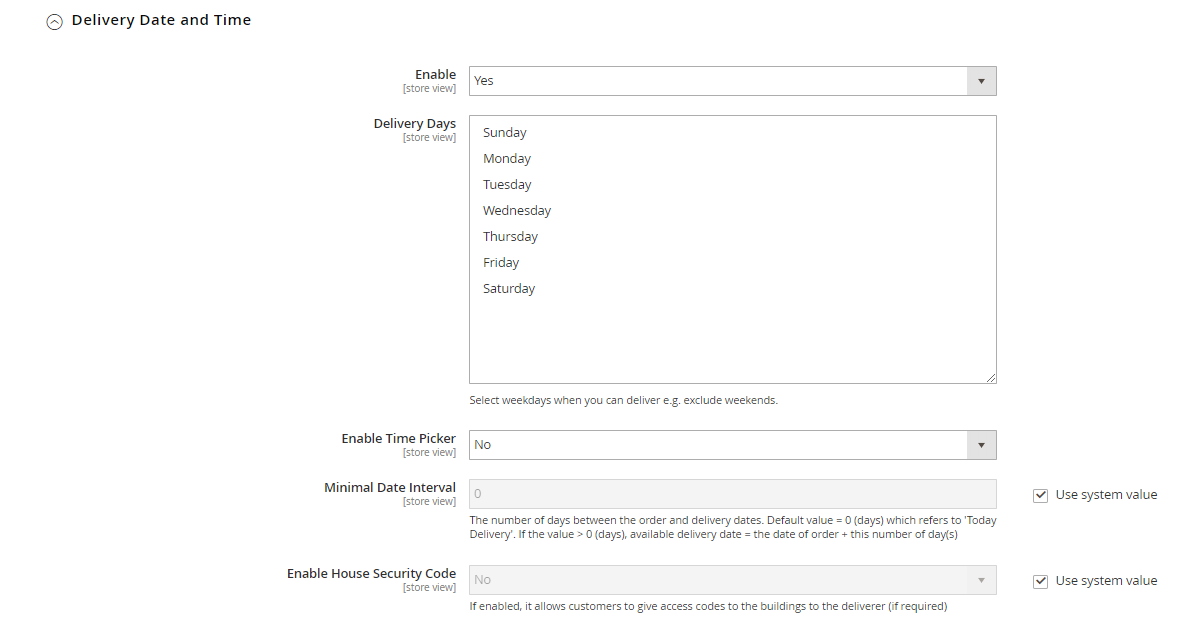
- Enable: Set “Yes” to enable Delivery Date and Time.
- Delivery Days: Select the weekdays on which you do deliver. In order to select multiple days, press and hold the Command / Ctrl key, then click the days you enable for delivery.

- Enable Time Picker: Set “Yes” to Enable Time Picker.
- Delivery Time Ranges: Allow to set up delivery time along with the delivery date on the checkout page. Click the Add New button, then set the Start hours and the End hours for the time sliders. Once enabled, your customers can pickup a delivery slot from within such specified time range only.
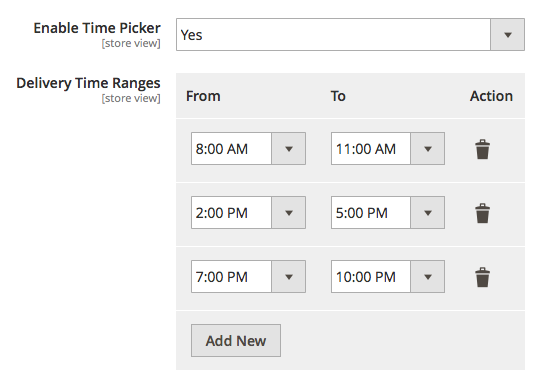
- Minimal Date Interval:This feature refers to the number of day(s) between the order and delivery dates. If you set 1 day in the Minimal Date Interval field, your customer will see the first available date for delivery = the date of order + 1 day.That means, if a customer places an order on 8 July 2018, they can select a delivery date starting from 9 July 2018 in the delivery date calendar, and 8 July 2018 will be disabled. In oder to set up the same day delivery, just leave the Minimal Date Interval blank. Same day delivery refers to the day on which the customer places an order and want the delivery on that day itself.

- Enable House Security Code: If enabled, it allows customers to give access codes to the buildings to the deliverer

- Delivery Note: With Delivery Note, customers can leave any other information about their order delivery. To enable Delivery Note, go to Stores | Configuration | UberTheme | UB One Step Checkout | Advanced | Other, click Order Note and select Display in Delivery Time. If Delivery Date & Time is not enabled, you can place the Delivery Note under the Order Review block instead.
6.3.2 Include Delivery Date & Time info in the Order Confirmation Email
As a customer makes purchase in your store, Magento sends an Order Confirmation email based on your configuration to notify customer about his purchase.
To include the Delivery Date & Time in this email notification which are sent to the customers, you need to customize default Magento 2 transactional email template following these steps:
- Create a new e-mail template
- Assign this e-mail to the appropriate sales email.
Step 1: Create a new e-mail template:
- Go to Marketing | Email Templates, click on Add New Template.
- Select the New Order(Magento/luma) as default template. Since we’re using the Luma theme for this guide, we choose New Order (Magento/luma) as our default template.
- Click Load Template. This will load the base header template into your New Template form as on this screenshot:
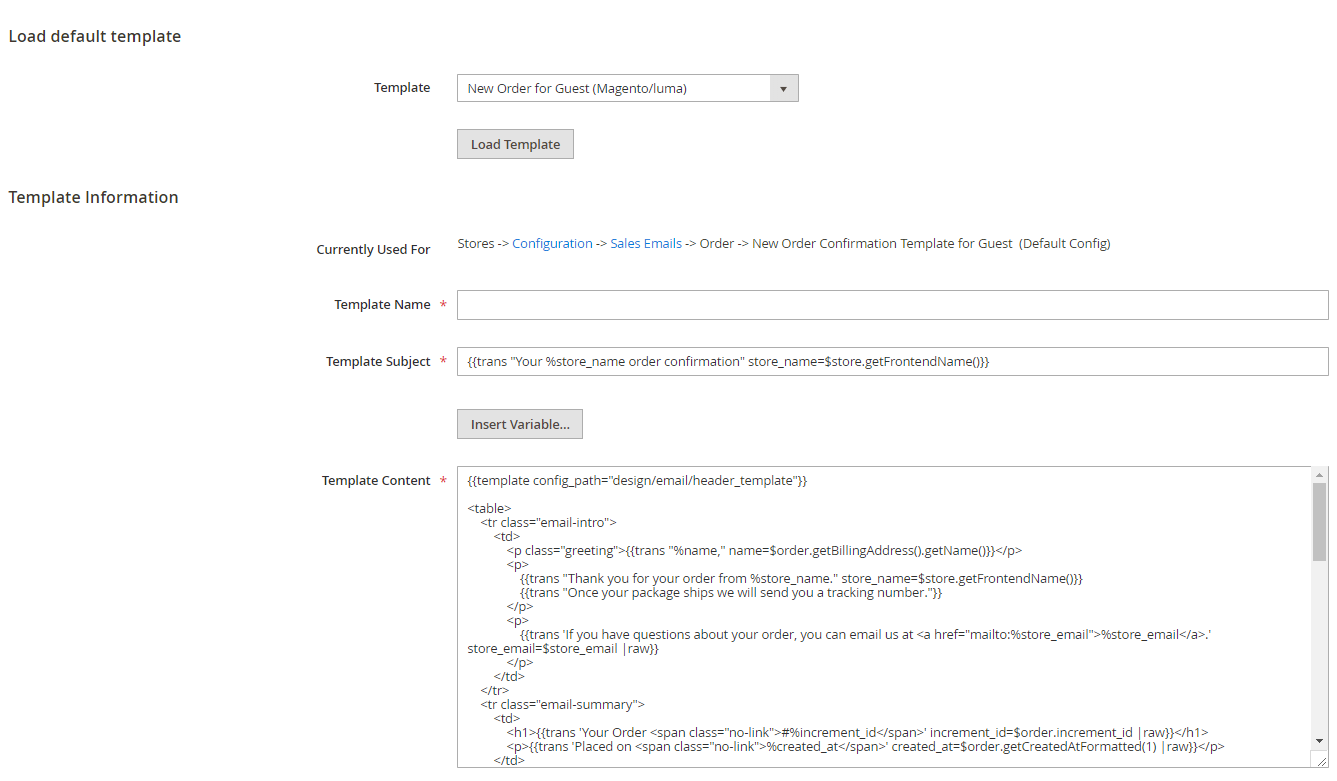
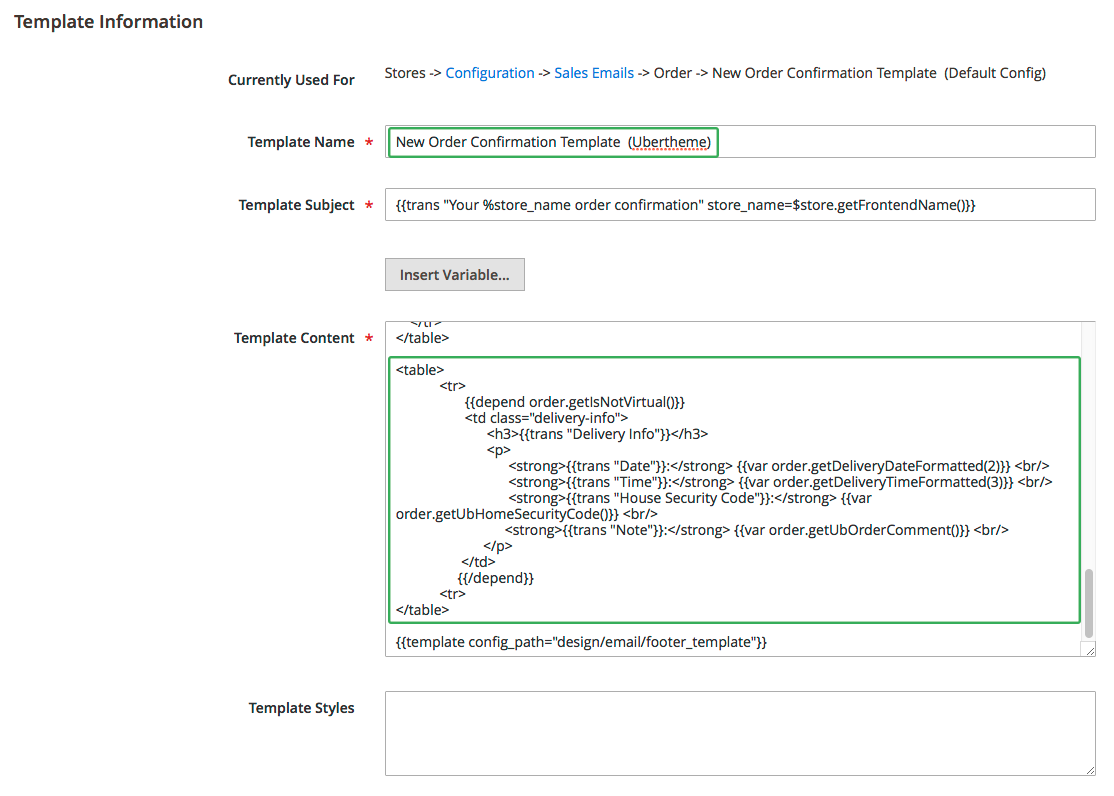
- Give the new e-mail template a suitable name. For the demo purpose of this guide, we use New Order Confirmation Template (Ubertheme).
- For Template Subject, you can adjust it a bit or keep it unchanged
- For Template Content, insert the following code block to display the Delivery Date & Time. For the purpose of this guide, we place such code at the bottom of the Template Content, right above the Footer:
You can copy the HTML code and paste into your Template Content field:
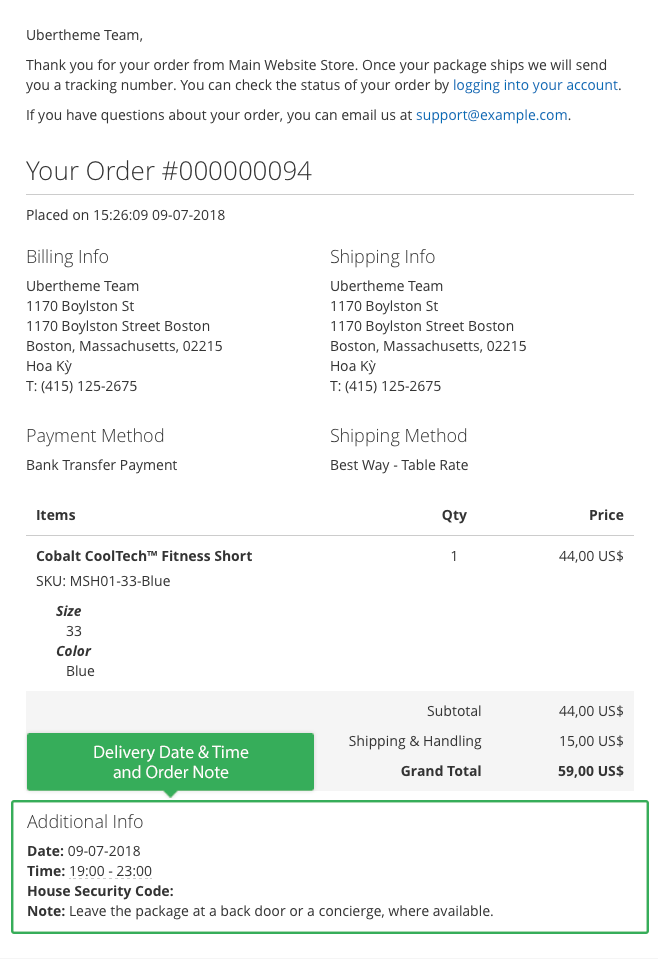
<table> <tr> {{depend order.getIsNotVirtual()}} <td class="delivery-info"> <h3>{{trans "Additional Info"}}</h3> <p> <strong>{{trans "Date"}}:</strong> {{var order.getDeliveryDateFormatted(2)}} <br/> <strong>{{trans "Time"}}:</strong> {{var order.getDeliveryTimeFormatted(3)}} <br/> <strong>{{trans "House Security Code"}}:</strong> {{var order.getUbHomeSecurityCode()}} <br/> <strong>{{trans "Note"}}:</strong> {{var order.getUbOrderComment()}} <br/> </p> </td> {{/depend}} <tr> </table> - Template Styles: If you wish to add CSS styles to this e-mail content, you can add the CSS styling in this field.
- Once you have inserted the code, you can save it by clicking Save Template.
NOTE: If you do not enable Home Security Code, you can remove this line:
<strong>{{trans “House Security Code”}}:</strong> {{var order.getUbHomeSecurityCode()}} <br/>
Step 2: Assign this e-mail to the appropriate sales email.
Now that you have created a new order template, you need to assign this template to the appropriate sales email:
- Go to Stores | Configuration | Sales | Sales Emails.
- Expand Order panel, uncheck New Order Confirmation Template checkbox and select E-mail template which you just created above.
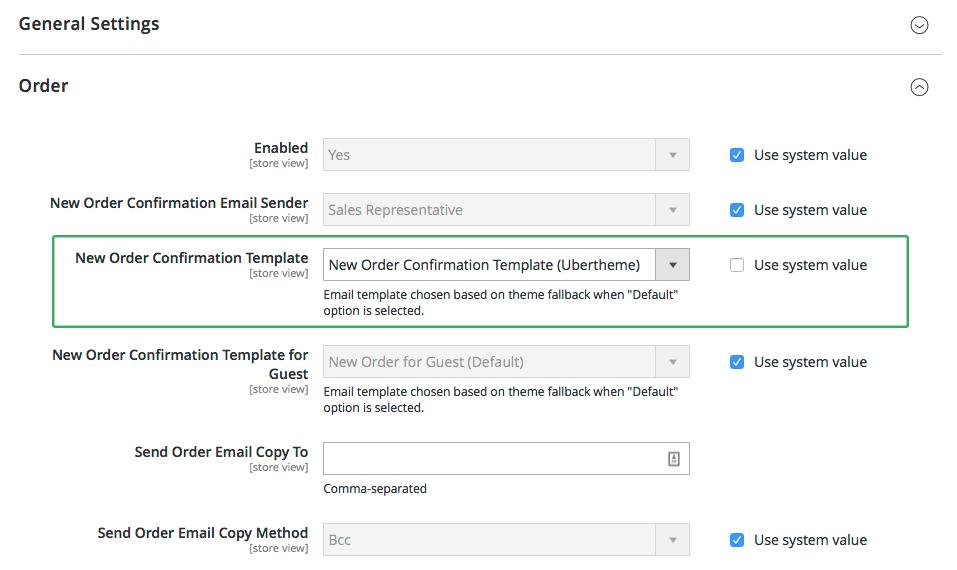
- Click Save Config.Once done, the Delivery Date & Time, House Security code and Delivery Note will be included in the order confirmation e-mail sent to your customers, as shown in the following screenshot:
To include Delivery Date & Time in other transactional emails, simply follow similar steps above.
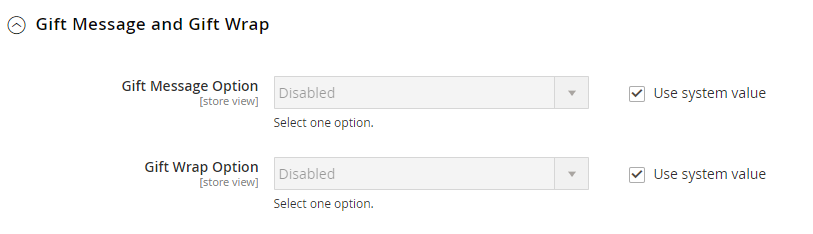
6.4 Gift Message and Gift Wrap
Gift Message and Gift Wrap are the new features released in the UB One Step Checkout ver 1.0.3.
These options allow customers to include free gift message(s) at the checkout page which will be usually printed on the packing slip. If customers want to add a special touch to their gift, they can add gift wrap option as well. Both Gift Message and Gift Wrap are optional settings.
By default, Gift Message and Gift Wrap are disabled when you install UB One Step Checkout as shown in the screenshot below:
6.4.1 Gift Message
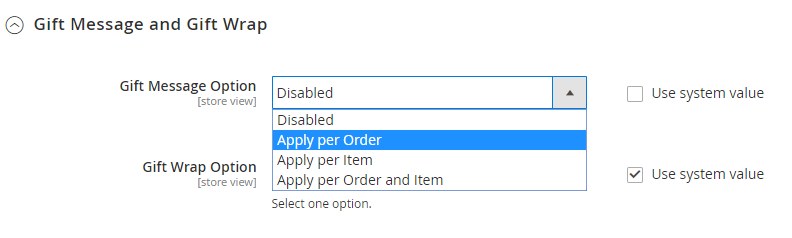
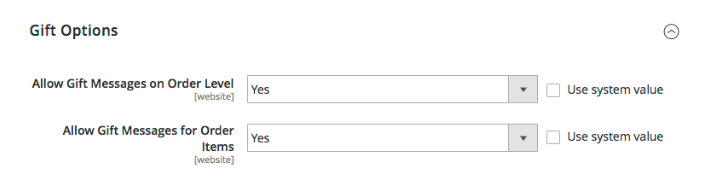
To enable Gift Message:
- Go to Store | (Settings) Configuration | Ubertheme | UB One Step Checkout, navigate to Advanced | Gift Message and Gift Wrap section.
- Uncheck Gift Message Option checkbox and select one of the three setting options -- Apply per Order, Apply per Item, or Apply per Order and Item. If Apply per Order and Item is enabled, you will see Add a Gift Message checkbox and Gift Message links under every single product items on the Order Review block (providing that the Allow Gift Message option is enabled in each product setting -- You can check by going to Catalog | Products, click on a product and navigate to Gift Options section).
- When prompted to update the Page Cache, click the Cache Management link at the top of the workspace. Then, follow the instructions to refresh the cache.
Here is an example of the storefront when enabling Apply per Order and Item.
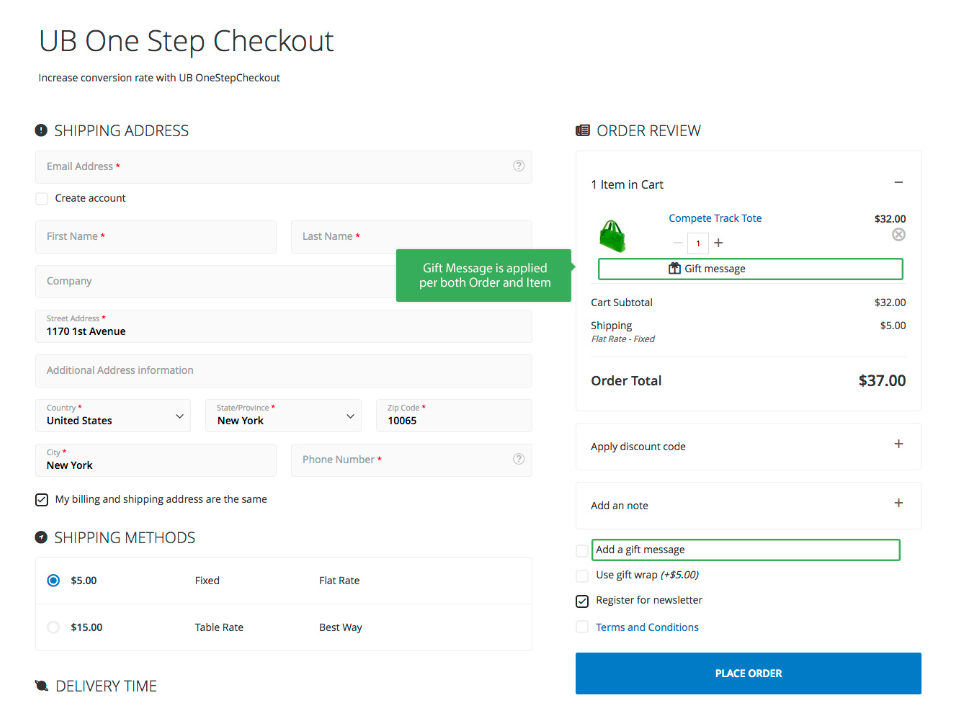
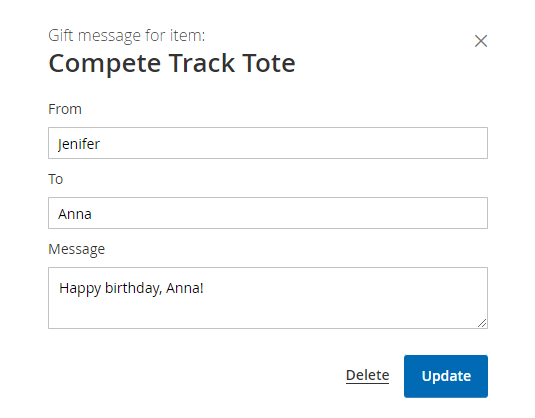
You may be able to add different gift messages for each product item, just click the “Gift Message” link under each product item and enter your message. Besides, you can also update or delete each message.
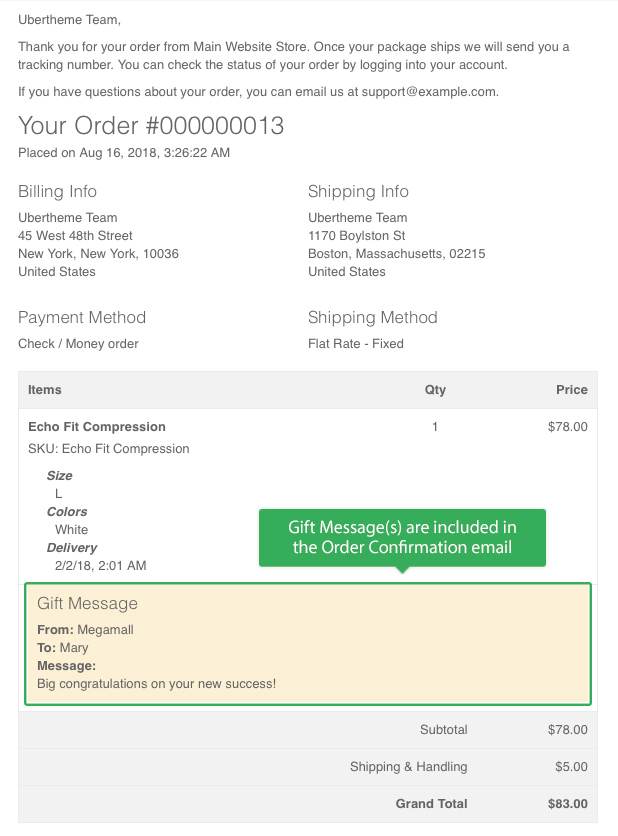
Once a customer places an order, all Gift Message(s) will be included in the Order Confirmation email that is sent over to the customer, as shown in the following screenshot (we simply use default Magento 2 Order Confirmation email, you can determine the format of email your way):
Customer can also log in My Account | My Order dashboard to view all of the Order history.
6.4.2 Gift Wrap
To enable Gift Wrap:
- Go to Store | (Settings) Configuration | Ubertheme | UB One Step Checkout, navigate to Advanced | Gift Message and Gift Wrap section.
- Uncheck Gift Wrap Option and select one of the Gift Wrap types -- Calculate per Order or Calculate per Item.
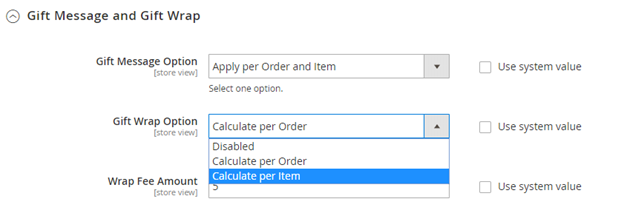
- Once Gift Wrap Option is selected, Wrap Fee Amount field will appear accordingly. By default, Wrap Fee Amount is 0. You can enter the gift wrap fee you want.

Once an order is placed, customer will receive an Order Confirmation email as shown in the following sample:
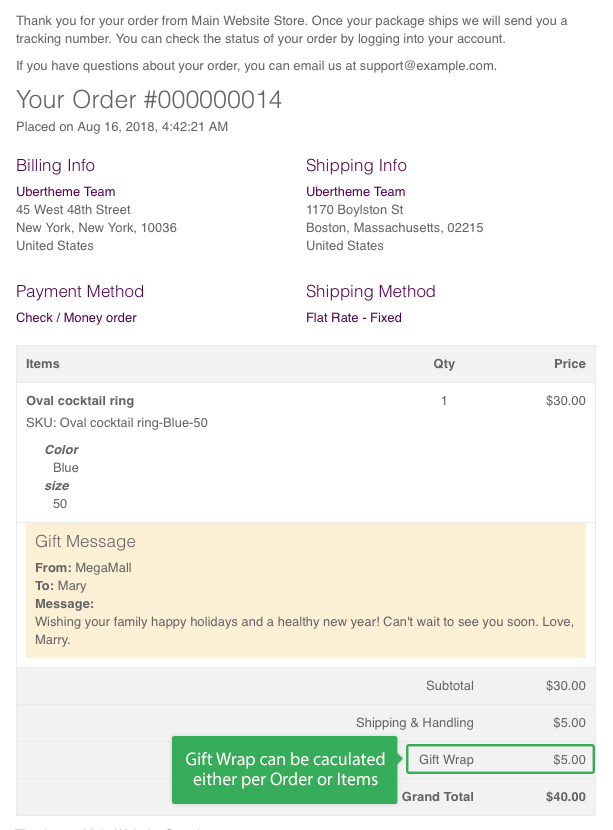
For Shop Owner, he simply navigates to the Order workspace in the backend to see the lists of all current orders. Gift Message and Gift Wrap fee are stored under each order accordingly.
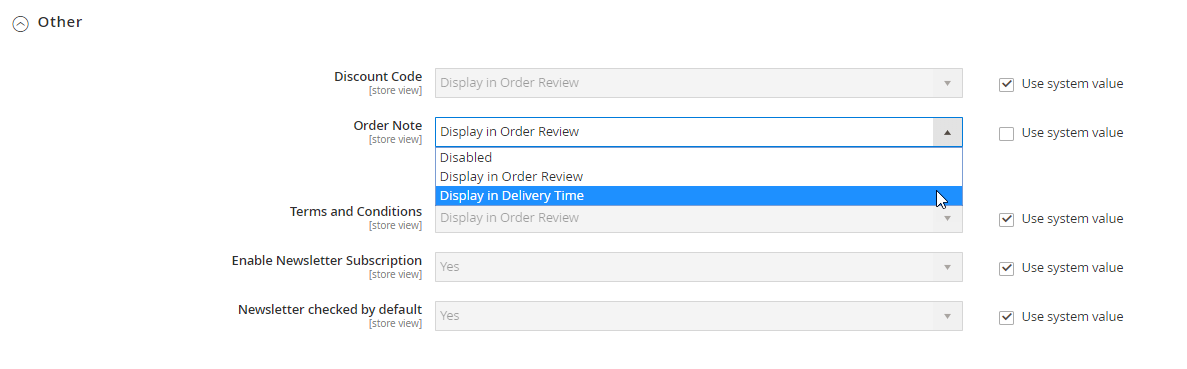
6.5 Other
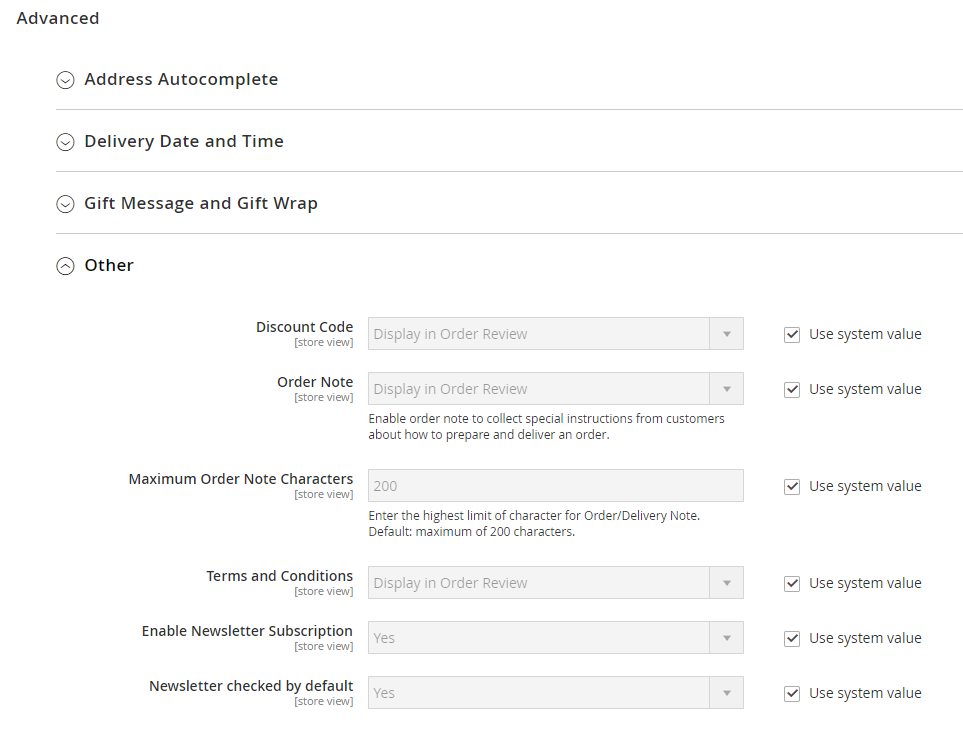
- Discount Code : Show or hide Coupon Code block in the checkout page. If enabled, you can select Display in Payment Method or Display in Order Summary to display the Coupon Code block under Payment Method block or Order Summary block.
- Order Note : The Order Note block allows you to collect special instructions from customers about how to prepare and deliver an order. You can select Display in Delivery Time or Display in Order Summary to display the Order Note under Delivery Time block or Order Summary block.
- Maximum Order Note Characters : Allow to limit the maximum characters of the Order Note. By default, Maximum Order Note Characters is 200. You can enter the highest limit of character you want.
- Terms and Conditions : It’s similar to the Discount Code block. You can flexibly show the Terms and Conditions under the Payment Method block or Order Summary block. To enable Terms and Condition in the checkout page, navigate to your Magento backend | Stores | (Stores) Terms and Conditions. Click ‘Add New Condition’ button to create your Terms and Conditions content.
NOTE:
The Enable/Disable Terms and Conditions setting is auto synced between UB One Step Checkout and default Magento’s setting. For instance, if you enable the Terms and Conditions in UB One Step Checkout’s setting panel, the ‘Enable Terms and Conditions’ under Stores | Configuration | Sales | Checkout is enabled as well, and vice versa.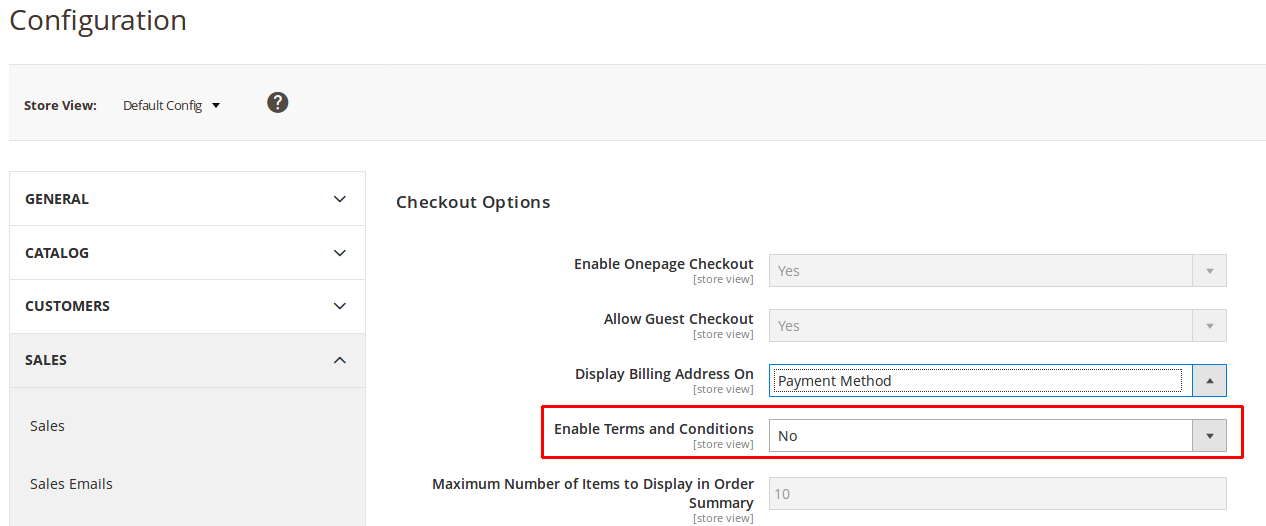
- Enable Newsletter Subscription : Enable or disable the Newsletter Subscription
- Newsletter checked by default : If select “No”, default checkbox Newsletter is un-checked
7. FAQs
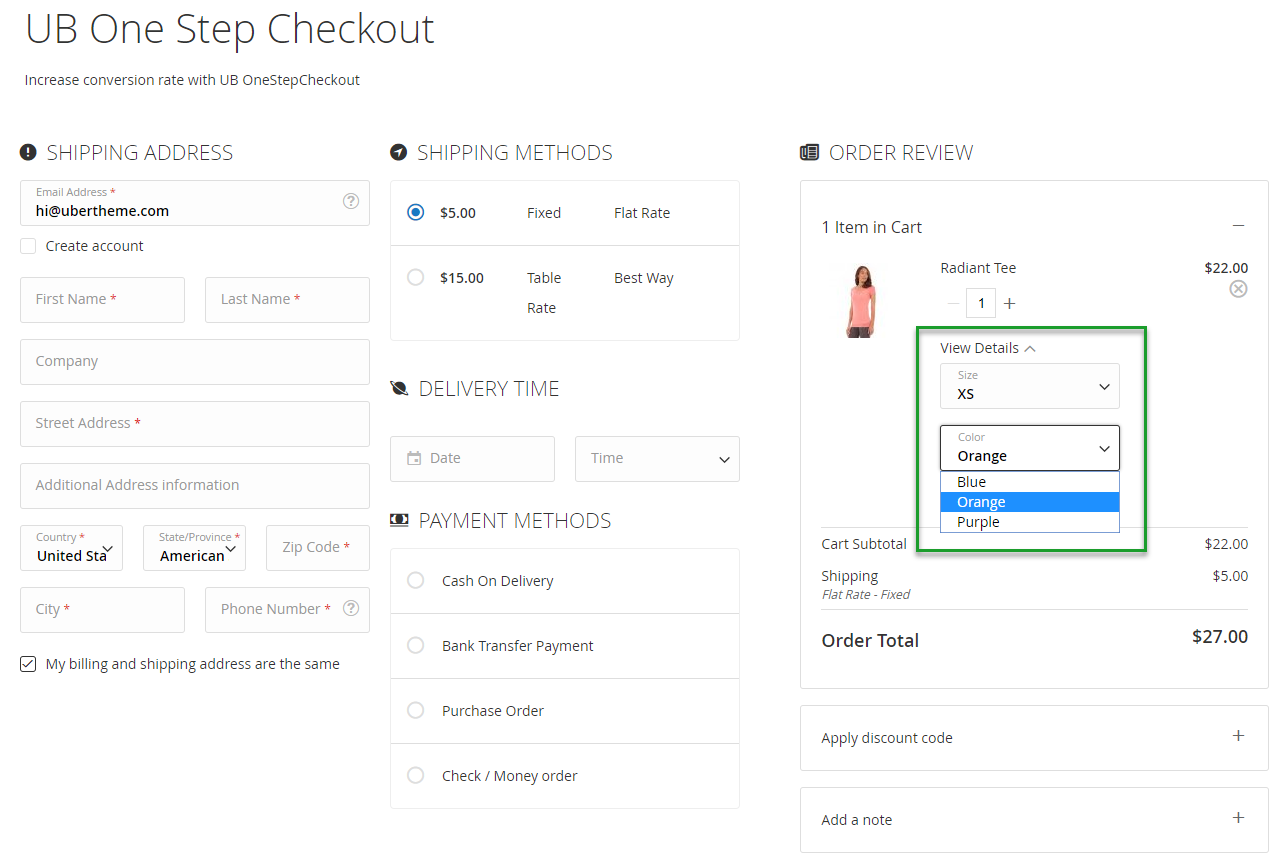
7.1 Configure the Mini Cart thumbnails (optional)
If you have a different image for each product variation (e.g. color ..), you can set the configuration to use the correct image for the mini cart thumbnail on the checkout page. Please follow steps below:
- Step 1. Navigate to the Admin sidebar | Stores | Configuration | Sales | Checkout. Then, expand the Shopping Cart section.
- Step 2. Uncheck Configurable Product Image checkbox and select Product Thumbnail Itself.
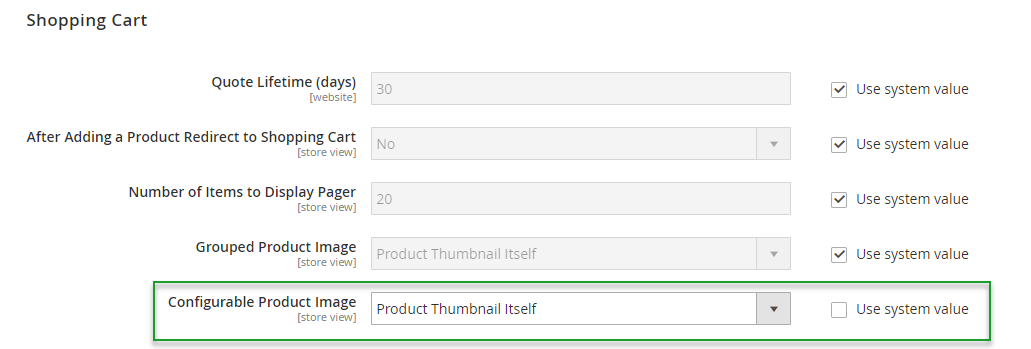
- Step 3. Click Save Config.
Once done, when customer changes the attributes (e.g. color) on the one step checkout page, the product variation’s thumbnail will be changed accordingly.
7.2 How to display the header and footer on the UB One Step Checkout page
Magento 2 removed both the header and footer sections on the checkout page by default. If you want to enable both the header and footer on the UB One Step Checkout page, then follow steps below:
- Step 1. Copy this xml file: app/code/Ubertheme/Checkout/view/frontend/layout/onestepcheckout_index_index.xml
and place it under the path: app/design/frontend/YOUR_THEME_VENDOR/YOUR_THEME/Ubertheme_Checkout/layout/onestepcheckout_index_index.xml
- Step 2. Open the xml file you have just cloned, find the line:
<page xmlns:xsi="https://www.w3.org/2001/XMLSchema-instance" layout="checkout" xsi:noNamespaceSchemaLocation="urn:magento:framework:View/Layout/etc/page_configuration.xsd">
and replace it with:
<page xmlns:xsi="https://www.w3.org/2001/XMLSchema-instance" layout="1column" xsi:noNamespaceSchemaLocation="urn:magento:framework:View/Layout/etc/page_configuration.xsd">
- Step 3. Open the Terminal window, go to your web root folder and run the command below:
- php -f bin/magento cache:clean
Front-end Appearance:

8. Manual Uninstallation
If you want to have UB One Step Checkout extension uninstalled, please follow steps below:
- Step 1: Disable UB One Step Checkout module and clean associated database tables
-- Open your terminal, go to your Magento2 folder <your magento installation path> and run the following CLI commands:
php -f bin/magento maintenance:enable

php -f bin/magento deploy:mode:set developer

php -f bin/magento module:disable -c Ubertheme_Checkout

rm -rf /app/code/Ubertheme/Checkout
-- Open your Mysql cpanel (eg. PHPMyAdmin), and run the following SQL syntax:
NOTE: Make sure you replace with your own <table_prefix>:
DELETE FROM `<table_prefix>setup_module` WHERE `module` = 'Ubertheme_Checkout';
- Step 2: Once done, run the following commands:
NOTE: You can still keep the developer mode if you continue development process. Otherwise, run the following commands to switch to production mode:
php bin/magento deploy:mode:set production

php bin/magento maintenance:disable