UB SportsGear for Magento 2
Theme Introduction
UB SportsGear -- Responsive Magento 2 theme for sport apparel and equipment ecommerce store, packed with 3 complimentary Magento 2 extensions including UB Mega Menu, UB Content Slider, UB Quick View.
If you’re new to UB SportsGear theme, you may find the following links useful to learn more about this theme:
I. Installation Prerequisites
UB SportsGear is native with Magento 2.x. Please make sure your system meets the Magento 2 System requirements.
II. Download Packages
The download package includes:
- Theme: UB SportsGear (single theme for manual installation)
- Extensions: contains all extensions built in the theme
- QuickStart: is a full Magento 2 CMS version with our template and extensions already integrated to match demo
- PSD source files : contains all source files of the theme
III. Installation Instruction
There are two ways to install a UberTheme Magento theme:
- Manual theme Installation: Applicable if your store is full with content that you don’t want to overwrite.
- QuickStart Installation: Applicable if you want to get a whole new fresh site as per Demo.
Provided that you have installed the Magento base already, decide which way to install and follow steps as below.
Manual Theme Installation
Create folder
The first step is to manage the folders of your theme. We’ll refer to your theme name as [your_theme]
Necessary folders are listed below:
-- \app\design\frontend\Ubertheme
-- \app\design\frontend\Ubertheme\your_theme
Step 1: Create New Theme
To create a new theme, copy the ub_sportsgear folder in the extracted folder sportsgear to your site root folder.
The overwritten folders should have a directory layout like this:

Step 2: Theme Apply in backend
1. Log in to your Admin Panel e.g. //www.yourdomain.com/admin. Log out and log in back.
2. Navigate to System >> Tools >> Cache Management, Sellect All the cache types, take Action as Refresh and Submit.

3. Navigate to Content >> Design tab >> (Select Configuration) Edit field with the “UberTheme Sportsgear“.

4. Click Save Config button to finish. And clear cache again.
NOTE: If you wish to set up UB SportsGear like our demo, there’re a few more steps, including static block configuration and extension configuration.Quickstart Installation
Quickstart package is to minimize time and effort in installing the theme as per Demo site. Kindly note that, with Quickstart, all your existing data will be overwritten. Thus, we recommend using Quickstart for your first installation or just in case you want to refresh your site to the very beginning. For step by step guide, please click here
IV. Layout and Block positions
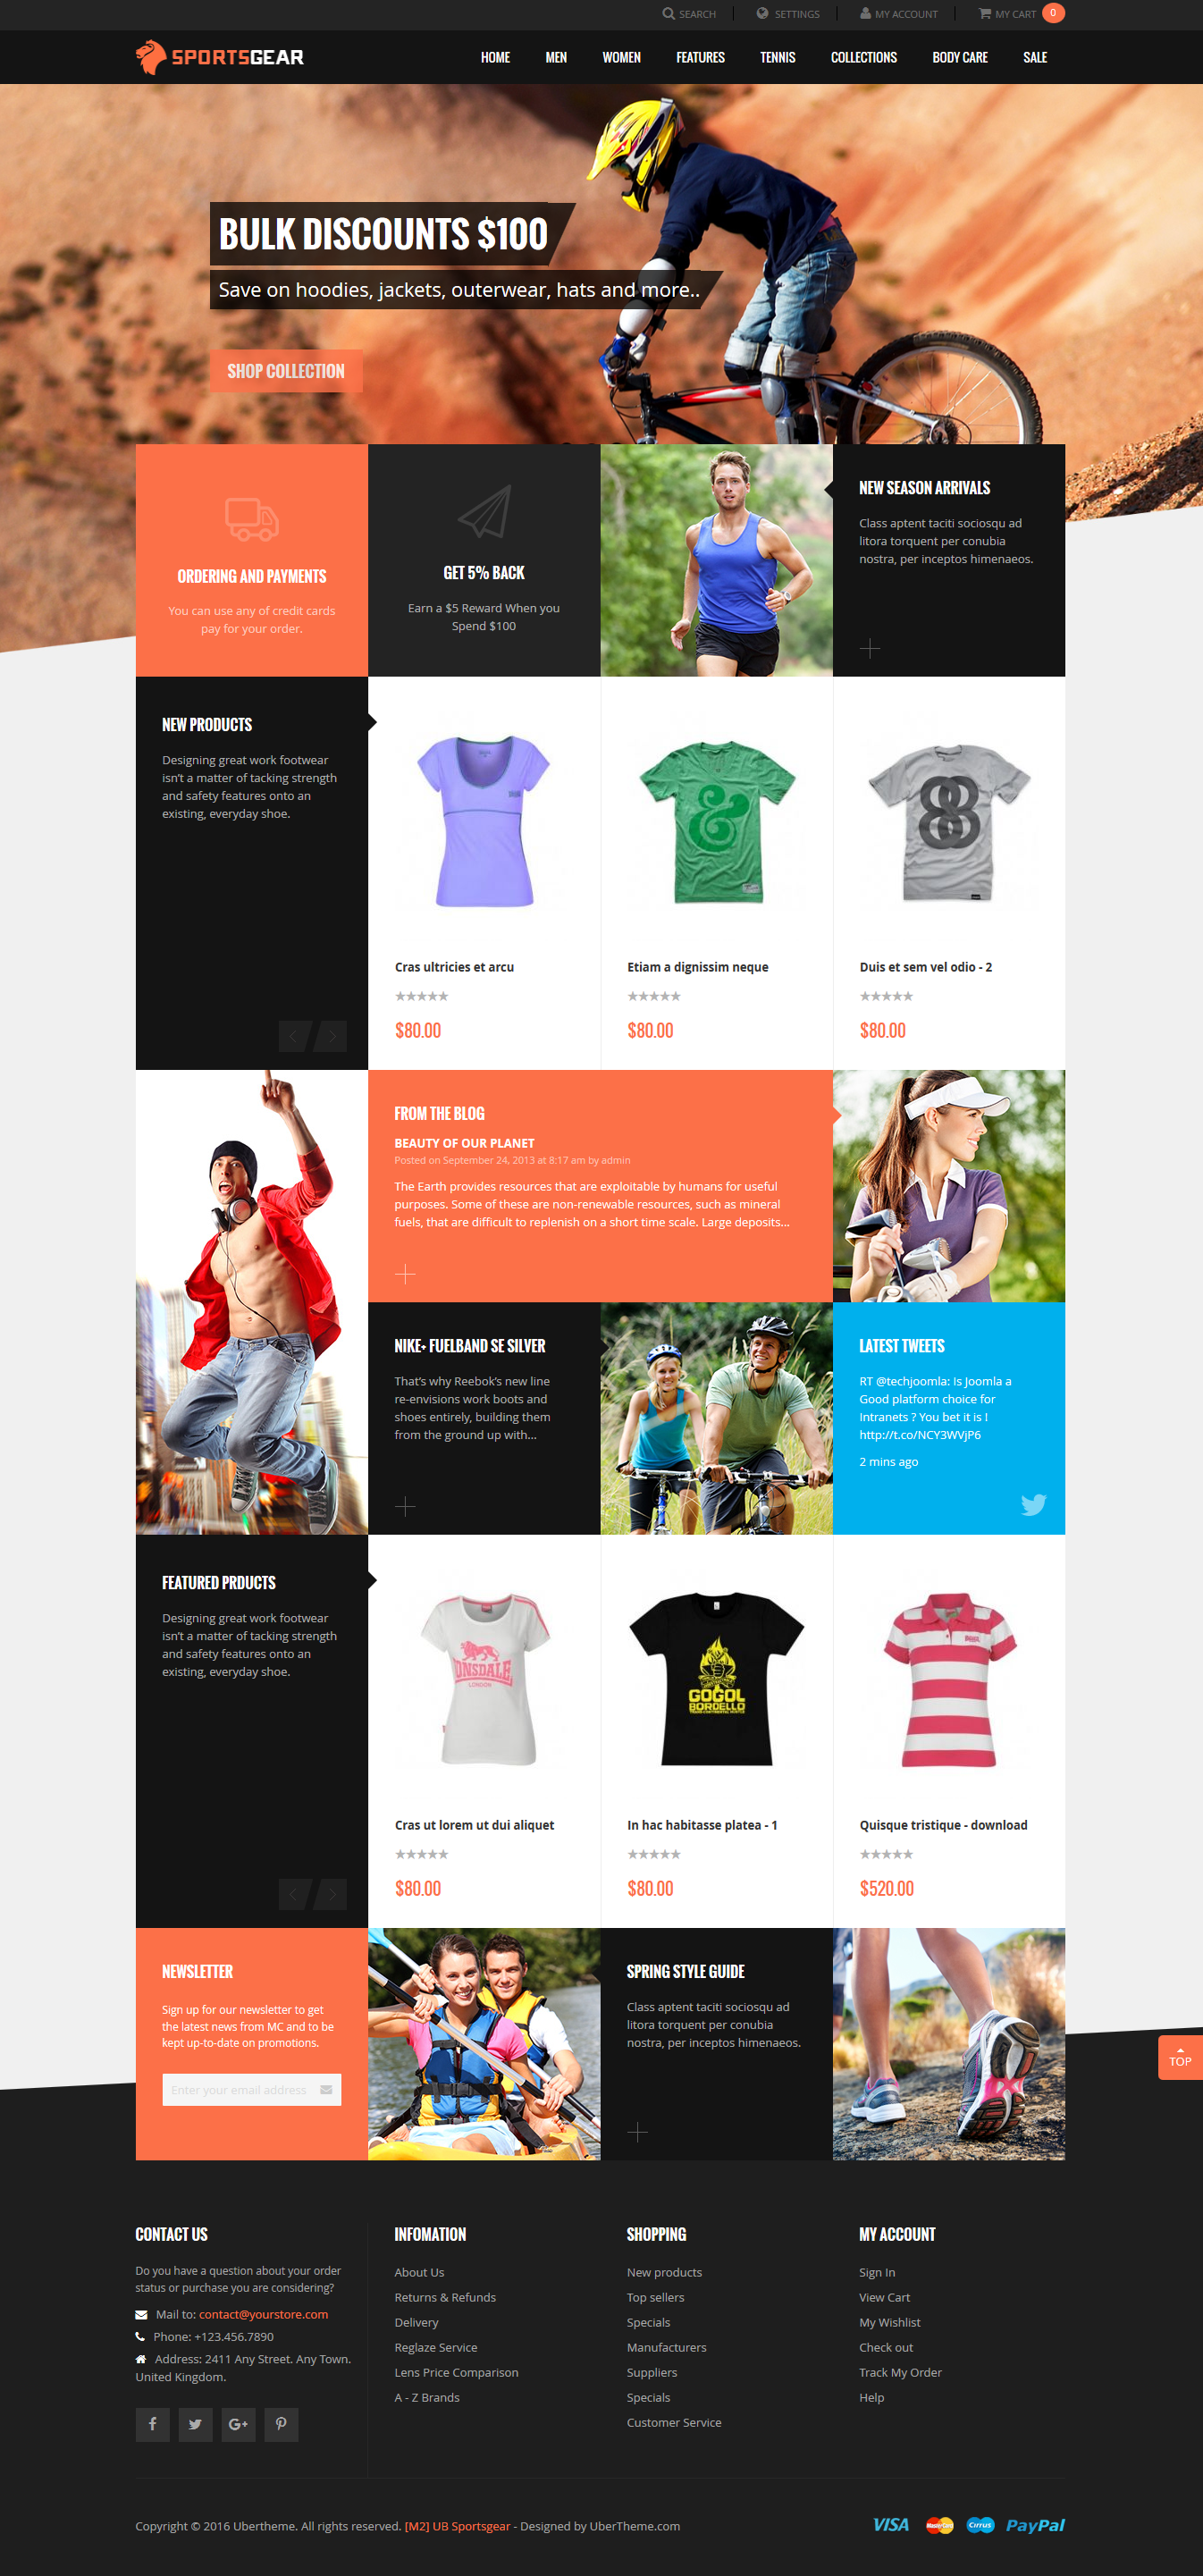
The layout of UB SportsGear Homepage can be illustrated as follows.

As seen in the screenshot, the UB SportsGear frontend has the following static blocks:
- UB Slider And Banner
- UB Position 1
- UB New Products
- UB Position 3
- UB Featured Products
- UB Position 5
- UB Footer
- UB Payment
V. Page Configuration
This section will guide you to configure your pages just as the Demo site of UB SportsGear
Homepage Configuration
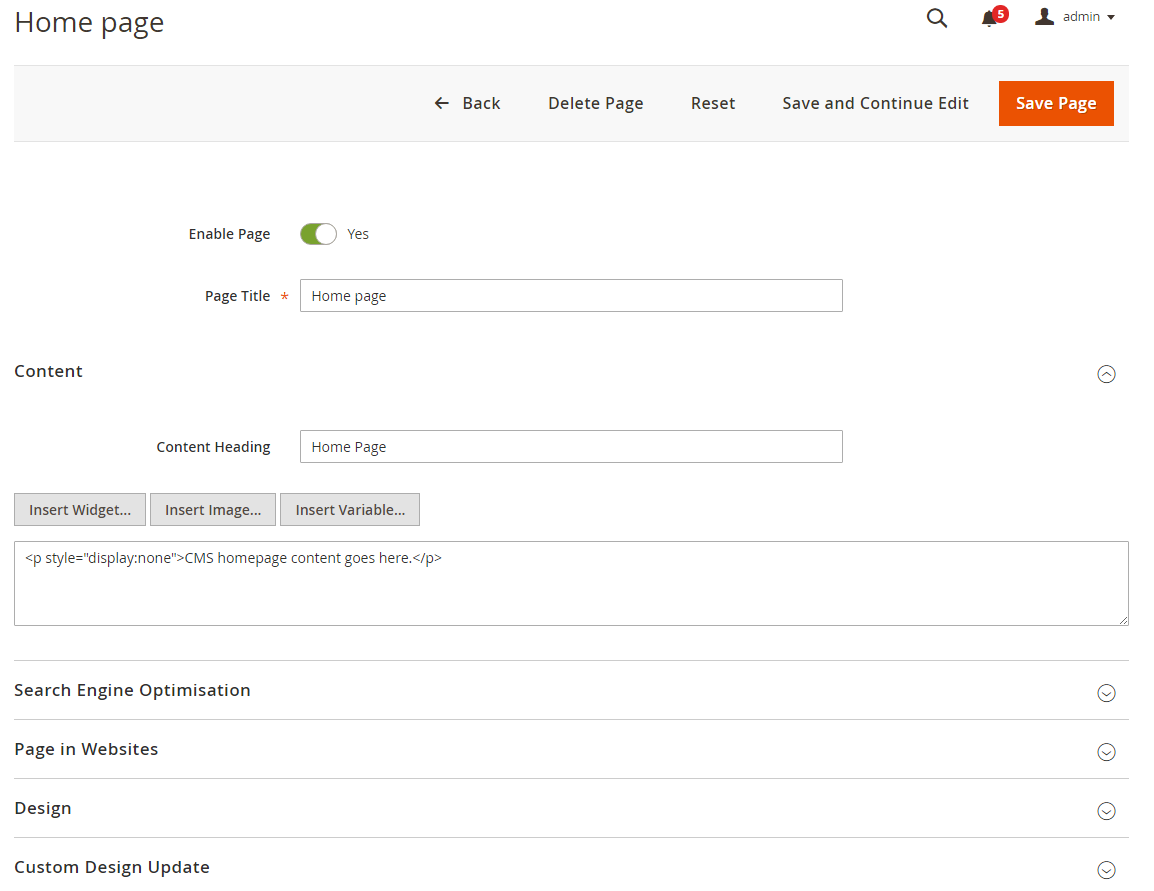
To configure this page, in the Admin Panel, navigate to Content | Elements | Pages | (Select Home Page) Edit.
- a. Content Tab: click to see the Back-end setting
You can choose one of the following options to create and configure contents:
In the Content field, click Show/Hide Editor button, then copy and paste the following code:
<p style="display:none">CMS homepage content goes here.</p>
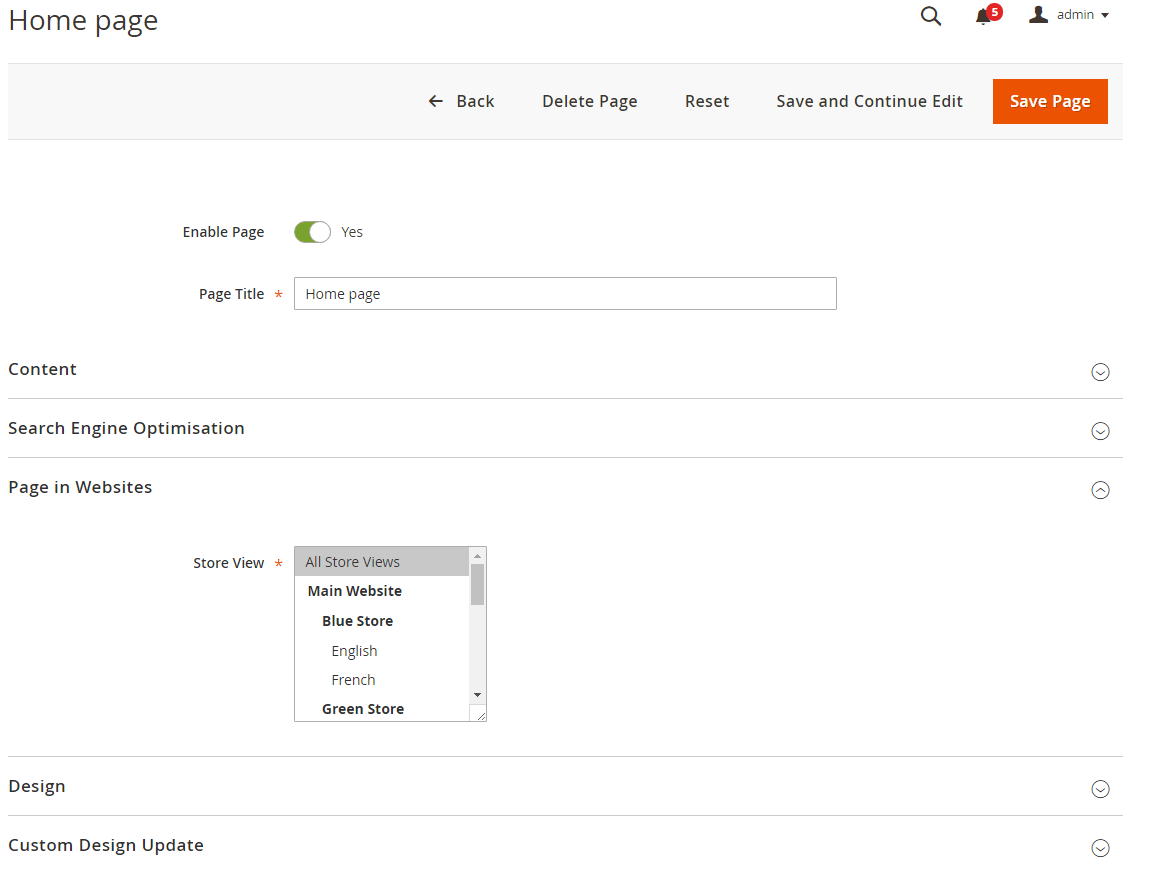
- b. Page in Websites : click to see the Back-end setting
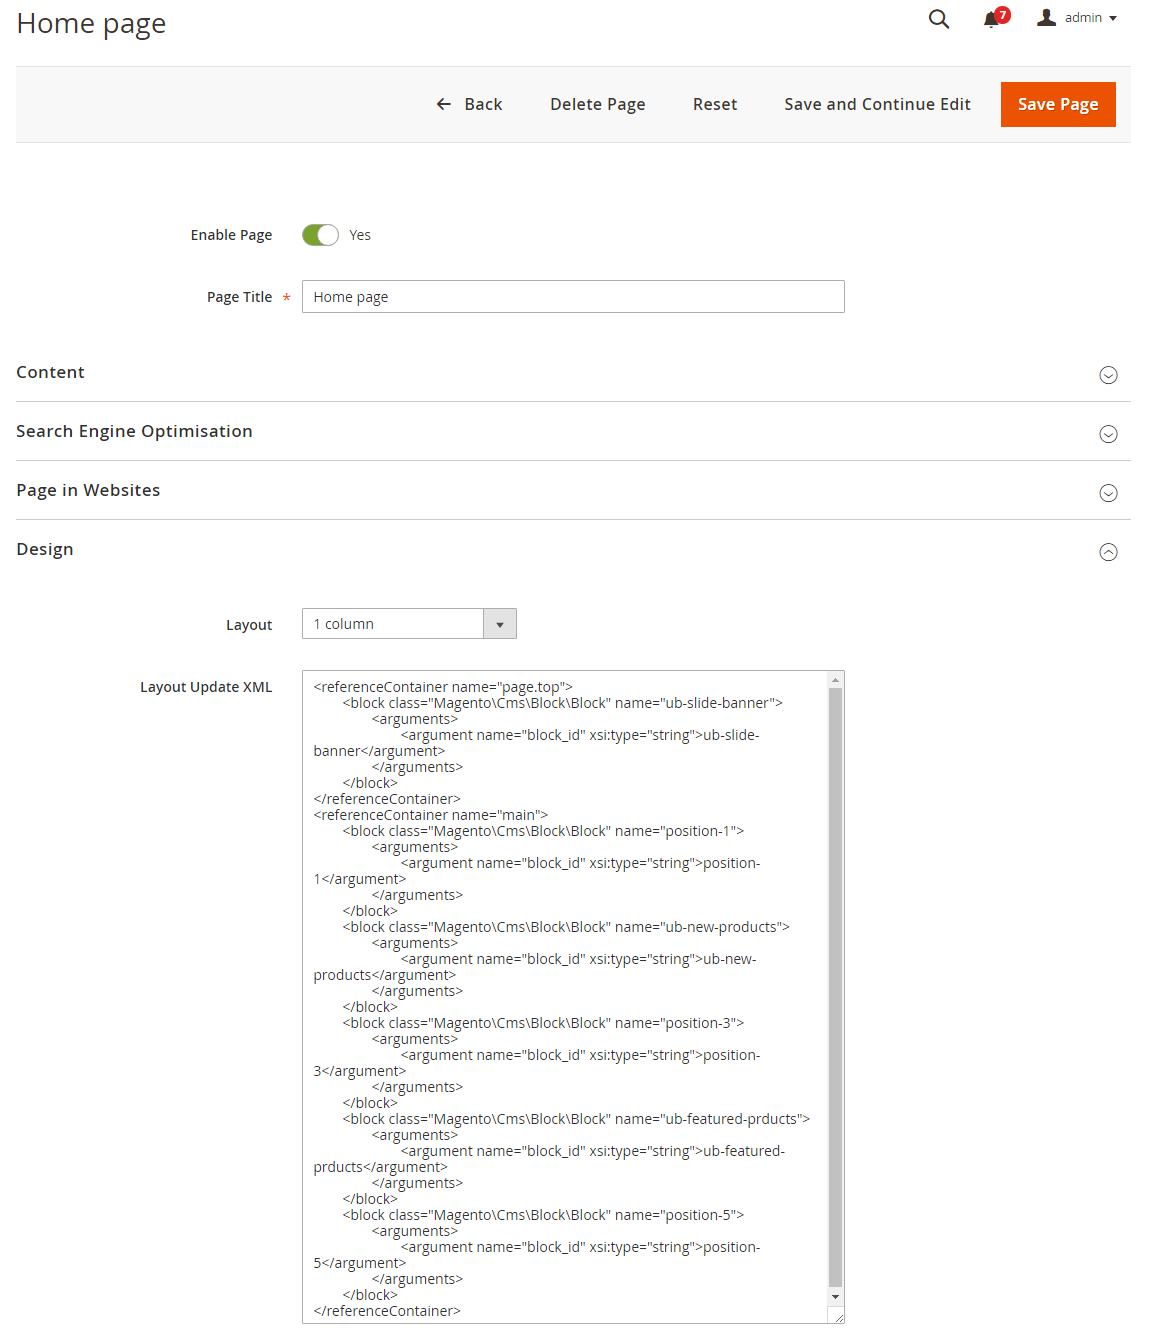
- c. Design Tab: click to see the Back-end setting
Copy and paste the following code into the “Design” field.
<referenceContainer name="page.top">
 <block class="Magento\Cms\Block\Block" name="ub-slide-banner">
 <arguments>
 <argument name="block_id" xsi:type="string">ub-slide-banner</argument>
 </arguments>
 </block>
</referenceContainer>
<referenceContainer name="main">
 <block class="Magento\Cms\Block\Block" name="position-1">
 <arguments>
 <argument name="block_id" xsi:type="string">position-1</argument>
 </arguments>
 </block>
 <block class="Magento\Cms\Block\Block" name="ub-new-products">
 <arguments>
 <argument name="block_id" xsi:type="string">ub-new-products</argument>
 </arguments>
 </block>
 <block class="Magento\Cms\Block\Block" name="position-3">
 <arguments>
 <argument name="block_id" xsi:type="string">position-3</argument>
 </arguments>
 </block>
 <block class="Magento\Cms\Block\Block" name="ub-featured-prducts">
 <arguments>
 <argument name="block_id" xsi:type="string">ub-featured-prducts</argument>
 </arguments>
 </block>
 <block class="Magento\Cms\Block\Block" name="position-5">
 <arguments>
 <argument name="block_id" xsi:type="string">position-5</argument>
 </arguments>
 </block>
</referenceContainer>
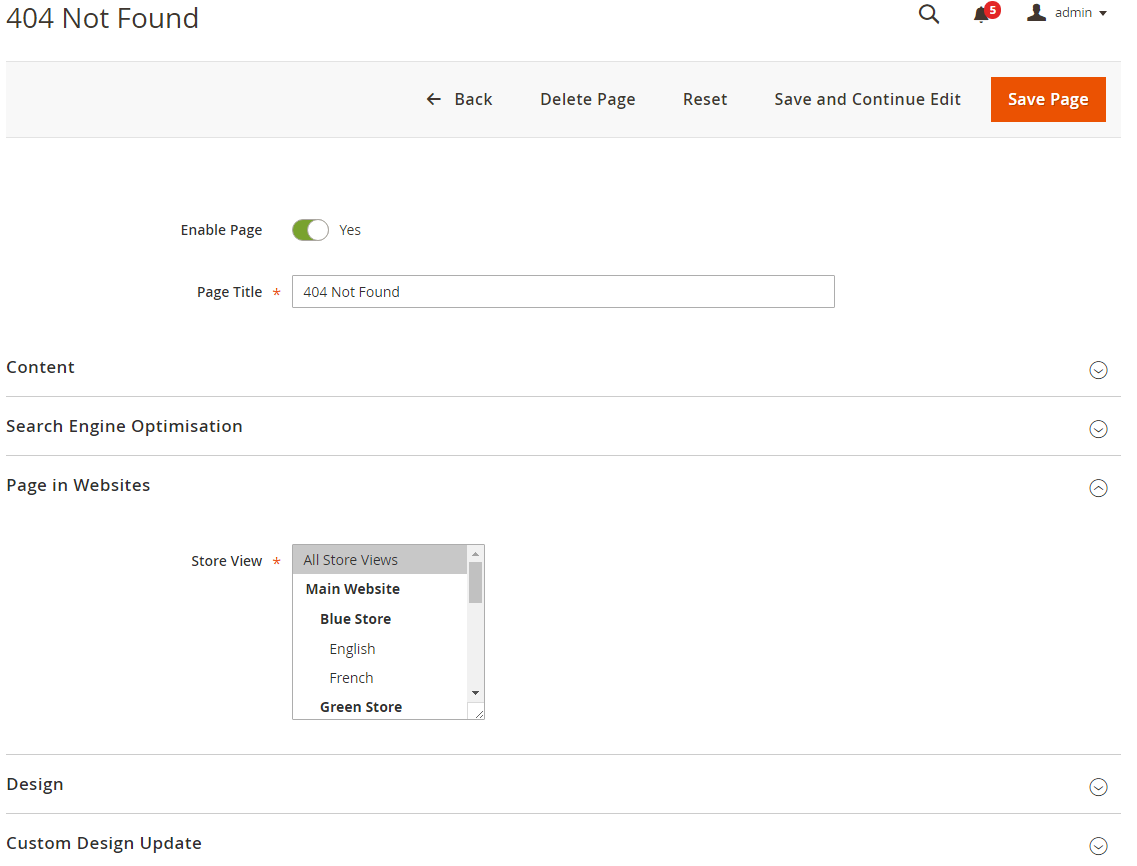
404 page Configuration
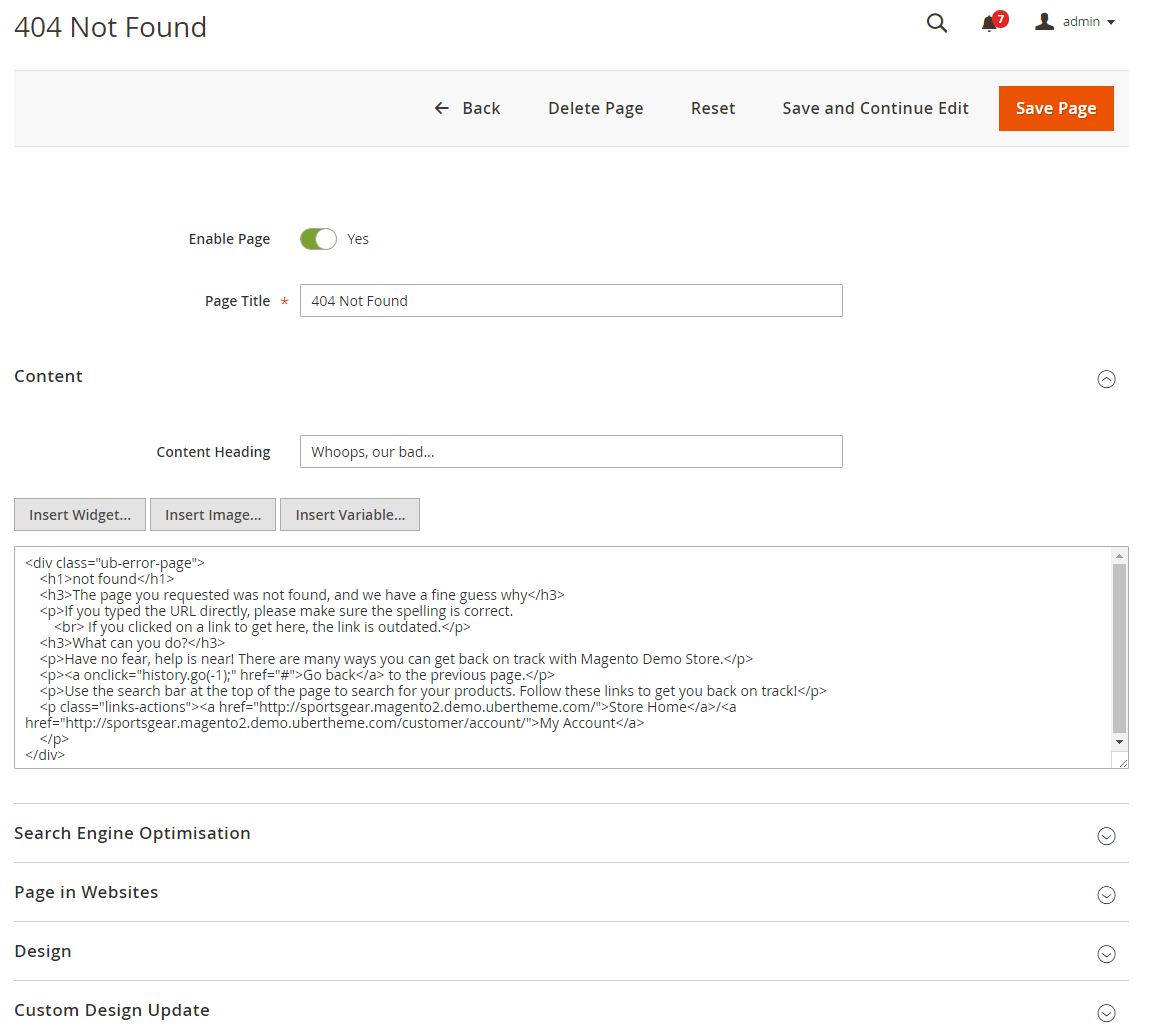
To configure this page, in the Admin Panel, navigate to Content | Elements | Pages, then select 404 Not Found 1 page to update the settings as follows:
- a. Content tab: click to see the Back-end setting
Copy and paste the code below on the Content field:
<div class="ub-error-page">
 <h1>not found</h1>
 <h3>The page you requested was not found, and we have a fine guess why</h3>
 <p>If you typed the URL directly, please make sure the spelling is correct.
 <br> If you clicked on a link to get here, the link is outdated.</p>
 <h3>What can you do?</h3>
 <p>Have no fear, help is near! There are many ways you can get back on track with Magento Demo Store.</p>
 <p><a onclick="history.go(-1);" href="#">Go back</a> to the previous page.</p>
 <p>Use the search bar at the top of the page to search for your products. Follow these links to get you back on track!</p>
 <p class="links-actions"><a href="http://sportsgear.magento2.demo.ubertheme.com/">Store Home</a>/<a href="http://sportsgear.magento2.demo.ubertheme.com/customer/account/">My Account</a>
 </p>
</div>
- b. Page in Websites tab: click to see the Back-end setting
- c. Design Tab: click to see the Back-end setting
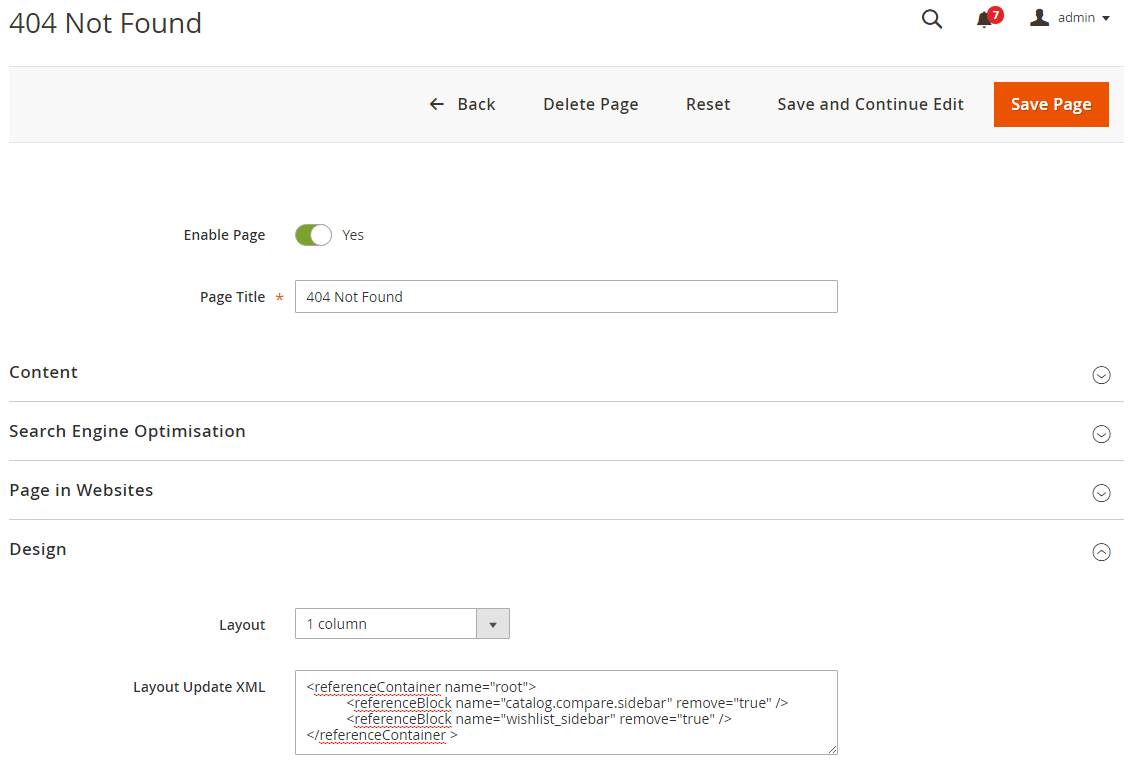
Front-end Appearance:

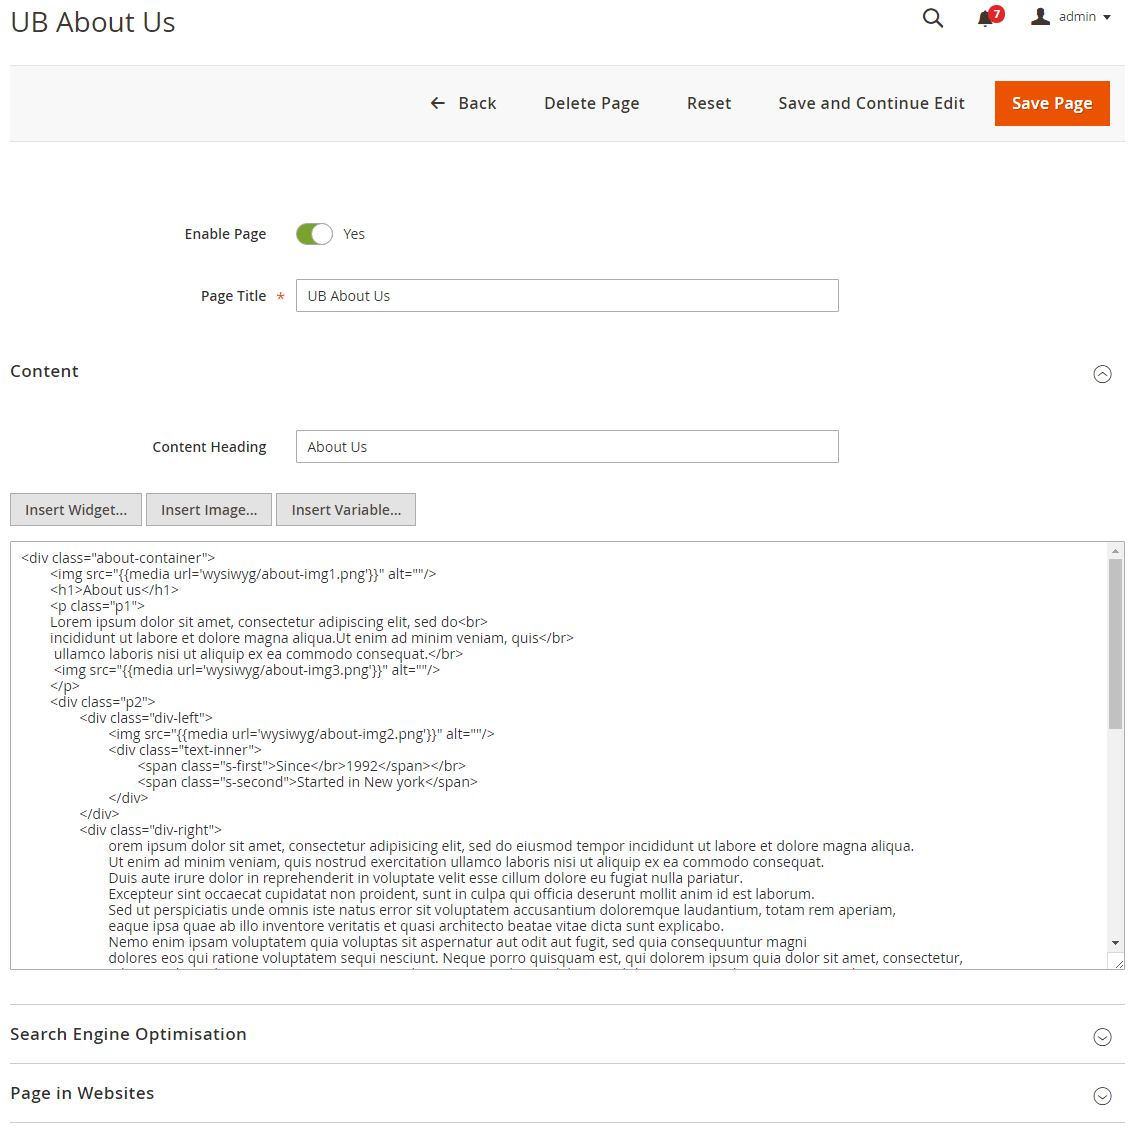
About Us Configuration
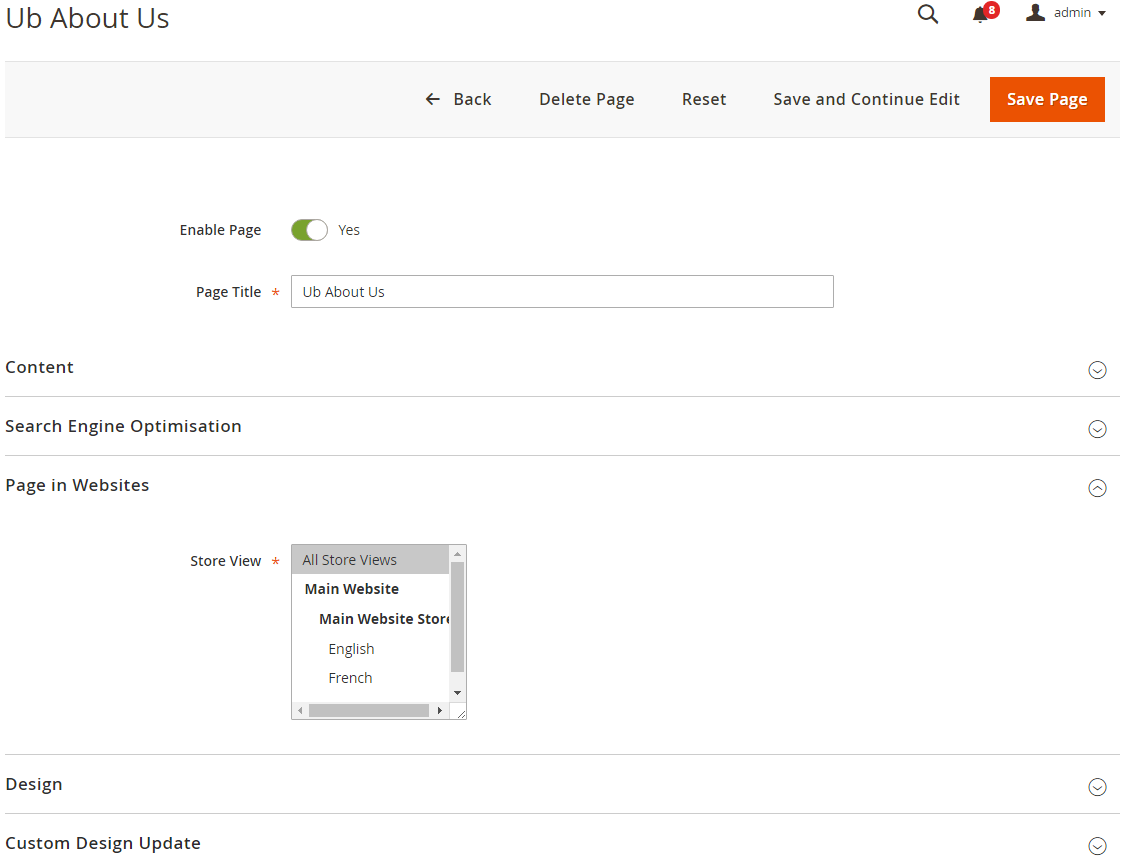
To configure this page, in the Admin Panel, navigate to Content | Elements | Pages, then select About Us page to update the settings as follows:
- a. Content tab: click to see the Back-end setting
Copy and paste the code below on the Content field:
<div class="about-container">
 <img src="{{media url='wysiwyg/about-img1.png'}}" alt=""/>
 <h1>About us</h1>
 <p class="p1">
 Lorem ipsum dolor sit amet, consectetur adipiscing elit, sed do<br>
 incididunt ut labore et dolore magna aliqua.Ut enim ad minim veniam, quis</br>
 ullamco laboris nisi ut aliquip ex ea commodo consequat.</br>
 <img src="{{media url='wysiwyg/about-img3.png'}}" alt=""/>
 </p>
 <div class="p2">
 <div class="div-left">
 <img src="{{media url='wysiwyg/about-img2.png'}}" alt=""/>
 <div class="text-inner">
 <span class="s-first">Since</br>1992</span></br>
 <span class="s-second">Started in New york</span>
 </div>
 </div>
 <div class="div-right">
 orem ipsum dolor sit amet, consectetur adipisicing elit, sed do eiusmod tempor incididunt ut labore et dolore magna aliqua.
 Ut enim ad minim veniam, quis nostrud exercitation ullamco laboris nisi ut aliquip ex ea commodo consequat.
 Duis aute irure dolor in reprehenderit in voluptate velit esse cillum dolore eu fugiat nulla pariatur.
 Excepteur sint occaecat cupidatat non proident, sunt in culpa qui officia deserunt mollit anim id est laborum.
 Sed ut perspiciatis unde omnis iste natus error sit voluptatem accusantium doloremque laudantium, totam rem aperiam,
 eaque ipsa quae ab illo inventore veritatis et quasi architecto beatae vitae dicta sunt explicabo.
 Nemo enim ipsam voluptatem quia voluptas sit aspernatur aut odit aut fugit, sed quia consequuntur magni
 dolores eos qui ratione voluptatem sequi nesciunt. Neque porro quisquam est, qui dolorem ipsum quia dolor sit amet, consectetur,
 adipisci velit, sed quia non numquam eius modi tempora incidunt ut labore et dolore magnam aliquam quaerat voluptatem.
 </div>
 </div>
 <div class="block-our-team">
 <div class="title">
 <h2>Our Team</h2>
 <span>Make a better place for stylish children</span>
 </div>
 <div class="list-member">
 <div class="item">
 <img src="{{media url='wysiwyg/about-img4.png'}}" alt=""/>
 <h2>Perter Hunts</h2>
 <p>CEO</p>
 </div>
 <div class="item">
 <img src="{{media url='wysiwyg/about-img5.png'}}" alt=""/>
 <h2>Michael Nguyen</h2>
 <p>Sales Director</p>
 </div>
 <div class="item">
 <img src="{{media url='wysiwyg/about-img6.png'}}" alt=""/>
 <h2>Emily Stones</h2>
 <p>Marketer</p>
 </div>
 <div class="item">
 <img src="{{media url='wysiwyg/about-img7.png'}}" alt=""/>
 <h2>Yumi Lambert</h2>
 <p>Art Director</p>
 </div>
 </div>
 </div>
</div>
- b. Page in Websites tab: click to see the Back-end setting
Front-end Appearance:

1. UB Slider And Banner
In your admin dashboard, click Content | (Elements) Blocks | Add New Block, then create UB Slider And Banner block with configuration as follows:
Back-end setting
In the Content field, click Show/Hide Editor button, then copy and paste the following code:
<div class="block-slide-home">
 {{block class="Ubertheme\UbContentSlider\Block\Slider" name="ub.megamall.slider"
 title=""
 content_type="slider"
 slider_key="images-slider"
 addition_class="ub-images-slider-content"
 show_item_title=0
 show_item_desc=1
 number_items=1
 number_items_desktop=1
 number_items_tablet=1
 number_items_tablet_small=1
 show_paging=1
 auto_run=1
 show_navigation=1
 slide_transition="fadeUp"
 }}
</div>
Front-end Appearance:

2. UB Position 1
In your admin dashboard, click Content | (Elements) Blocks | Add New Block, then create UB Position 1 block with configuration as follows:
Back-end setting
In the Content field, click Show/Hide Editor button, then copy and paste the following code:
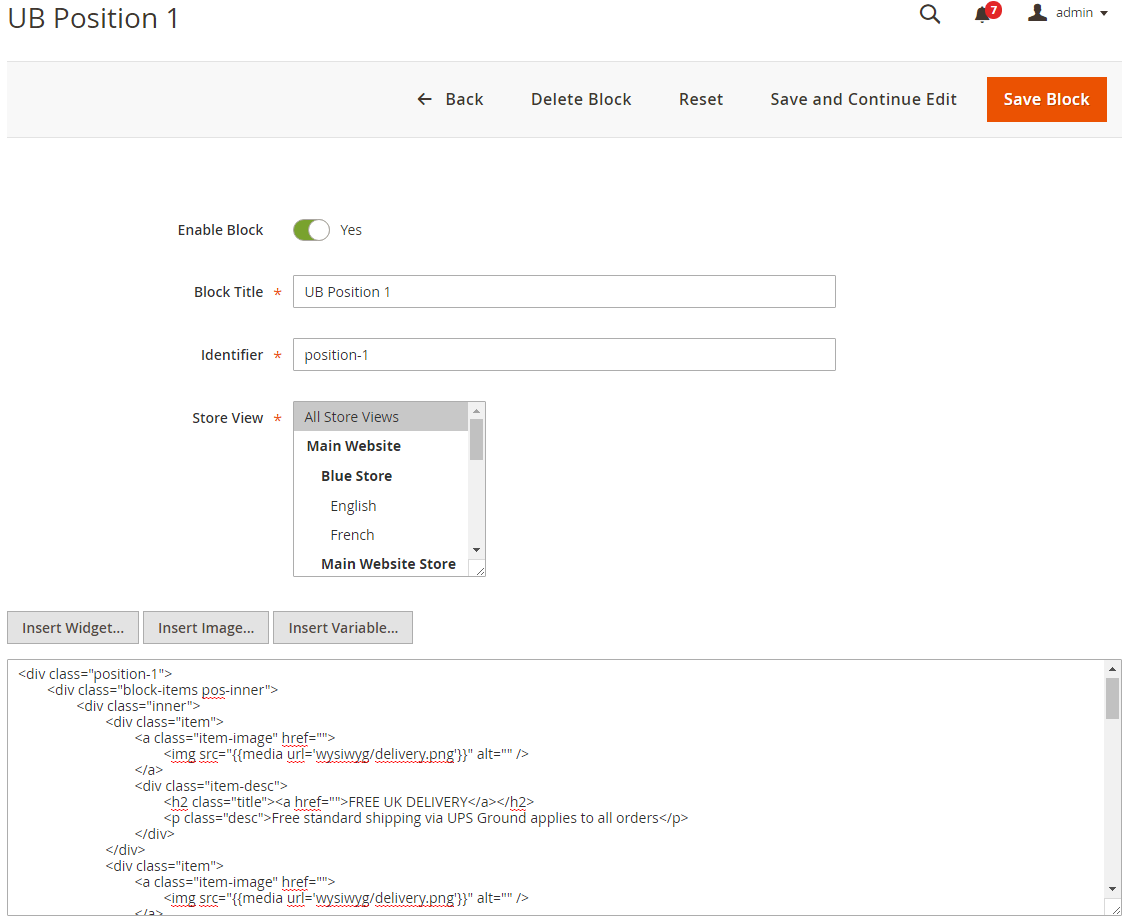
<div class="position-1">
 <div class="block-items pos-inner">
 <div class="inner">
 <div class="item">
 <a class="item-image" href="">
 <img src="{{media url='wysiwyg/delivery.png'}}" alt="" />
 </a>
 <div class="item-desc">
 <h2 class="title"><a href="">FREE UK DELIVERY</a></h2>
 <p class="desc">Free standard shipping via UPS Ground applies to all orders</p>
 </div>
 </div>
 <div class="item">
 <a class="item-image" href="">
 <img src="{{media url='wysiwyg/delivery.png'}}" alt="" />
 </a>
 <div class="item-desc">
 <h2 class="title"><a href="">Returns Policy</a></h2>
 <p class="desc">You can return any unwanted item to us for a refund upto 14 days.</p>
 </div>
 </div>
 <div class="item">
 <a class="item-image" href="">
 <img src="{{media url='wysiwyg/delivery.png'}}" alt="" />
 </a>
 <div class="item-desc">
 <h2 class="title"><a href="">Ordering and Payments</a></h2>
 <p class="desc">You can use any of credit cards pay for your order.</p>
 </div>
 </div>
 </div>
 <script type="text/javascript">
 require([
 'jquery',
 'owlslider',
 'domReady!'
 ],function($){

 $('.position-1 .block-items .inner').owlCarousel({
 "items": 1,
 "itemsScaleUp": true,
 "itemsDesktop" : [1199, 1],
 "itemsDesktopSmall" : [979, 1],
 "itemsTablet" : [768, 1],
 "itemsTabletSmall" : [767, 1],
 "itemsMobile" : [480, 1],
 "lazyLoad":true,
 "navigation":false,
 "pagination":false,
 "autoPlay" : true,
 "dots": false,
 });
 });

 </script>
 </div>
 <div class="block-get-back pos-inner">
 <a class="item-image" href="">
 <img src="{{media url='wysiwyg/signup.png'}}" alt="" />
 </a>
 <div class="item-desc">
 <h2 class="title"><a href="">Get 5% Back</a></h2>
 <p class="desc">Earn a $5 Reward When you Spend $100</p>
 </div>
 </div>
 <div class="block-nsa-img pos-inner">
 <a class="item-image" href="">
 <img src="{{media url='wysiwyg/banner1.jpg'}}" alt="" />
 </a>
 </div>
 <div class="block-nsa-info pos-inner">
 <div class="item-desc">
 <h2 class="title"><a href="">NEW SEASON ARRIVALS</a></h2>
 <p class="desc">Class aptent taciti sociosqu ad litora torquent per conubia nostra, per inceptos himenaeos.</p>
 <a class="readmore" href="">+</a>
 </div>
 </div>
</div>
Front-end Appearance:

3. UB New Products
In your admin dashboard, click Content | (Elements) Blocks | Add New Block, then create UB New Products block with configuration as follows:
Back-end setting
In the Content field, click Show/Hide Editor button, then copy and paste the following code:
<div class="position-2">
 <div class="block-info-left pos-inner">
 <div class="item-desc">
 <h2 class="title">NEW PRODUCTS</h2>
 <p class="desc">Designing great work footwear isn’t a matter of tacking strength and safety features onto an existing, everyday shoe.</p>
 </div>
 </div>
 {{block class="Ubertheme\UbContentSlider\Block\Slider"
 name="new_products"
 template="new_products.phtml"
 title="new product"
 show_title="0"
 content_type="latest_products"
 show_desc="0"
 show_wishlist="0"
 show_compare="0"
 show_add_cart="1"
 show_review="1"
 show_paging=0
 number_items="3"
 number_items_desktop="3"
 number_items_desktop_small="3"
 number_items_tablet="2"
 number_items_tablet_small="2"
 slide_transition="backSlide"
 }}
</div>
Front-end Appearance:

4. UB Position 3
In your admin dashboard, click Content | (Elements) Blocks | Add New Block, then create UB Position 3 block with configuration as follows:
Back-end setting
In the Content field, click Show/Hide Editor button, then copy and paste the following code:
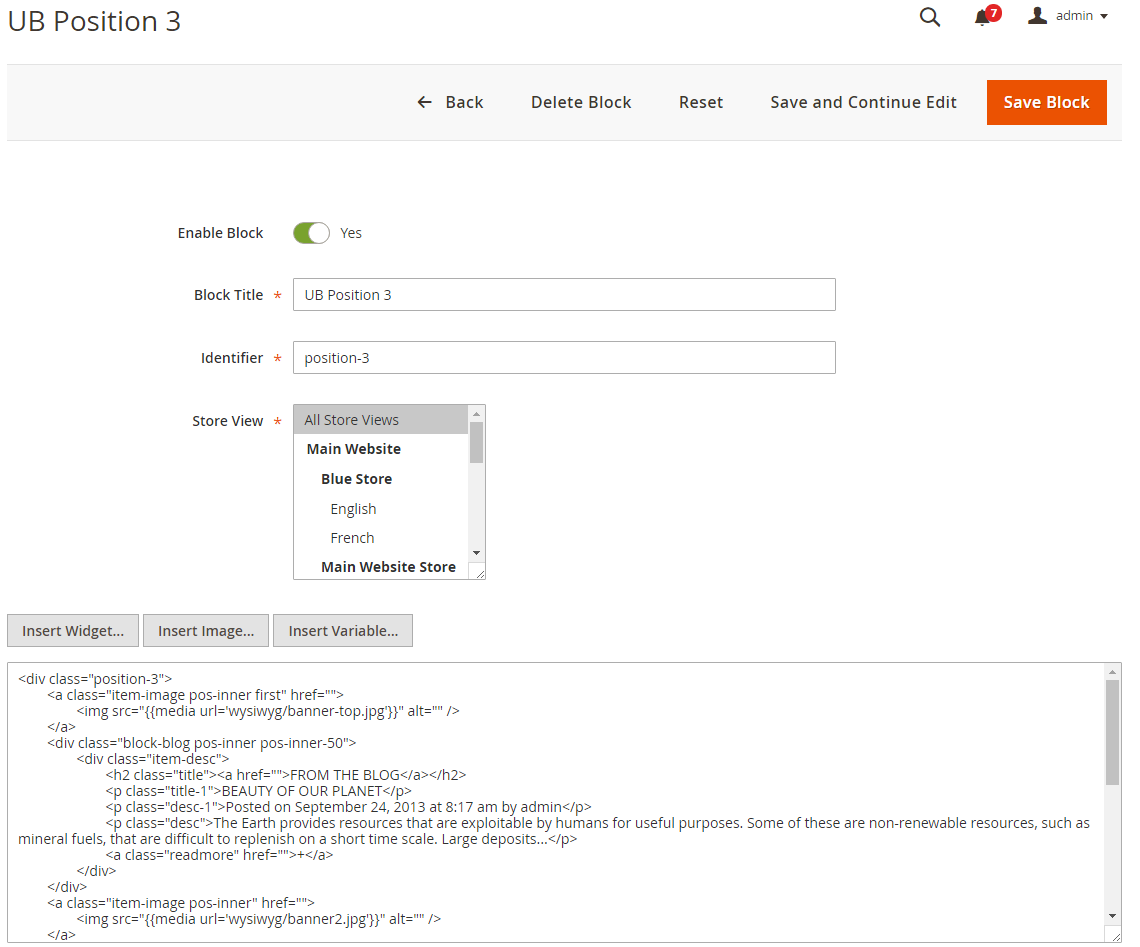
<div class="position-3">
 <a class="item-image pos-inner first" href="">
 <img src="{{media url='wysiwyg/banner-top.jpg'}}" alt="" />
 </a>
 <div class="block-blog pos-inner pos-inner-50">
 <div class="item-desc">
 <h2 class="title"><a href="">FROM THE BLOG</a></h2>
 <p class="title-1">BEAUTY OF OUR PLANET</p>
 <p class="desc-1">Posted on September 24, 2013 at 8:17 am by admin</p>
 <p class="desc">The Earth provides resources that are exploitable by humans for useful purposes. Some of these are non-renewable resources, such as mineral fuels, that are difficult to replenish on a short time scale. Large deposits...</p>
 <a class="readmore" href="">+</a>
 </div>
 </div>
 <a class="item-image pos-inner" href="">
 <img src="{{media url='wysiwyg/banner2.jpg'}}" alt="" />
 </a>
 <div class="block-nike pos-inner">
 <div class="item-desc">
 <h2 class="title"><a href="">NIKE+ FUELBAND SE SILVER</a></h2>
 <p class="desc">That’s why Reebok’s new line re-envisions work boots and shoes entirely, building them from the ground up with...</p>
 <a class="readmore" href="">+</a>
 </div>
 </div>
 <a class="item-image pos-inner" href="">
 <img src="{{media url='wysiwyg/banner3.jpg'}}" alt="" />
 </a>
 <div class="block-tweets pos-inner">
 <div class="item-desc">
 <h2 class="title">LATEST TWEETS</h2>
 <p class="desc">RT <a href="https://twitter.com/JoomlArt">@techjoomla</a>: Is Joomla a Good platform choice for Intranets ? You bet it is ! <a href="https://twitter.com/JoomlArt">http://t.co/NCY3WVjP6</a></p>
 <a class="more-time" href="https://twitter.com/JoomlArt"> 2 mins ago</a>
 <img class="icontweet" src="{{media url='wysiwyg/icon_twitter.png'}}" alt="" />
 </div>
 </div>
</div>
Front-end Appearance:

5. UB Featured Products
In your admin dashboard, click Content | (Elements) Blocks | Add New Block, then create Today hightlight block with configuration as follows:
Back-end setting
In the Content field, click Show/Hide Editor button, then copy and paste the following code:
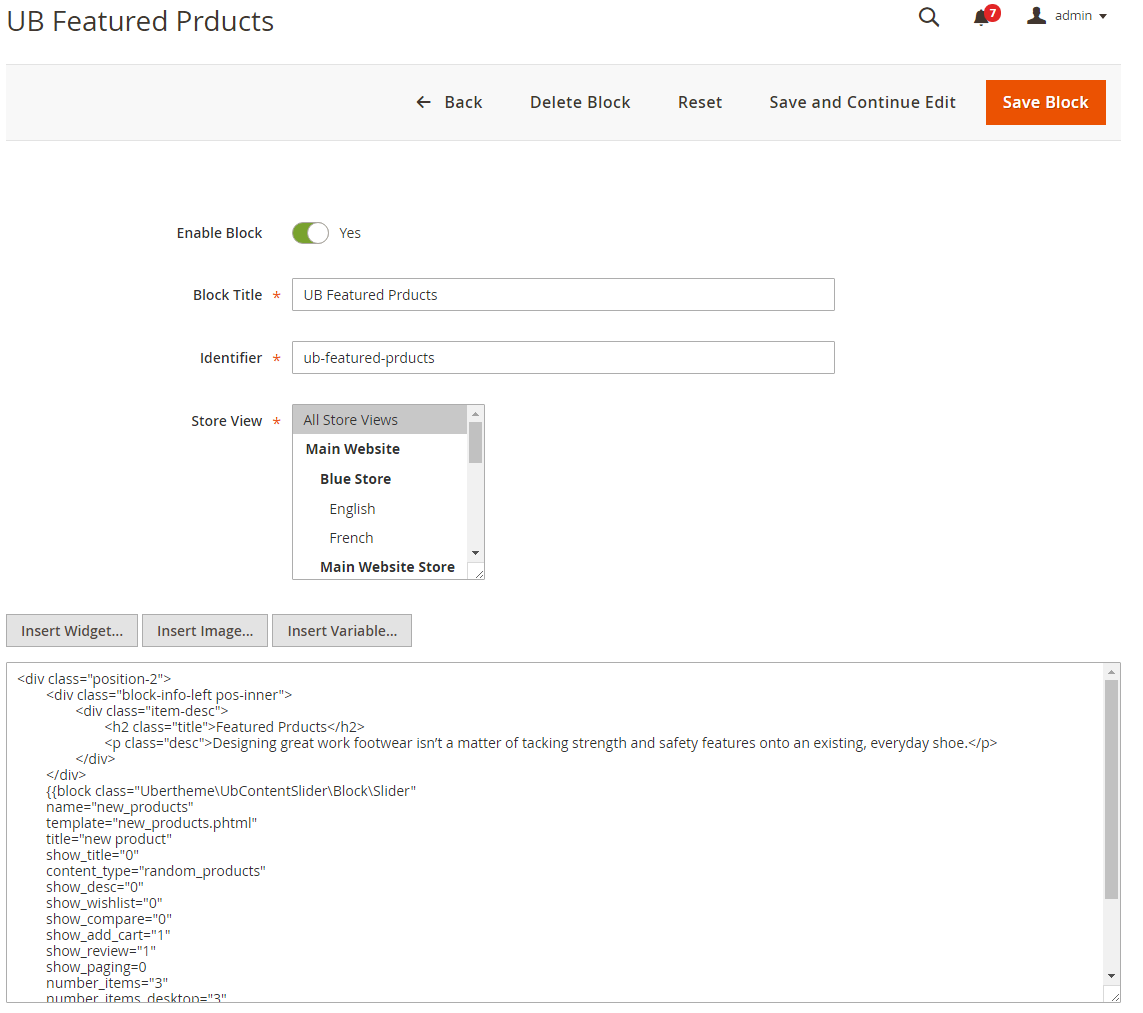
<div class="position-2">
 <div class="block-info-left pos-inner">
 <div class="item-desc">
 <h2 class="title">Featured Prducts</h2>
 <p class="desc">Designing great work footwear isn’t a matter of tacking strength and safety features onto an existing, everyday shoe.</p>
 </div>
 </div>
 {{block class="Ubertheme\UbContentSlider\Block\Slider"
 name="new_products"
 template="new_products.phtml"
 title="new product"
 show_title="0"
 content_type="random_products"
 show_desc="0"
 show_wishlist="0"
 show_compare="0"
 show_add_cart="1"
 show_review="1"
 show_paging=0
 number_items="3"
 number_items_desktop="3"
 number_items_desktop_small="3"
 number_items_tablet="2"
 number_items_tablet_small="2"
 slide_transition="backSlide"
 }}
</div>
Front-end Appearance:

6. UB Position 5
In your admin dashboard, click Content | (Elements) Blocks | Add New Block, then create UB Position 5 block with configuration as follows:
Back-end setting
In the Content field, click Show/Hide Editor button, then copy and paste the following code:
<div class="position-5">
 <div class="block-newsletter pos-inner">
 <div class="item-desc">
 <h2 class="title">NEWSLETTER</h2>
 <p class="desc">Sign up for our newsletter to get the latest news from MC and to be kept up-to-date on promotions.</p>
 </div>
 {{block class="Magento\Newsletter\Block\Subscribe" name="form.subscribe" as="subscribe" before="-" template="subscribe.phtml"}}
 </div>
 <a class="item-image pos-inner first" href="">
 <img src="{{media url='wysiwyg/banner4.jpg'}}" alt="" />
 </a>
 <div class="block-info-left pos-inner">
 <div class="item-desc">
 <h2 class="title"><a href="">SPRING STYLE GUIDE</a></h2>
 <p class="desc">Class aptent taciti sociosqu ad litora torquent per conubia nostra, per inceptos himenaeos.</p>
 <a class="readmore" href="">+</a>
 </div>
 </div>
 <a class="item-image pos-inner last" href="">
 <img src="{{media url='wysiwyg/banner5.jpg'}}" alt="" />
 </a>
</div>
Front-end Appearance:

7. UB Footer
In your admin dashboard, click Content | (Elements) Blocks | Add New Block, then create UB Footer block with configuration as follows:
Back-end setting
In the Content field, click Show/Hide Editor button, then copy and paste the following code:
<div class="ub-blocks">
 <div class="block block-Sportsgear">
 <div class="title">Contact us</div>
 <div class="block-content">
 <p>Do you have a question about your order status or purchase you are considering?</p>
 <ul class="list-info">
 <li class="email"><i class="fa fa-envelope"></i><span>Mail to:</span> <a title="[email protected]" href="#">[email protected]</a>
 </li>
 <li class="phone"><i class="fa fa-phone"></i><span>Phone:</span> +123.456.7890</li>
 <li class="address"><i class="fa fa-home"></i><span>Address:</span> 2411 Any Street. Any Town. United Kingdom.</li>
 </ul>

 <ul class="social">
 <li>
 <a class="facebook" href="http://www.facebook.com/ubertheme"><i class="fa fa-facebook" aria-hidden="true"></i></a>
 </li>
 <li>
 <a class="tiwter" href="https://twitter.com/ubertheme"><i class="fa fa-twitter" aria-hidden="true"></i></a>
 </li>
 <li>
 <a class="google" href="https://plus.google.com/+UberthemeMagento/posts"><i class="fa fa-google-plus" aria-hidden="true"></i></a>
 </li>
 <li class="last">
 <a class="pinterest" href="http://www.facebook.com/ubertheme"><i class="fa fa-pinterest-p" aria-hidden="true"></i></a>
 </li>
 </ul>

 </div>
 </div>
 <div class="block">
 <div class="title">infomation</div>
 <div class="block-content">
 <ul>
 <li><a href="{{store url='ub-about-us'}}">About Us</a>
 </li>
 <li><a href="#">Returns & Refunds</a>
 </li>
 <li><a href="#">Delivery</a>
 </li>
 <li><a href="#">Reglaze Service</a>
 </li>
 <li><a href="#">Lens Price Comparison</a>
 </li>
 <li><a href="#">A - Z Brands</a>
 </li>
 </ul>
 </div>
 </div>
 <div class="block">
 <div class="title">SHOPPING</div>
 <div class="block-content">
 <ul>
 <li><a href="#">New products</a>
 </li>
 <li><a href="#">Top sellers</a>
 </li>
 <li><a href="#">Specials</a>
 </li>
 <li><a href="#">Manufacturers</a>
 </li>
 <li><a href="#">Suppliers</a>
 </li>
 <li><a href="#">Specials</a>
 </li><li><a href="#">Customer Service</a>
 </li>
 </ul>
 </div>
 </div>
 <div class="block">
 <div class="title">my account</div>
 <div class="block-content">
 <ul>
 <li><a href="{{store url='customer/account/create/'}}">Sign In</a>
 </li>
 <li><a href="{{store url='cart/'}}">View Cart</a>
 </li>
 <li><a href="{{store url='wishlist/'}}">My Wishlist</a>
 </li>
 <li><a href="{{store url='checkout/'}}">Check out</a>
 </li>
 <li><a href="#">Track My Order</a>
 </li>
 <li><a href="#">Help</a>
 </li>
 </ul>
 </div>
 </div>
</div>
<a href="#" class="btn-btt" title="Back to Top" id="button-btt"><i class="fa fa-caret-up"></i>Top</a>
Front-end Appearance:

8. UB Payment
In your admin dashboard, click Content | (Elements) Blocks | Add New Block, then create UB Payment block with configuration as follows:
Back-end setting
In the Content field, click Show/Hide Editor button, then copy and paste the following code:
<ul class="payment">
 <li><img src="{{media url='wysiwyg/payment/bg-payment.png'}}" alt=""/></li>
</ul>

9. UB Banner 5
In your admin dashboard, click Content | (Elements) Blocks | Add New Block, then create UB Banner 5 block with configuration as follows:
Back-end setting
In the Content field, click Show/Hide Editor button, then copy and paste the following code:
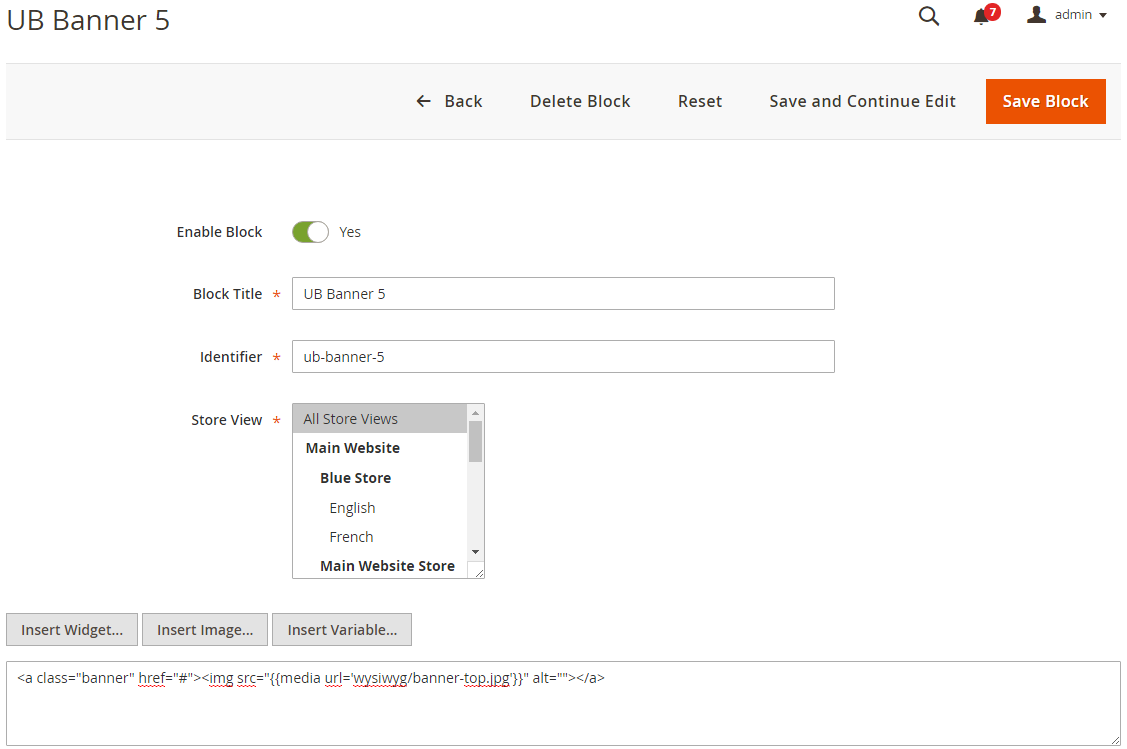
<a class="banner" href="#"><img src="{{media url='wysiwyg/banner-top.jpg'}}" alt=""></a>
Front-end Appearance:

10. UB Related and Upsell Description
In your admin dashboard, click Content | (Elements) Blocks | Add New Block, then create UB Related and Upsell Description block with configuration as follows:
Back-end setting
In the Content field, click Show/Hide Editor button, then copy and paste the following code:
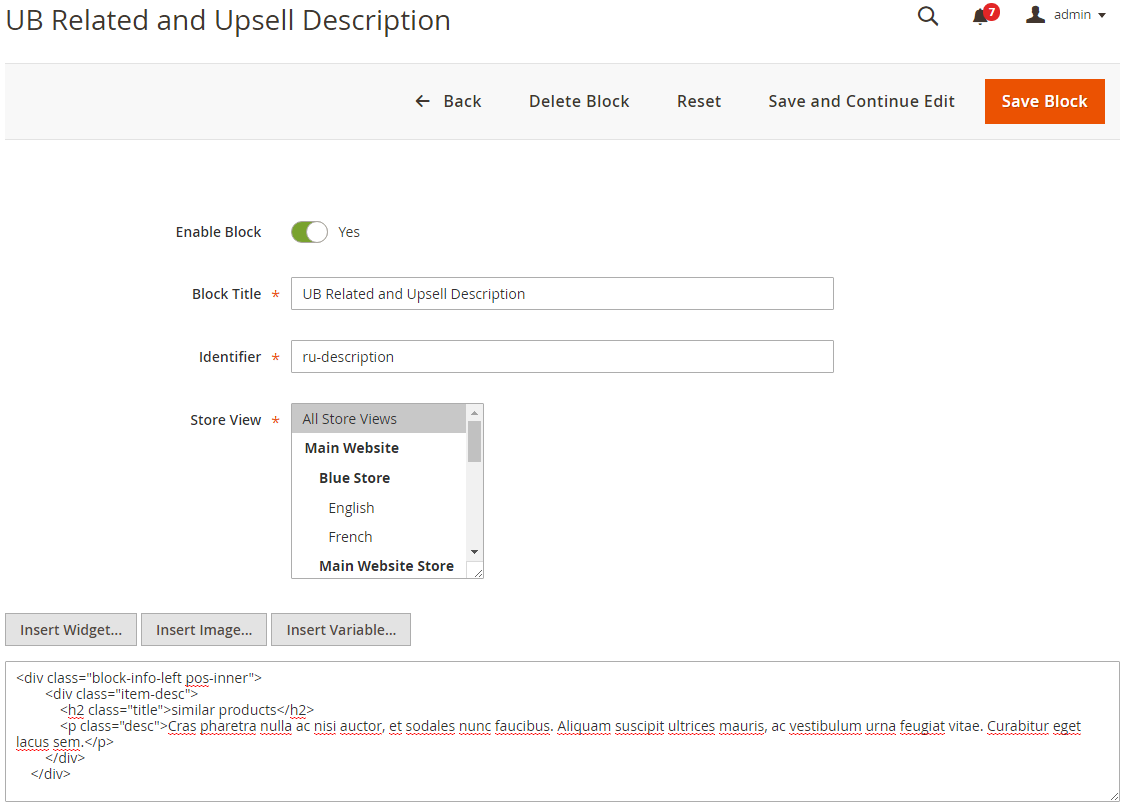
<div class="block-info-left pos-inner">
 <div class="item-desc">
 <h2 class="title">similar products</h2>
 <p class="desc">Cras pharetra nulla ac nisi auctor, et sodales nunc faucibus. Aliquam suscipit ultrices mauris, ac vestibulum urna feugiat vitae. Curabitur eget lacus sem.</p>
 </div>
 </div>
Front-end Appearance:

VII. Extention Configuration
Standard UB SportsGear 2.0 is packed with base theme only, with no built-in extensions. If you select Extended UB SportsGear 2.0, depending the extension you purchased, please follow specific userguides below:
1. UB Content Slider extension
In the Magento Admin Panel, navigate to Content | UB Content Slider | Manage Slider and configure the default settings as the Back-end setting.
Now your slider should be displayed in the frontend.

UB SportsGear supports Magento extenstion Content Slider. You can follow the steps indicated in above-mentioned guide: VI. Static Block Configuration -- section ’UB Slider And Banner’’ to create UB Slider And Banner static block.
2. UB Mega Menu extension
This section provides detailed instruction to configure Mega Menu style as per our UB SportsGear demo site.

Step 1 -- Create the Top Menu group
In the Magento backend, navigate to Content | (UB Mega Menu) Manage Menu, then click Add New Menu. In the popup, you can configure as per this screenshot (Make sure you insert menu key as main-menu).

Once done, you should see the new menu group visible as illustration in the following screenshort:

Step 2 -- Create menu item in the Top Menu
Supposed that you have some sample products in place already, now we start to create menu items for the mega menu. In the same Menu Group panel, go to Select | Manage Menu items:

Step 2.1 -- Create Products and its sub-menu items:

Click Add New Menu Item button to create each of menu item, and follow configuration below:
- Women: Configuration steps -- menu setting 1 > menu setting 2 (Make sure you insert extra class with
custom-style). - Clothing: Configuration steps -- menu setting 1 > menu setting 2
- Tennis: Configuration steps -- menu setting 1 > menu setting 2
Step 2.2 -- Create Product List menu items
Front-end Appearance:

Products: Configuration steps -- Setting 1 > Setting 2 (Make sure in the Setting 2 step, you insert Custom Content as per screenshot)
Step 2.3 -- Insert Product banner into Mega menu

Create Products banner item (by clicking Add New Menu Item) as sub-menu of Women following settings below:
Setting 1 > Setting 2 (Make sure in the Setting 2 step, you insert Custom Content)
UB Mega Menu Documentation
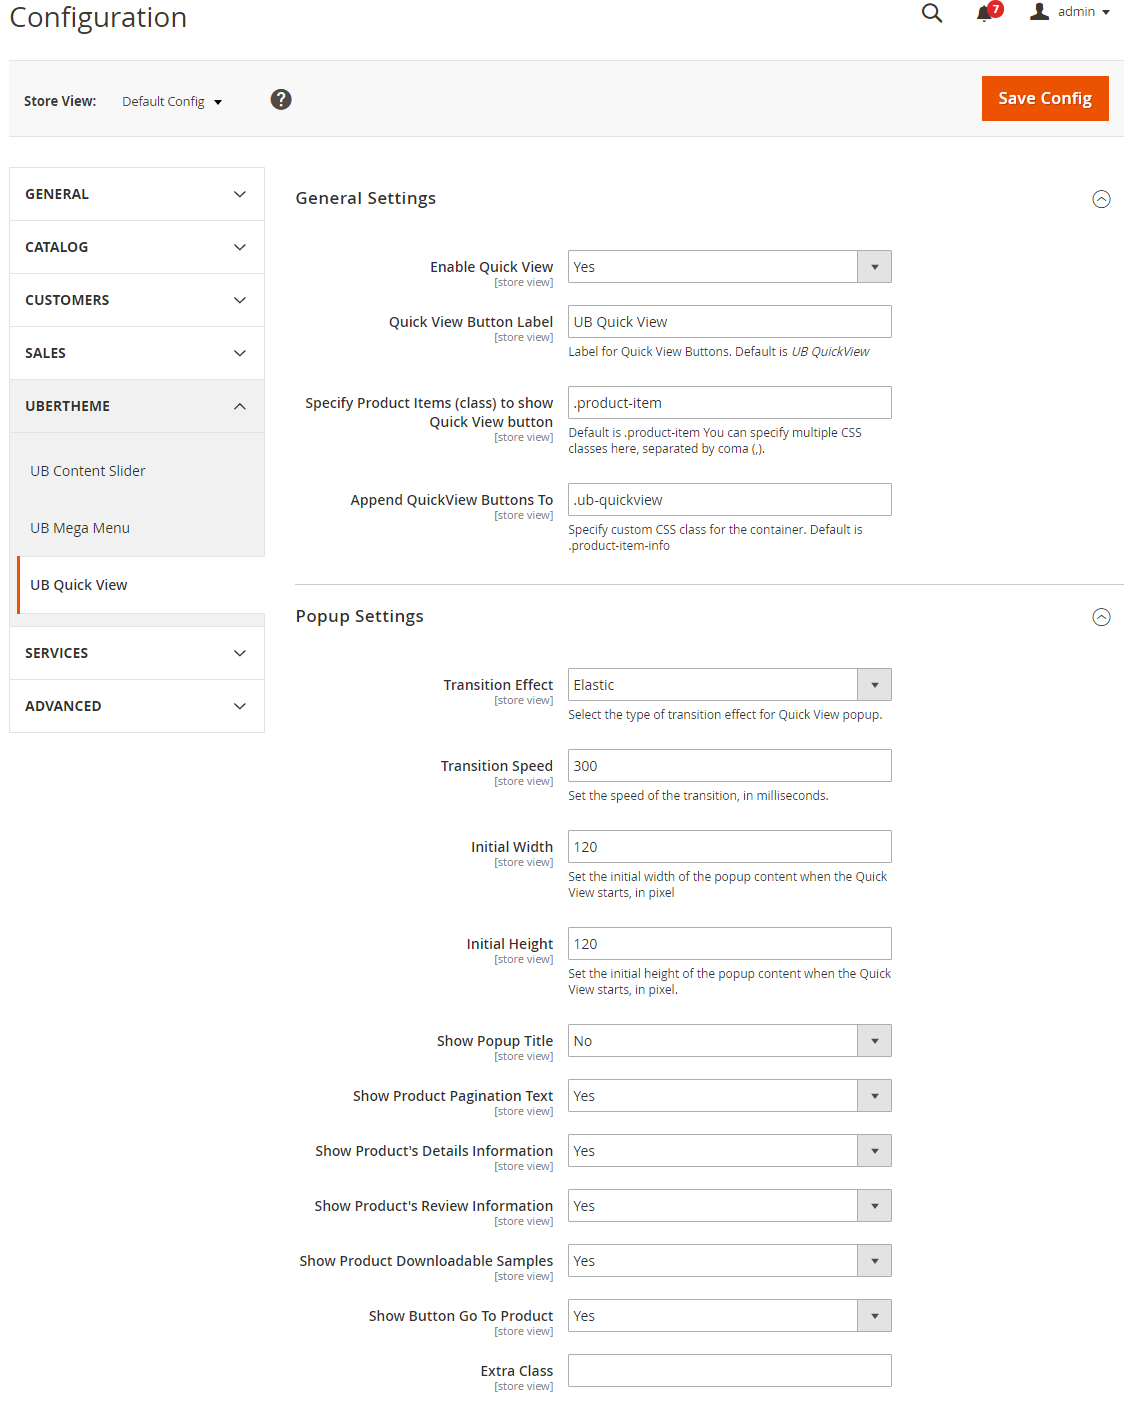
3. UB Quick View extension
In the Magento Admin Panel, navigate to Content | UB Quick View | Setting and configure the default settings as the Back-end setting
Front-end Appearance

UB Quick View Documentation
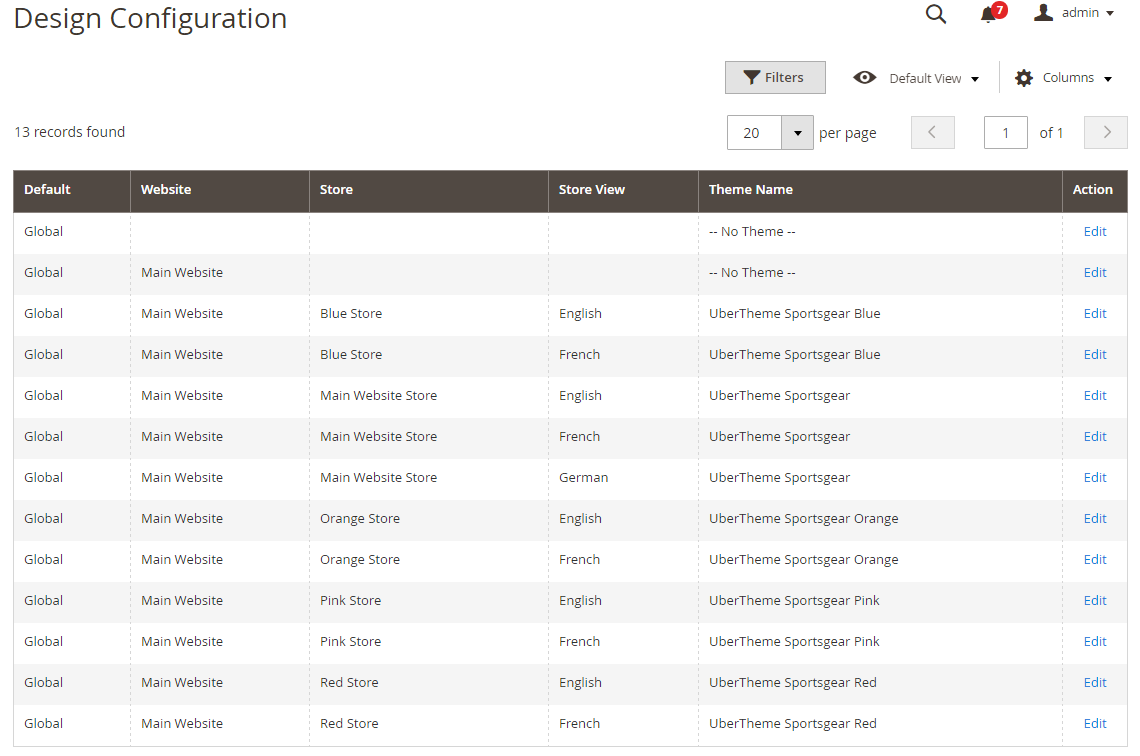
VII. Store Color Configuration
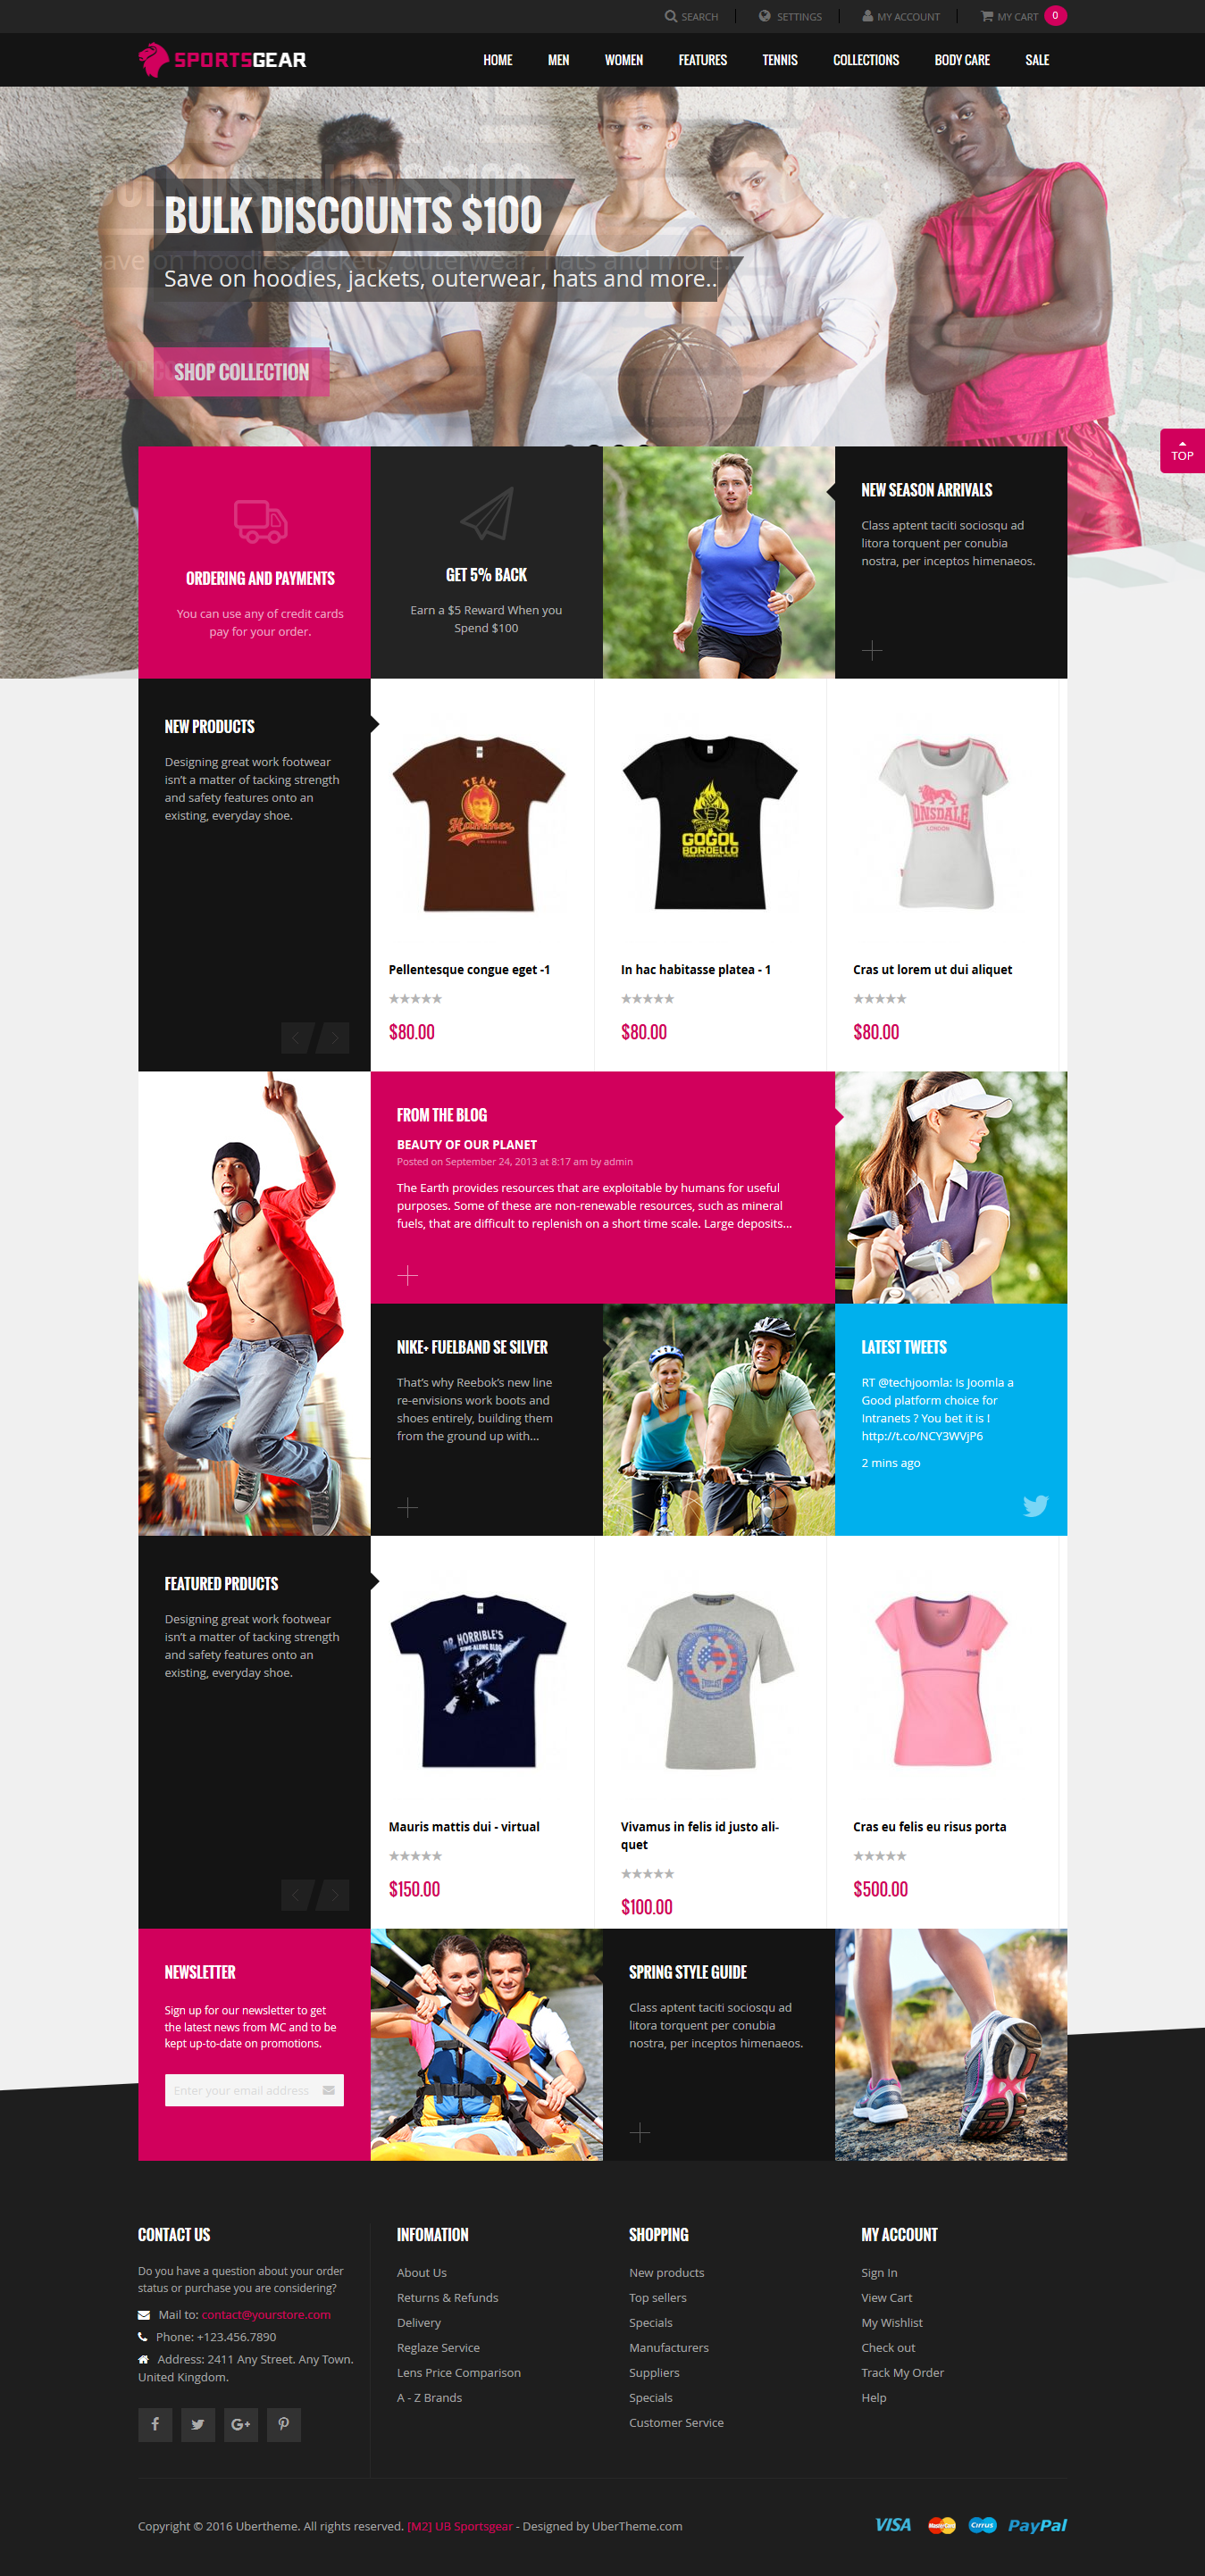
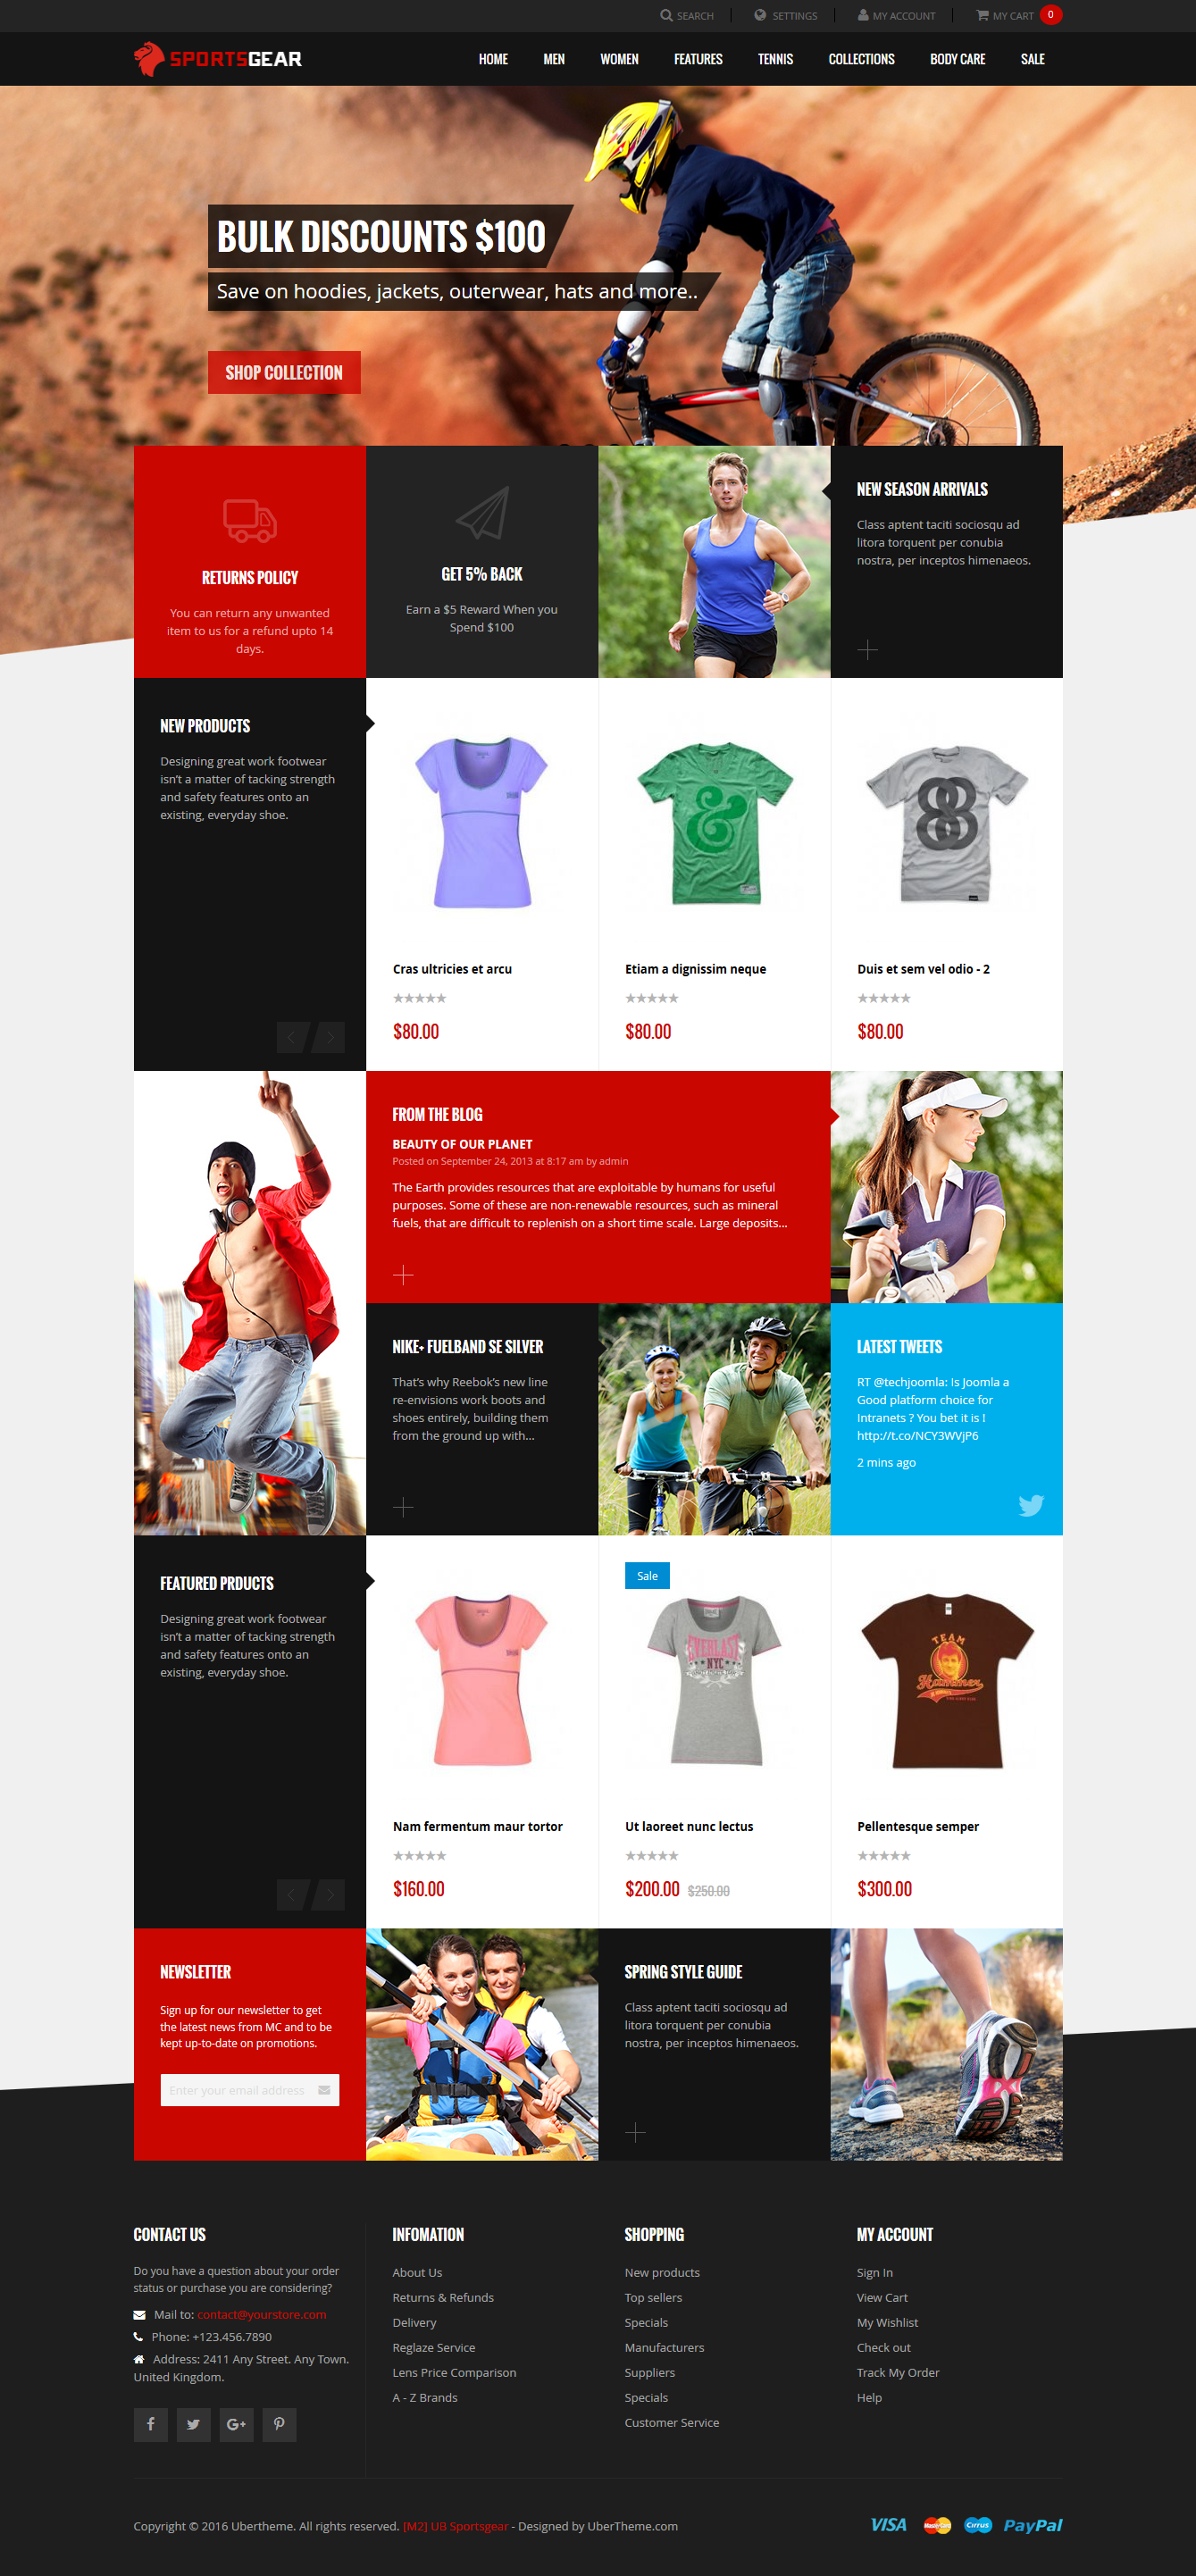
UB SportsGear built in a few color schemes for your store. Simply switch to the color you prefer.
Front-end Appearance:

- Pink Store -- View Front-end
- Blue Store -- View Front-end
- Main Website Store -- View Front-end
- Red Store -- View Front-end
- Orange Store -- View Front-end
In the Magento Admin Panel, navigate to Content >> Design and you should see the Configuration and Theme section where you can configure the store skin you wish:
- Configuration Tab: Back-end setting
- Themes Tab: Back-end setting
For instance you wish to use UB SportsGear Blue skin for your store, follow the steps below:
- Step 1: In the Magento Admin Panel, navigate to Content >> Design. Then click Edit button on the store-
- Step 2: Go to your admin dashboard, click System | Cache Management and clean cache
- Step 3: Open your terminal and go to the Magento directory. In this directory, run the following commands:
-- rm -R var/*
-- rm -R pub/static/*
-- php bin/mageno setup:static-content:deploy