UB Trex for Magento 2
Theme Introduction
UB Trex (beta) is a free Magento 2 theme we developed from the ground up. This documentation is to guide you through all steps how to install and configure responsive Magento 2 theme UB Trex.
I. Installation Prerequisites
UB Trex is a native Magento 2.x theme, please make sure your system meets the Magento 2 System requirements.
II. Download Packages
The download package includes:
- Theme: single theme for manual installation
- Quickstart: UB Trex without extensions (This quickstart is for free UB Trex version, without built-in extensions. You can purchase extension packages which are provided separately).
III. Installation Instruction
There are two ways to install a UberTheme Magento 2 theme:
- Manual Installation: Applicable if your store is full with content that you don’t want to overwrite.
- QuickStart Installation: Applicable if you want to get a whole new fresh site as per our Demo.
Manual Installation
Let’s start UB Trex manual installation by following these steps:
- Step 1: Download and extract UB Trex theme
- Step 2: Apply the theme
Step 1. Download and extract UB Trex theme
1.1. Download and extract UB Trex theme
Download the ub_trex_beta_1.0.0 zip file from your profile at Ubertheme, and extract it on your computer. Navigate inside the extracted folder, you should see the necessary folders listed below:
1.2. Copy and paste the folders to your web root
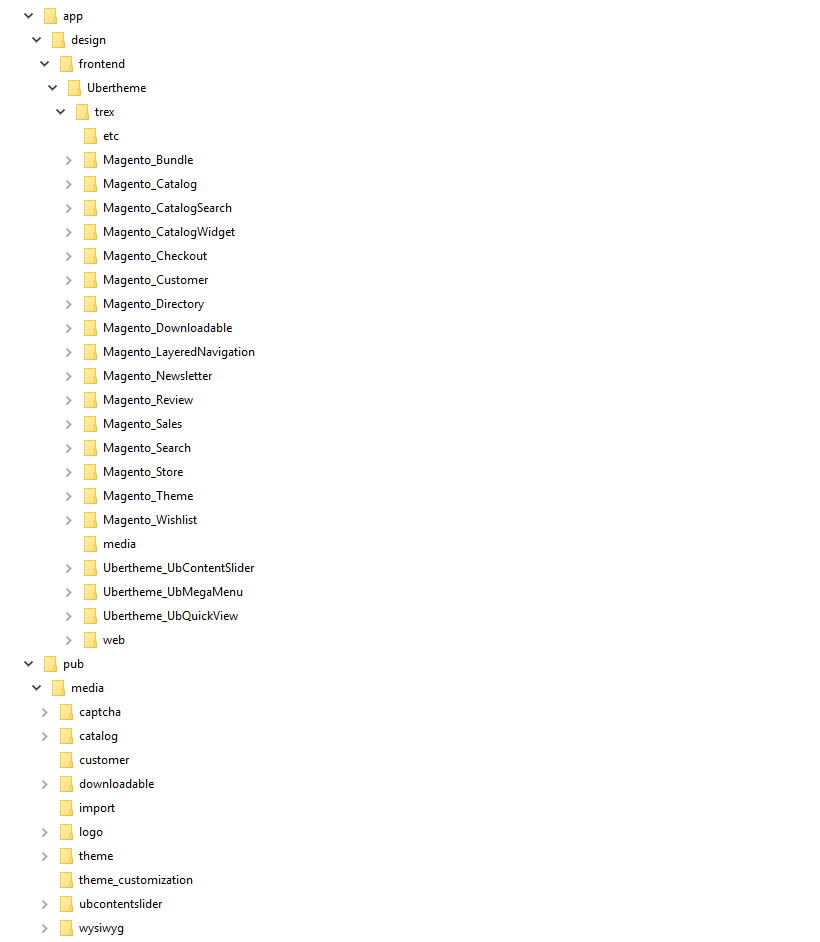
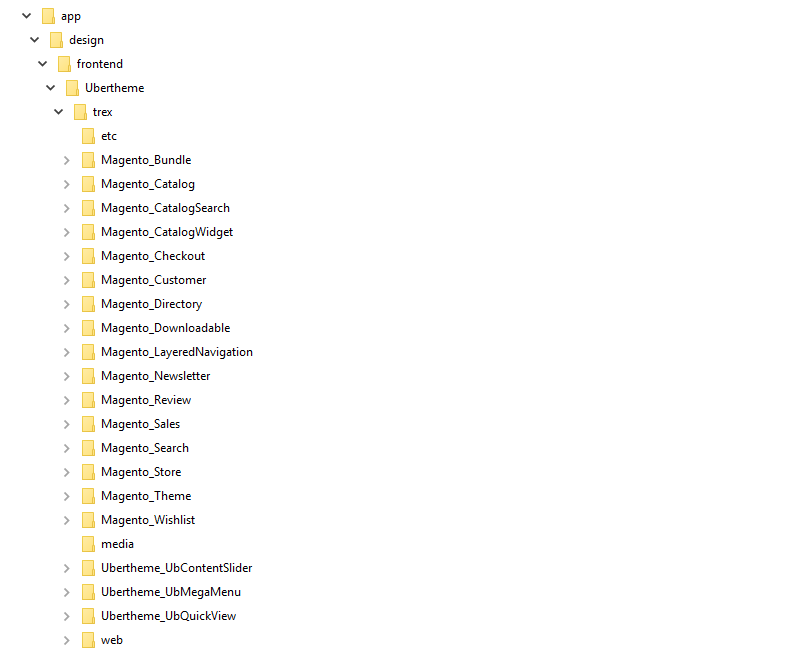
1.2.1. Copy and paste the folder app of the package you have unzipped to your web root. Once done, you should see the path:
..app/design/frontend/Ubertheme/trex/
The overwritten folders should have a directory tree like this:
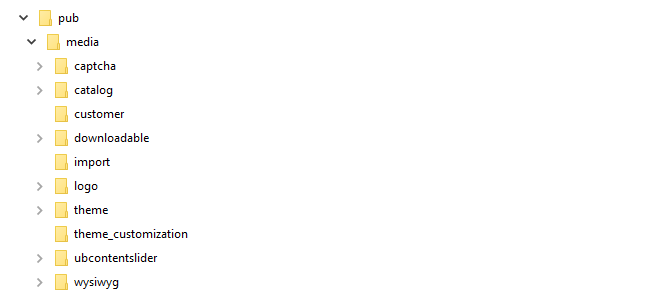
1.2.2. Copy and paste the pub/media folder of the package you have unzipped to your web root. Make sure you *merge*, not ‘replace’ existing media folder contents. The overwritten folders should have a directory layout like this:
Step 2: Apply the theme
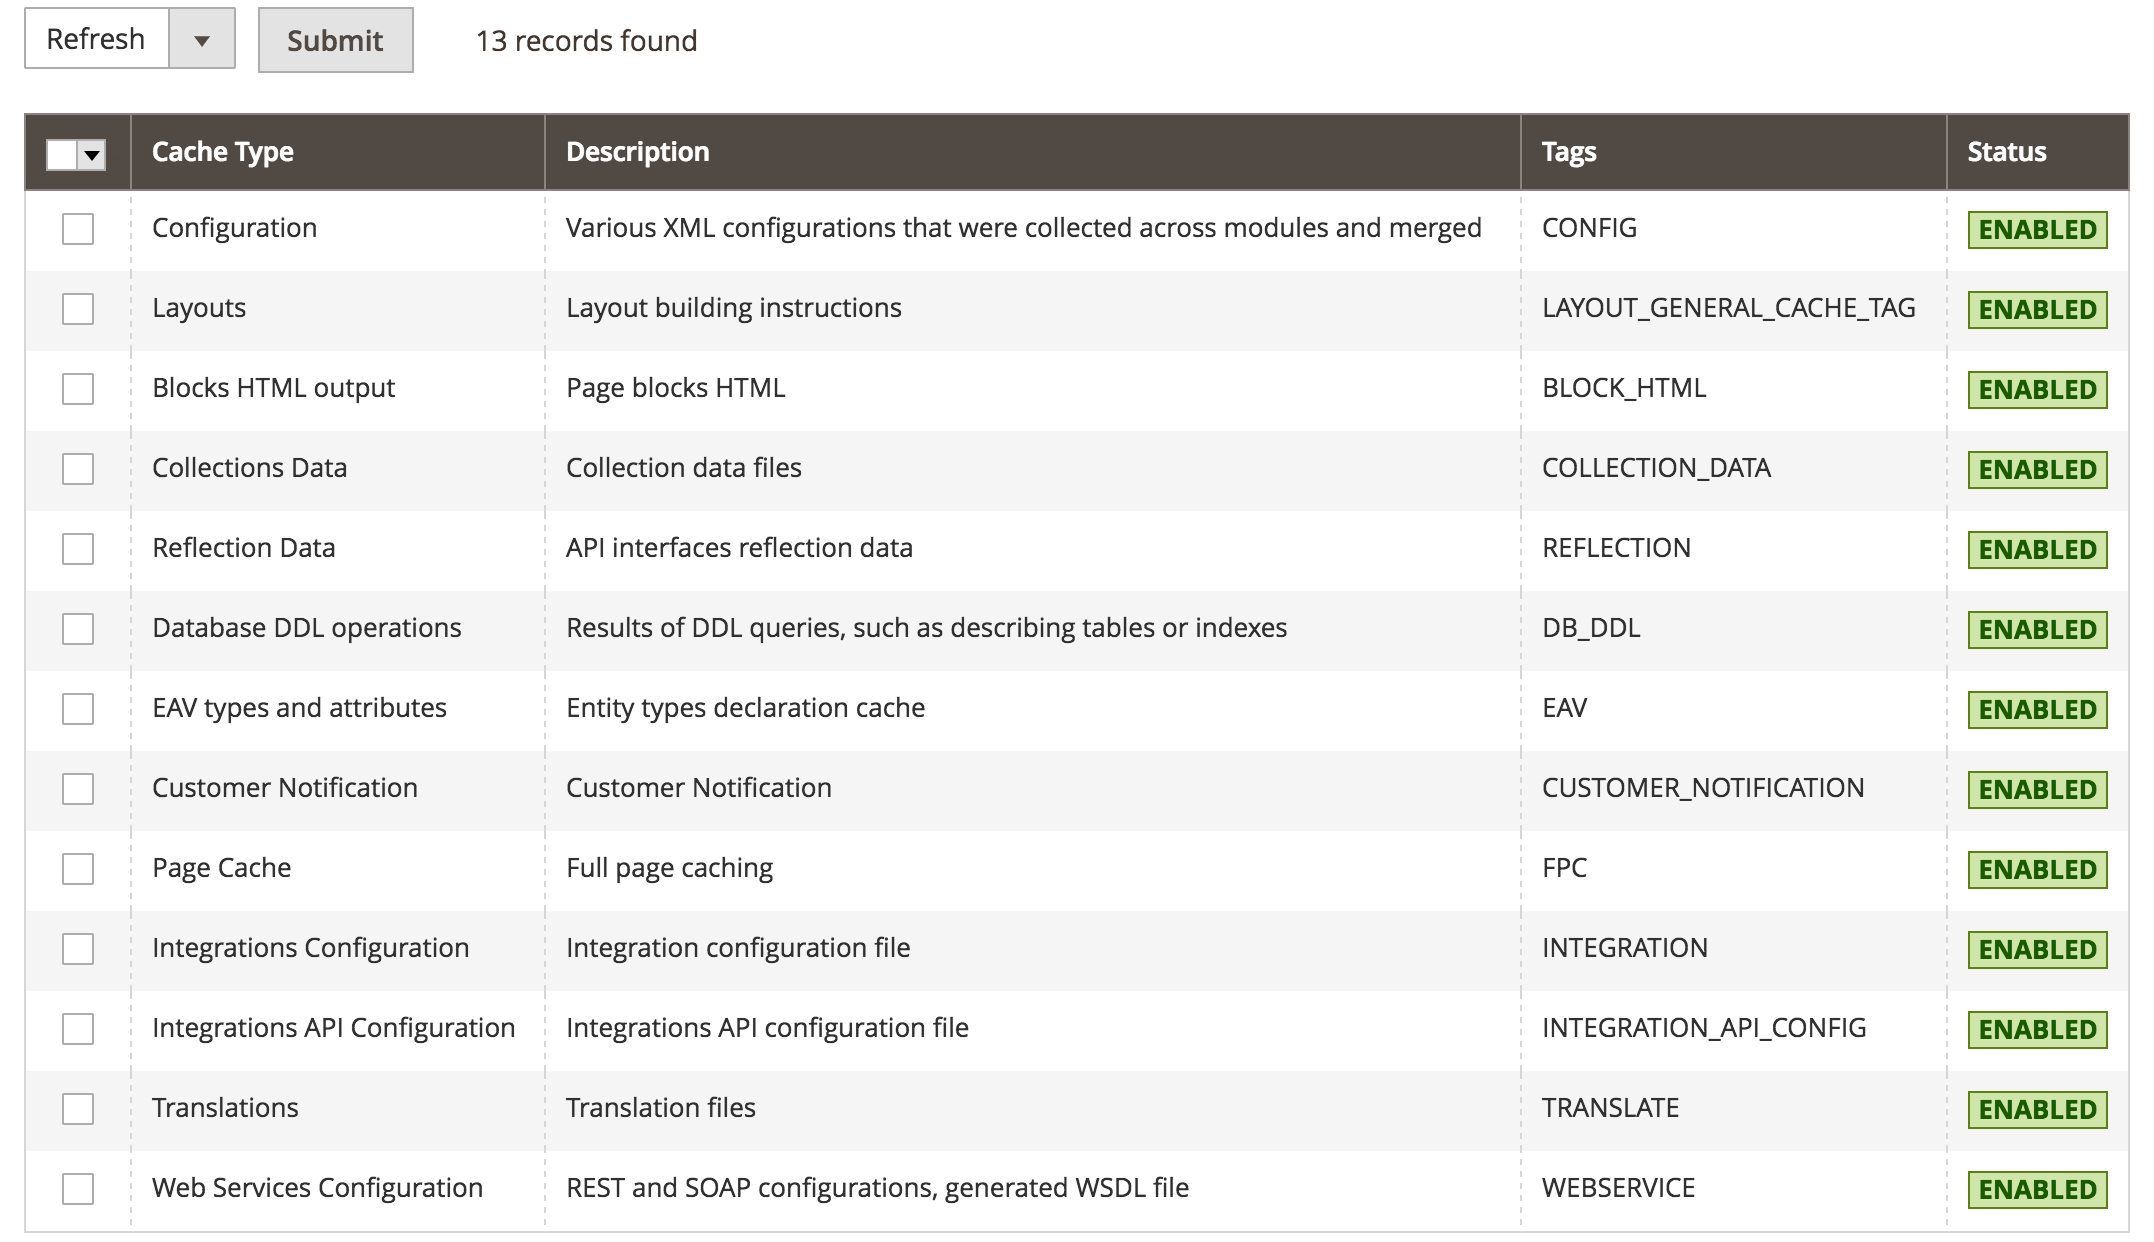
1. Navigate to System >> Tools >> Cache Management, select All the cache types, take Action as Refresh and Submit.
2. Navigate to Content >> Design tab >> (Select Configuration) Edit field with the “UB Trex“.
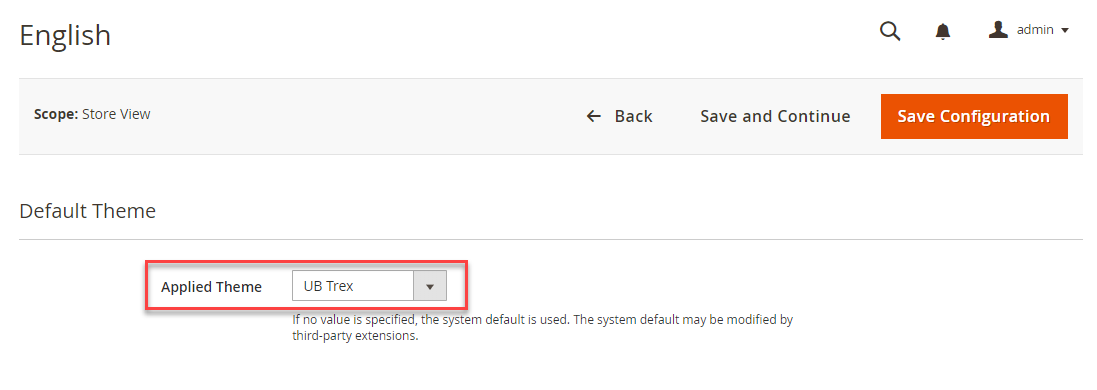
3. Click Save Config button to finish. And clear cache again.
NOTE: If you wish to set up UB Trex like our demo, there’re a few more steps, including static block configuration and extension configuration.That’s all. Now you can scroll down to learn more how to configure the theme.
Quickstart Installation
Quickstart package is to minimize time and effort in installing the theme as per Demo site. Kindly note that, with Quickstart, all your existing data will be overwritten. Thus, we recommend using Quickstart for your first installation or just in case you want to refresh your site to the very beginning. For step by step guide, please Click here
IV. Layout and Block positions
The layout of UB Trex Homepage can be illustrated as follows:
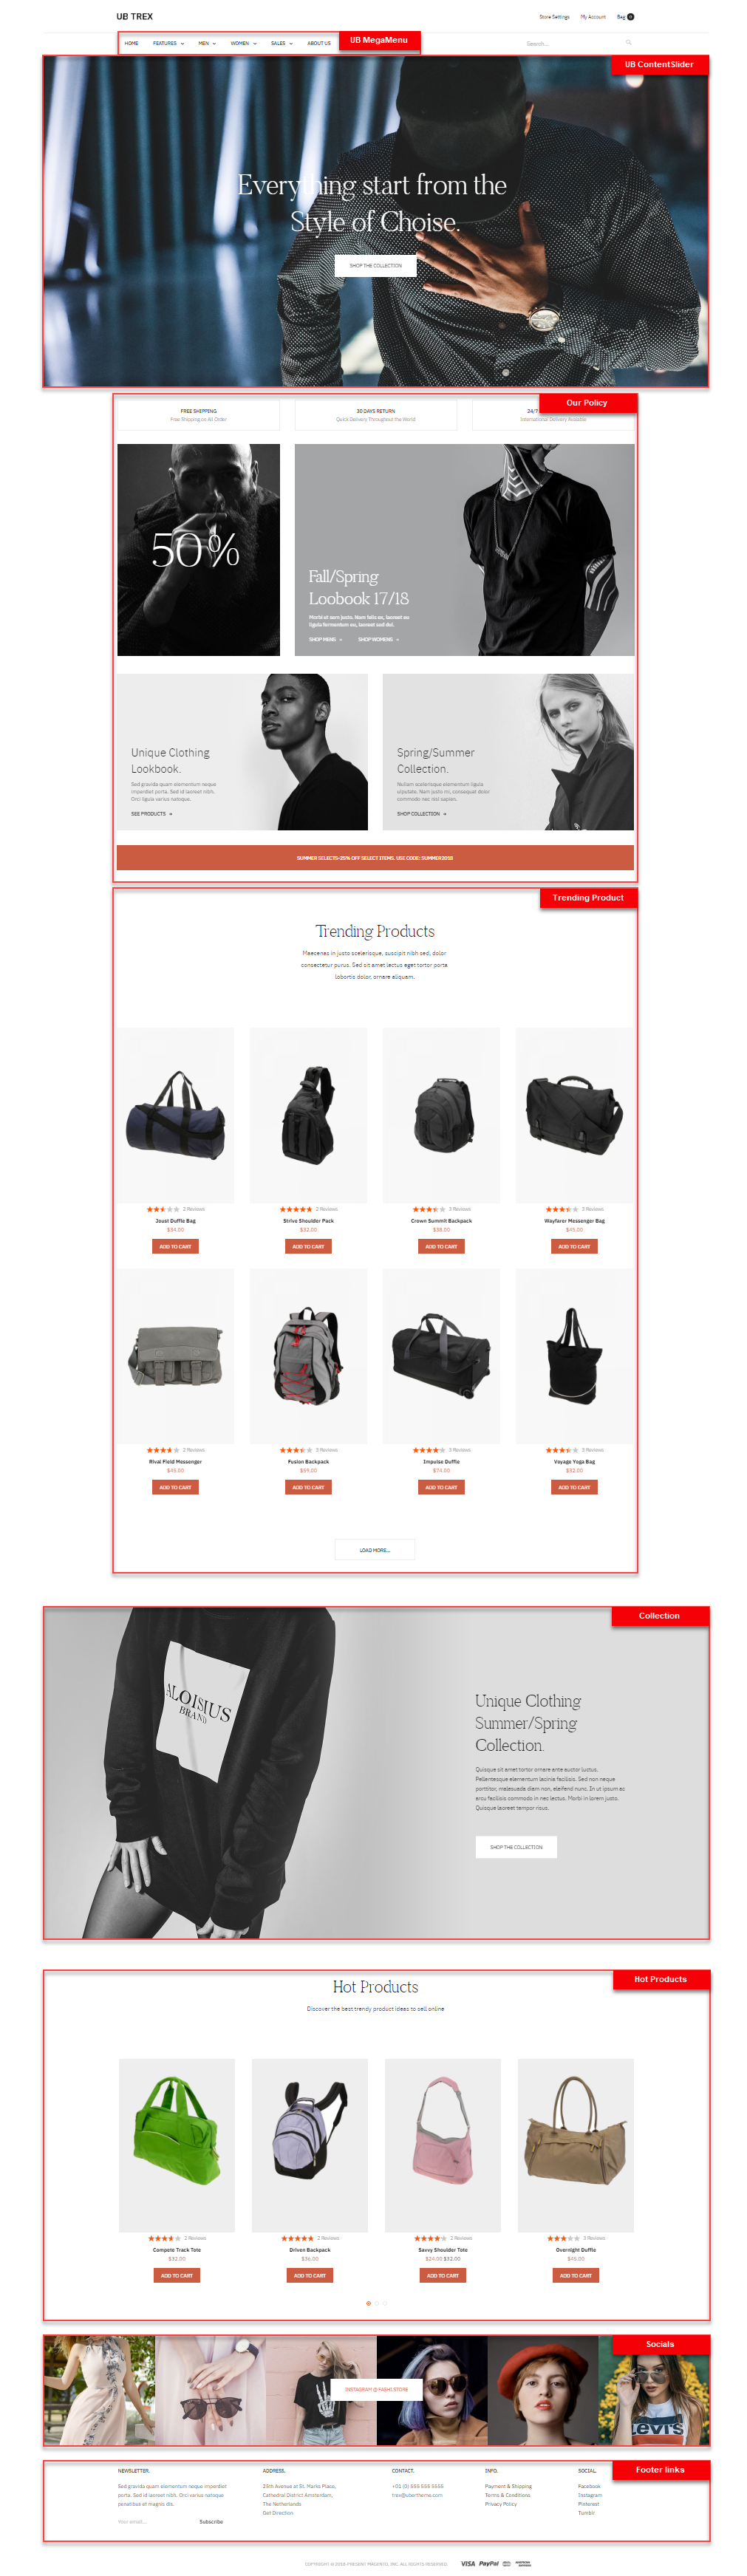
As seen in the screenshot, UB Trex storefront has the following static blocks:
- Extension: UB MegaMenu (UB Top Menu)
- Static Block: Slideshow
- Static Block: Our Policy
- Static Block: Trending Product
- Static Block: Collection
- Static Block: Hot Products
- Static Block: Social
- Static Block: Footer links
V. Page Configuration
This section will guide you to configure your pages just as the Demo site of UB Trex theme.
Homepage Configuration
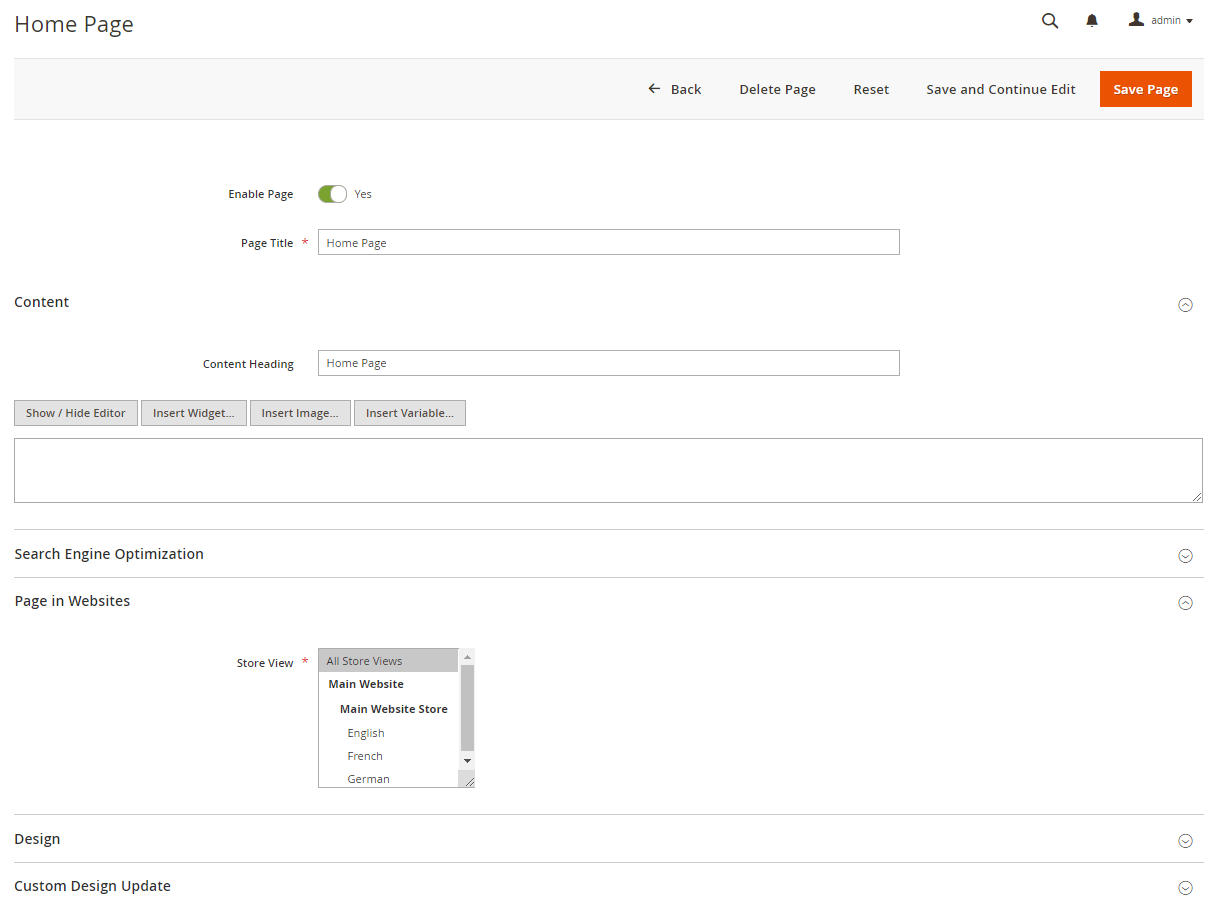
To configure this page, in the Admin Panel, navigate to Content | Elements | Pages | (Select Home Page) Edit.
- Page in Websites tab: click to see the Back-end setting
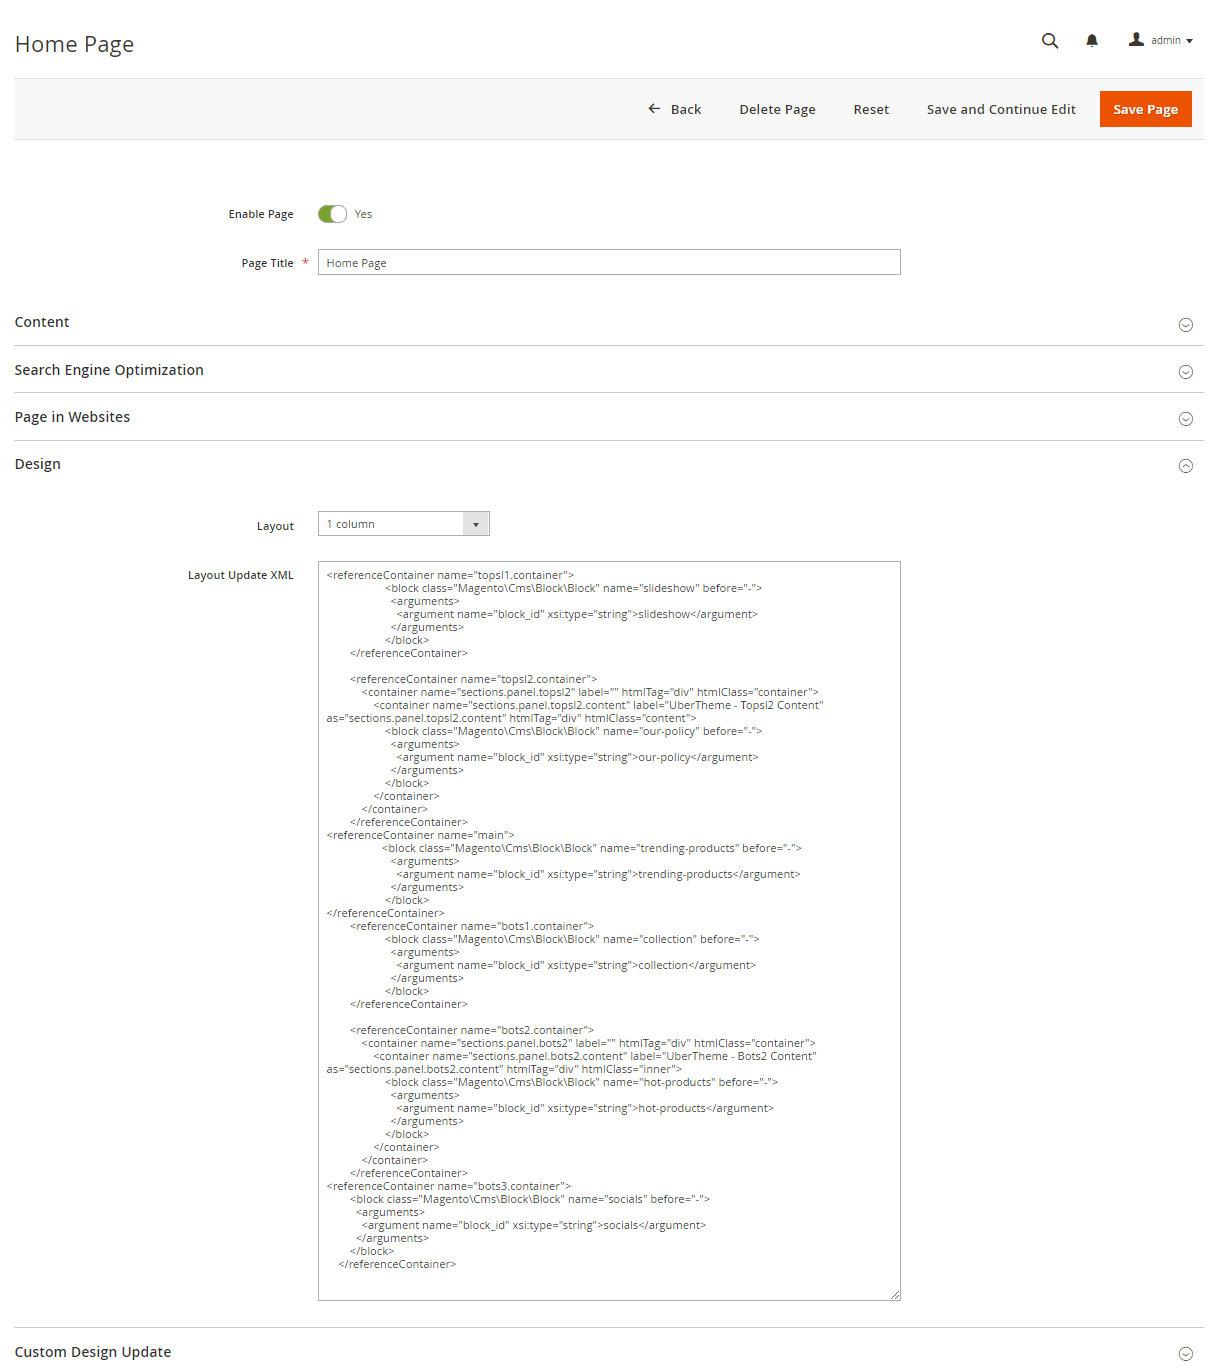
- Design tab: click to see the Back-end setting. You can copy and paste the following code into the “Design” field.
 <referenceContainer name="topsl1.container">
 <block class="Magento\Cms\Block\Block" name="slideshow" before="-">
 <arguments>
 <argument name="block_id" xsi:type="string">slideshow</argument>
 </arguments>
 </block>
 </referenceContainer>

 <referenceContainer name="topsl2.container">
 <container name="sections.panel.topsl2" label="" htmlTag="div" htmlClass="container">
 <container name="sections.panel.topsl2.content" label="UberTheme - Topsl2 Content" as="sections.panel.topsl2.content" htmlTag="div" htmlClass="content">
 <block class="Magento\Cms\Block\Block" name="our-policy" before="-">
 <arguments>
 <argument name="block_id" xsi:type="string">our-policy</argument>
 </arguments>
 </block>
 </container>
 </container>
 </referenceContainer>
<referenceContainer name="main">
 <block class="Magento\Cms\Block\Block" name="trending-products" before="-">
 <arguments>
 <argument name="block_id" xsi:type="string">trending-products</argument>
 </arguments>
 </block>
</referenceContainer>
 <referenceContainer name="bots1.container">
 <block class="Magento\Cms\Block\Block" name="collection" before="-">
 <arguments>
 <argument name="block_id" xsi:type="string">collection</argument>
 </arguments>
 </block>
 </referenceContainer>

 <referenceContainer name="bots2.container">
 <container name="sections.panel.bots2" label="" htmlTag="div" htmlClass="container">
 <container name="sections.panel.bots2.content" label="UberTheme - Bots2 Content" as="sections.panel.bots2.content" htmlTag="div" htmlClass="inner">
 <block class="Magento\Cms\Block\Block" name="hot-products" before="-">
 <arguments>
 <argument name="block_id" xsi:type="string">hot-products</argument>
 </arguments>
 </block>
 </container>
 </container>
 </referenceContainer>
<referenceContainer name="bots3.container">
 <block class="Magento\Cms\Block\Block" name="socials" before="-">
 <arguments>
 <argument name="block_id" xsi:type="string">socials</argument>
 </arguments>
 </block>
 </referenceContainer>
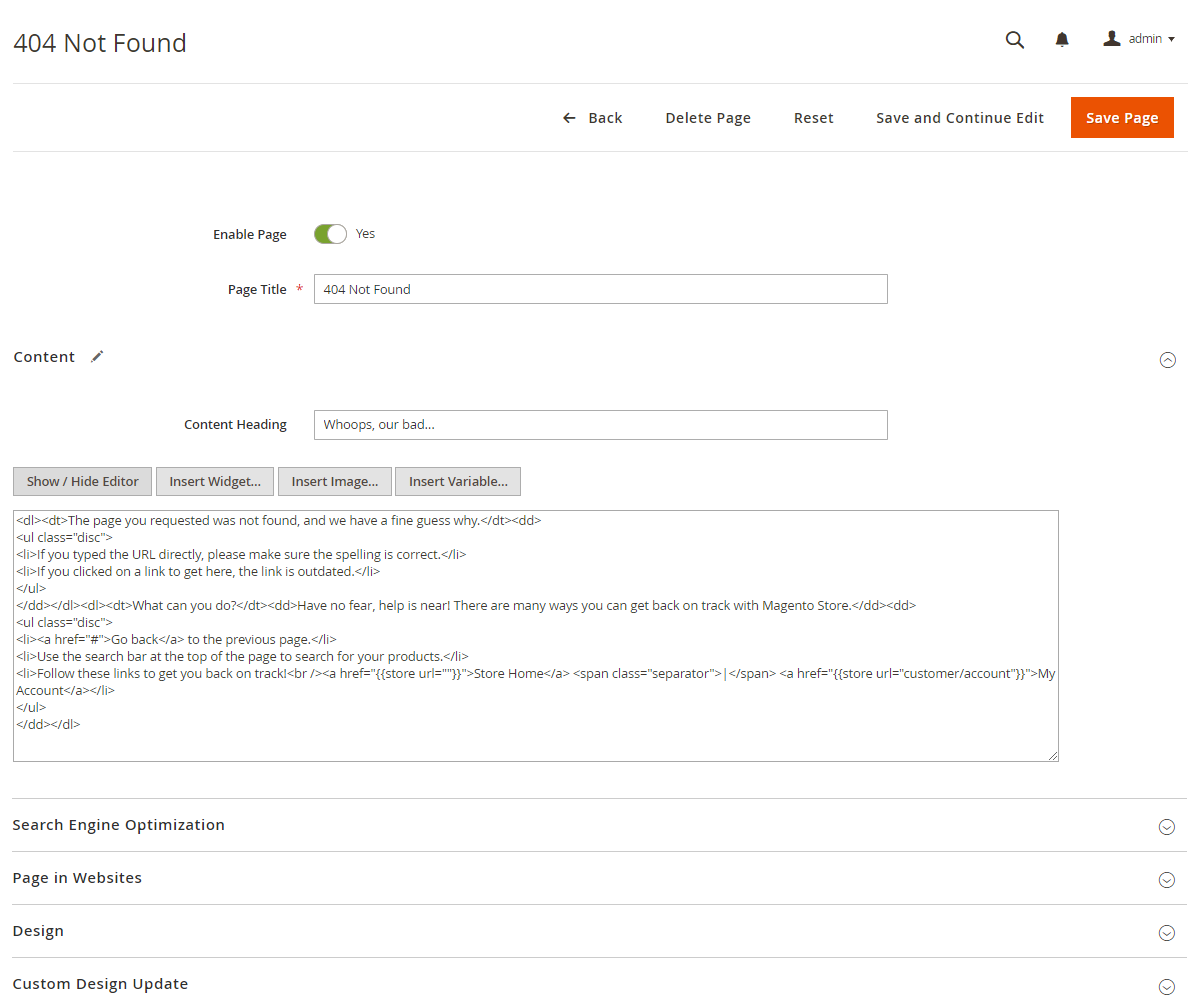
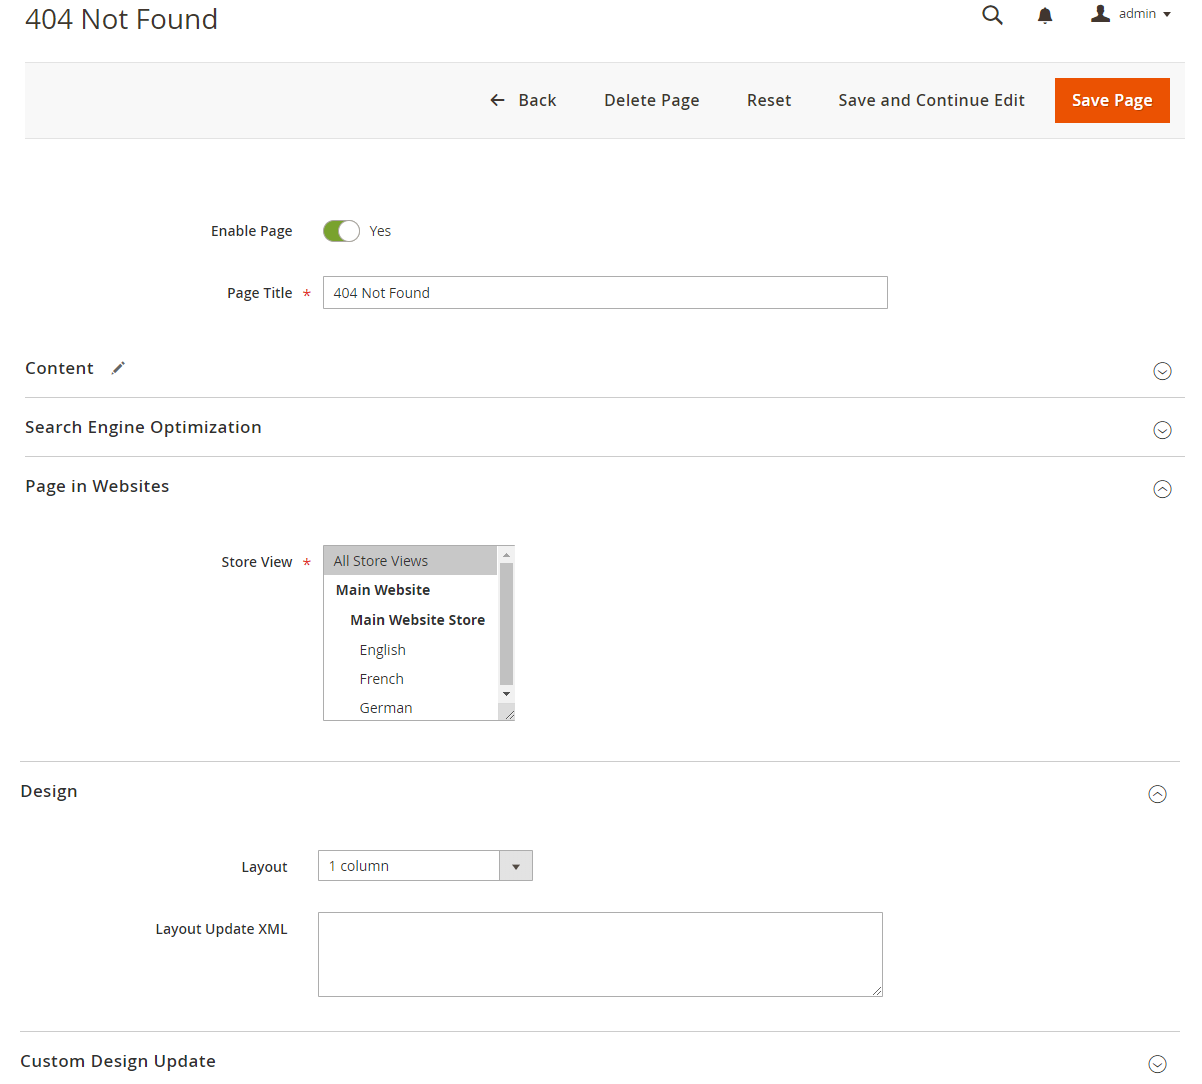
404 page Configuration
To configure this page, in the Admin Panel, navigate to Content | Elements | Pages, then select 404 Not Found page to update the settings as follows:
- Content tab: click to see the Back-end setting
- Page in Websites tab: click to see the Back-end setting.
Copy and paste the code below on the Content field:
<dl><dt>The page you requested was not found, and we have a fine guess why.</dt><dd>
<ul class="disc">
<li>If you typed the URL directly, please make sure the spelling is correct.</li>
<li>If you clicked on a link to get here, the link is outdated.</li>
</ul>
</dd></dl><dl><dt>What can you do?</dt><dd>Have no fear, help is near! There are many ways you can get back on track with Magento Store.</dd><dd>
<ul class="disc">
<li><a href="#">Go back</a> to the previous page.</li>
<li>Use the search bar at the top of the page to search for your products.</li>
<li>Follow these links to get you back on track!<br /><a href="{{store url=""}}">Store Home</a> <span class="separator">|</span> <a href="{{store url="customer/account"}}">My Account</a></li>
</ul>
</dd></dl>
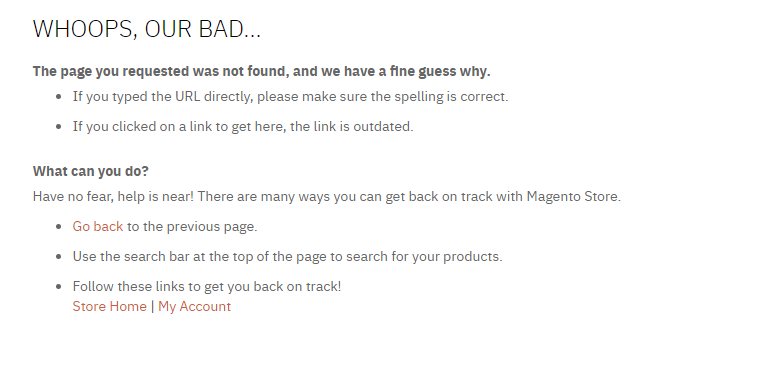
Front-end Appearance:
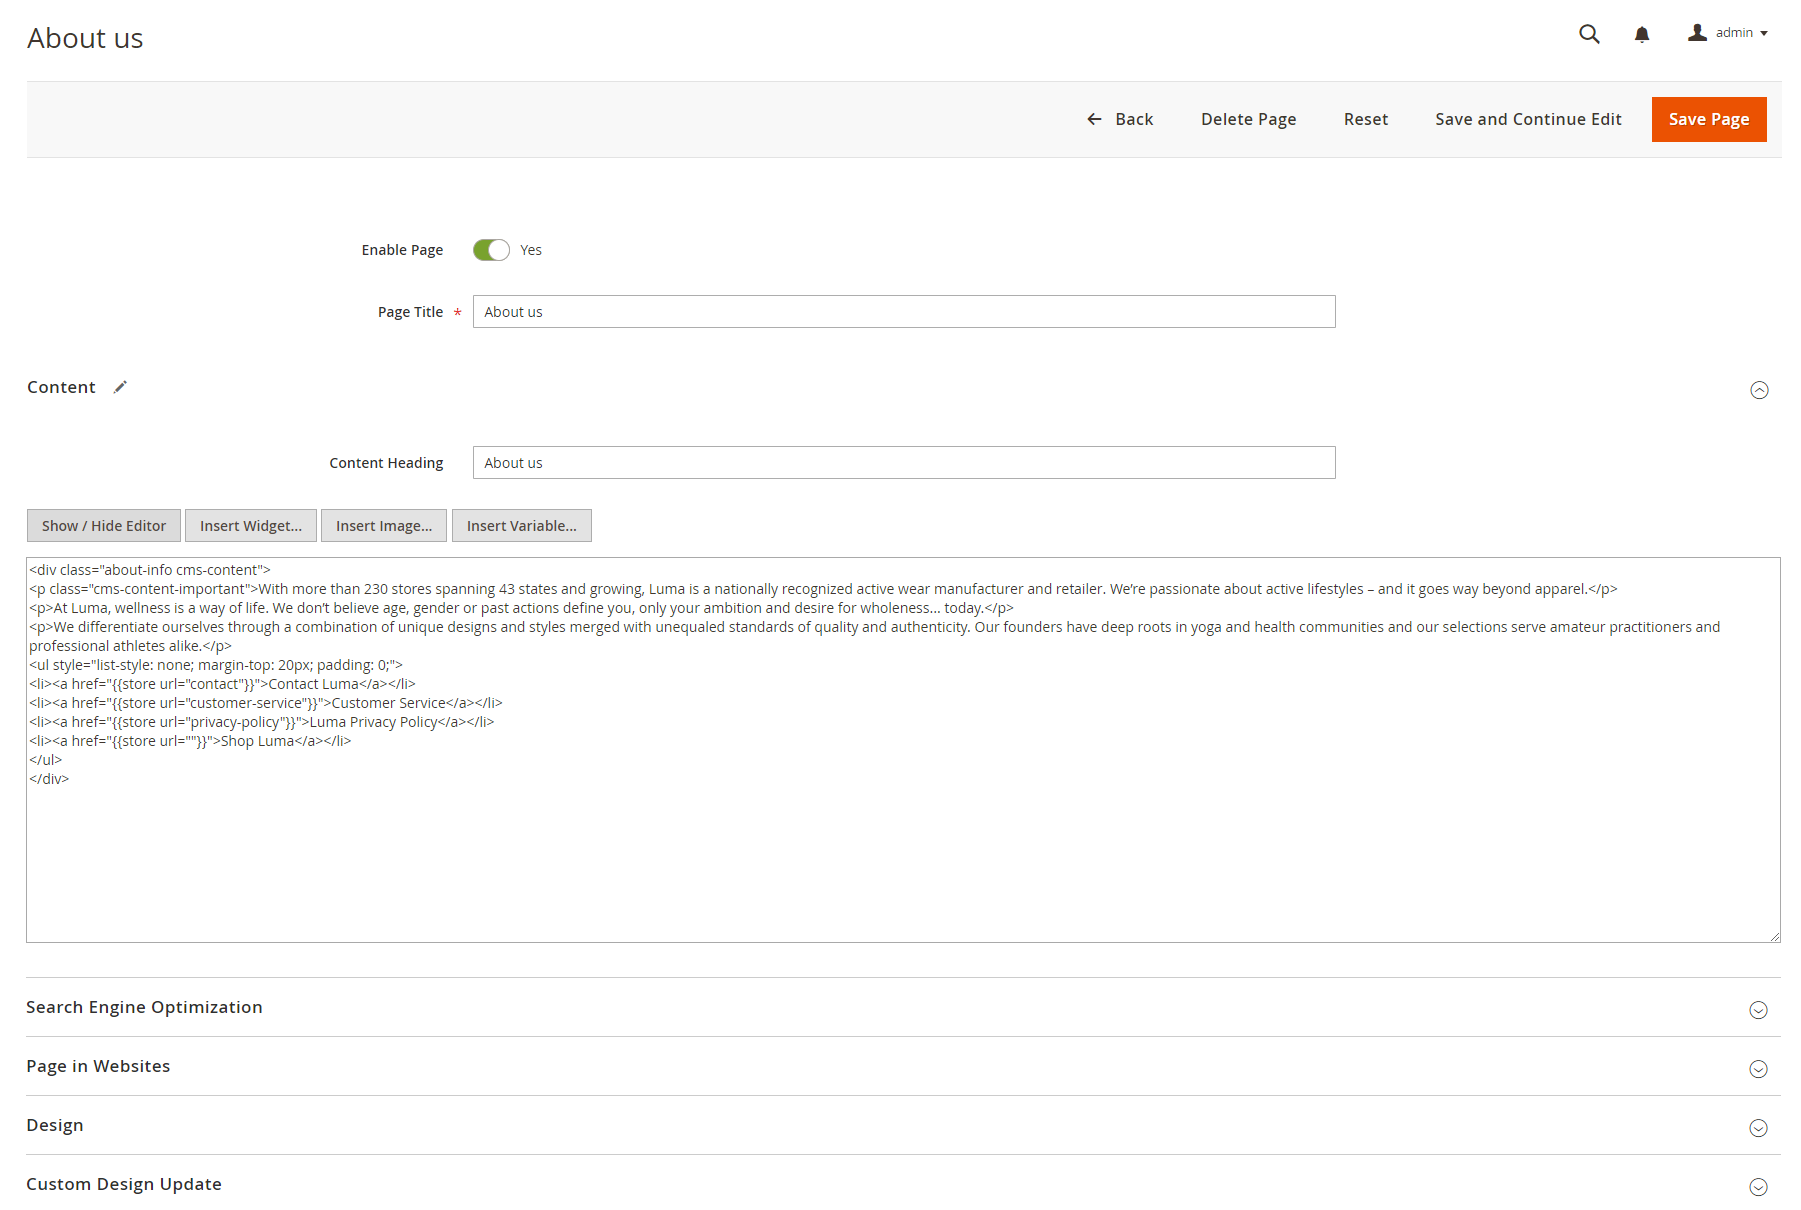
About Us Configuration
To configure this page, in the Admin Panel, navigate to Content | Elements | Pages, then select About Us page to update the settings as follows:
- Content tab: click to see the Back-end setting
- Page in Websites tab: click to see the Back-end setting.
Copy and paste the code below on the Content field:
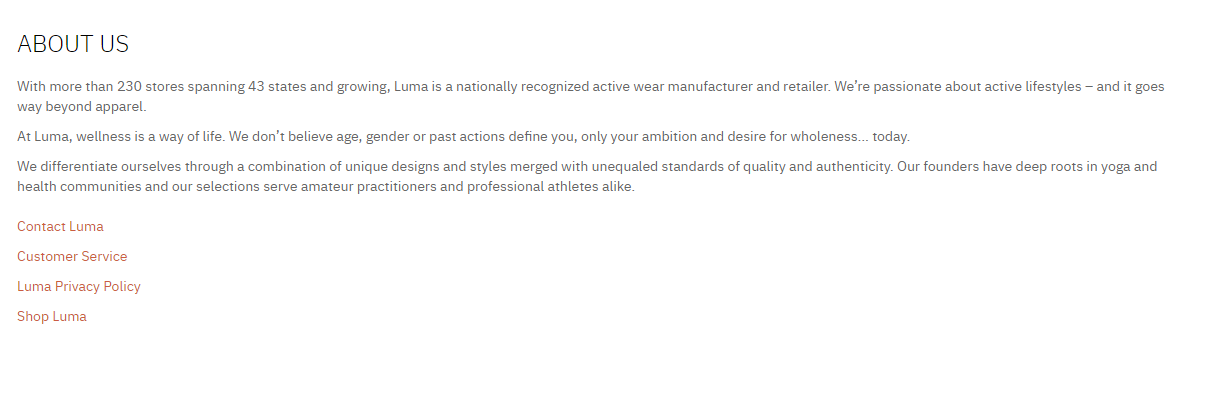
<div class="about-info cms-content">
<p class="cms-content-important">With more than 230 stores spanning 43 states and growing, Luma is a nationally recognized active wear manufacturer and retailer. We’re passionate about active lifestyles – and it goes way beyond apparel.</p>
<p>At Luma, wellness is a way of life. We don’t believe age, gender or past actions define you, only your ambition and desire for wholeness... today.</p>
<p>We differentiate ourselves through a combination of unique designs and styles merged with unequaled standards of quality and authenticity. Our founders have deep roots in yoga and health communities and our selections serve amateur practitioners and professional athletes alike.</p>
<ul style="list-style: none; margin-top: 20px; padding: 0;">
<li><a href="{{store url="contact"}}">Contact Luma</a></li>
<li><a href="{{store url="customer-service"}}">Customer Service</a></li>
<li><a href="{{store url="privacy-policy"}}">Luma Privacy Policy</a></li>
<li><a href="{{store url=""}}">Shop Luma</a></li>
</ul>
</div>
Front-end Appearance:
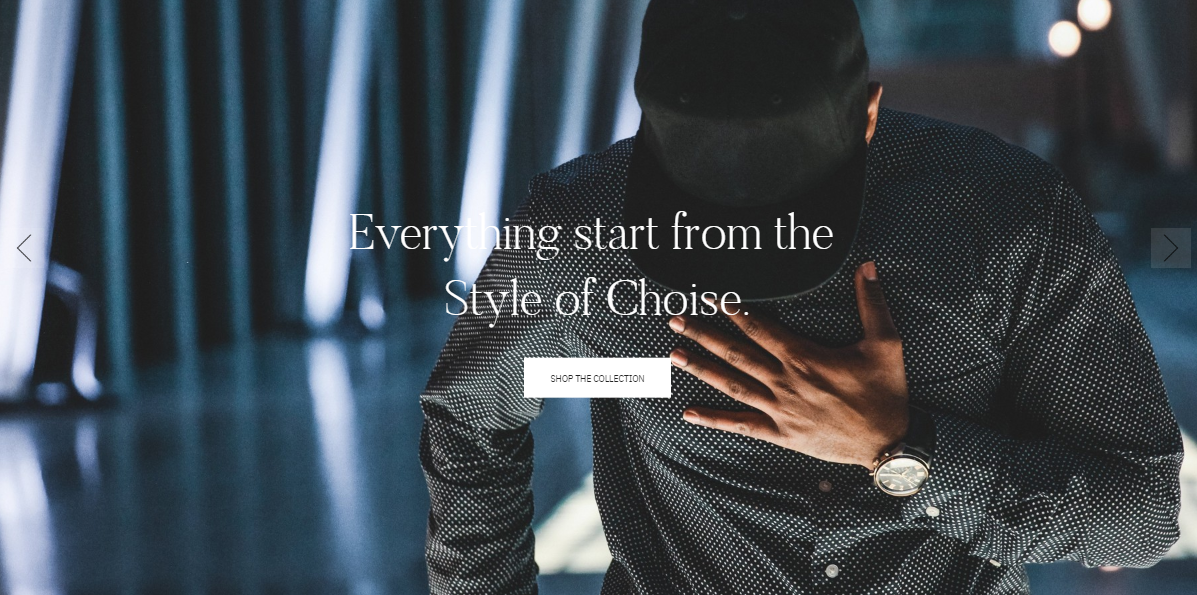
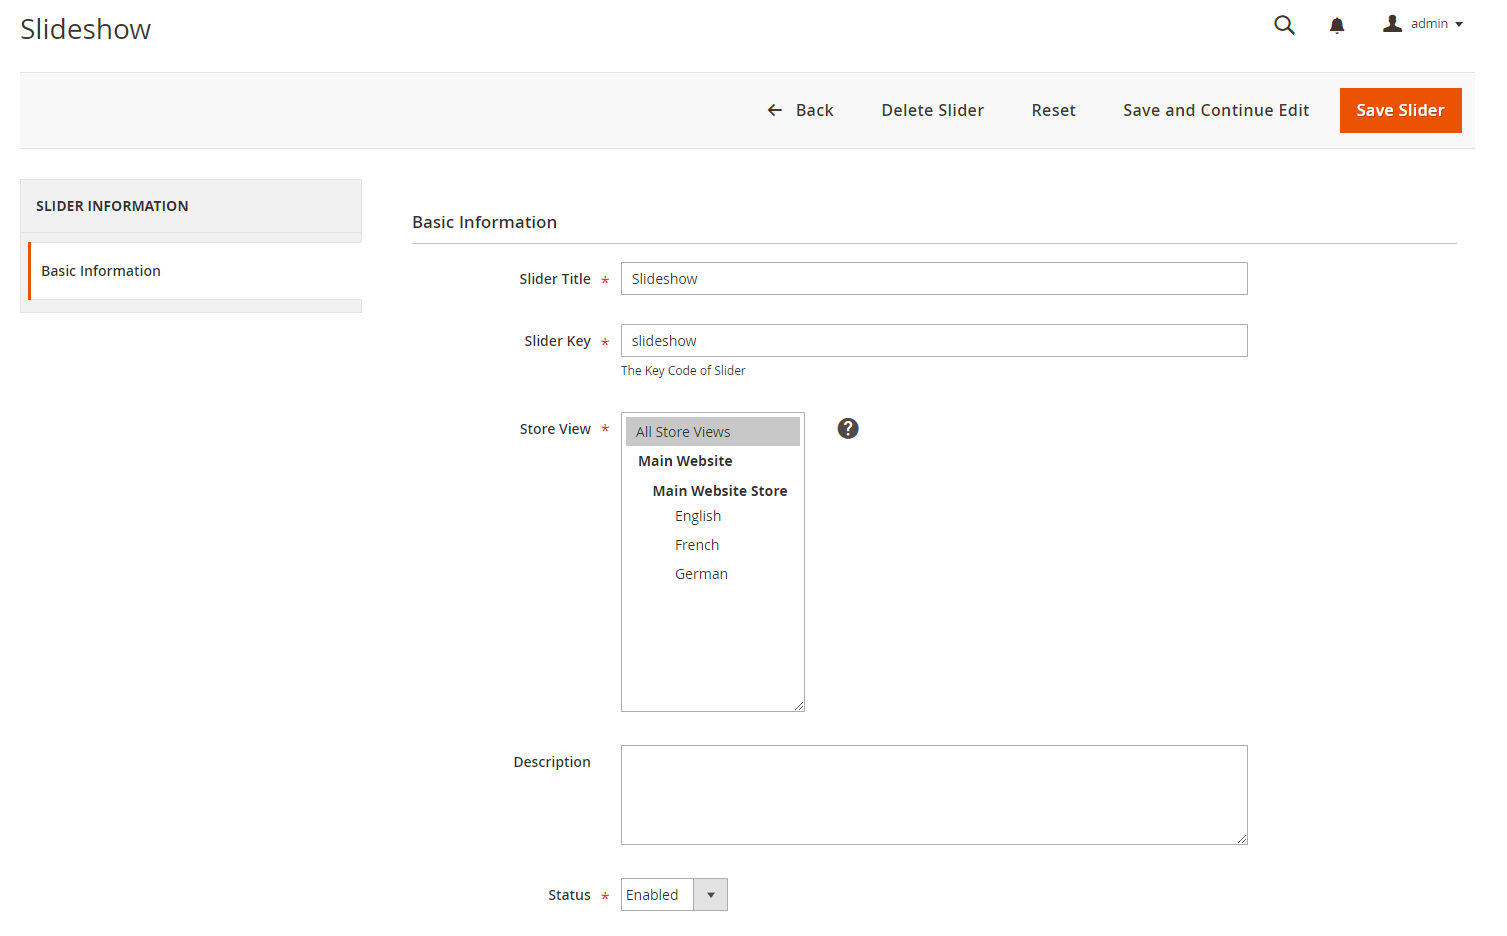
1. Slideshow
In your admin dashboard, click Content | (Elements) Blocks | Add New Block, then create a Slideshow block with the configuration like this sample: Back-end setting
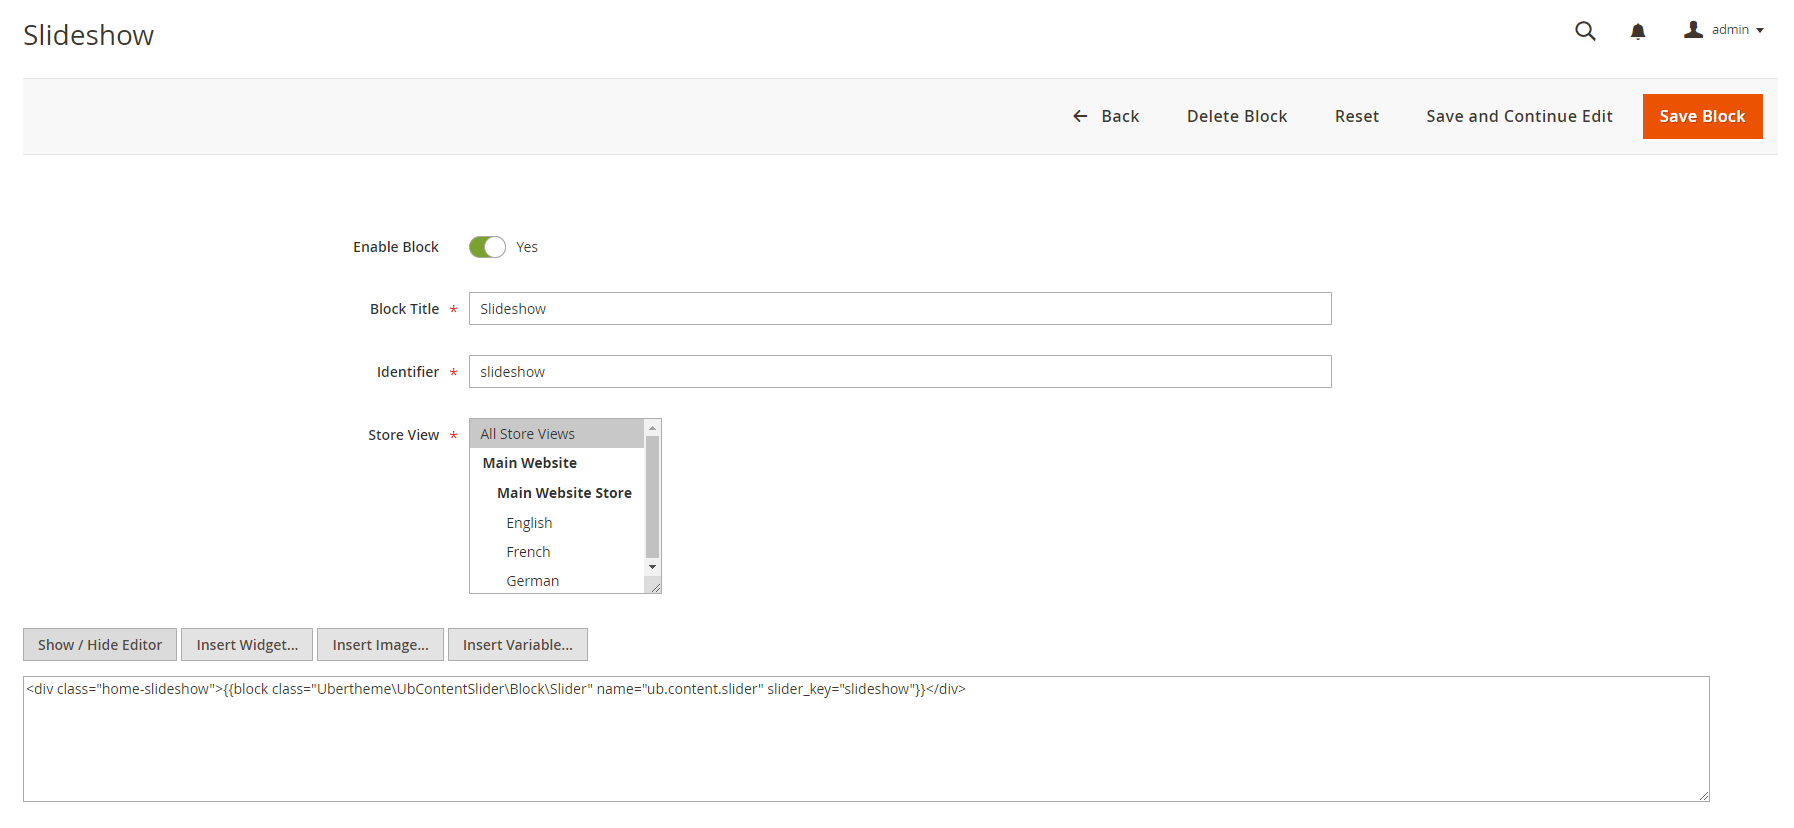
In the Content field, click Show/Hide Editor button, then copy and paste the following code:
<div class="home-slideshow">{{block class="Ubertheme\UbContentSlider\Block\Slider" name="ub.content.slider" slider_key="slideshow"}}</div>
Front-end Appearance:
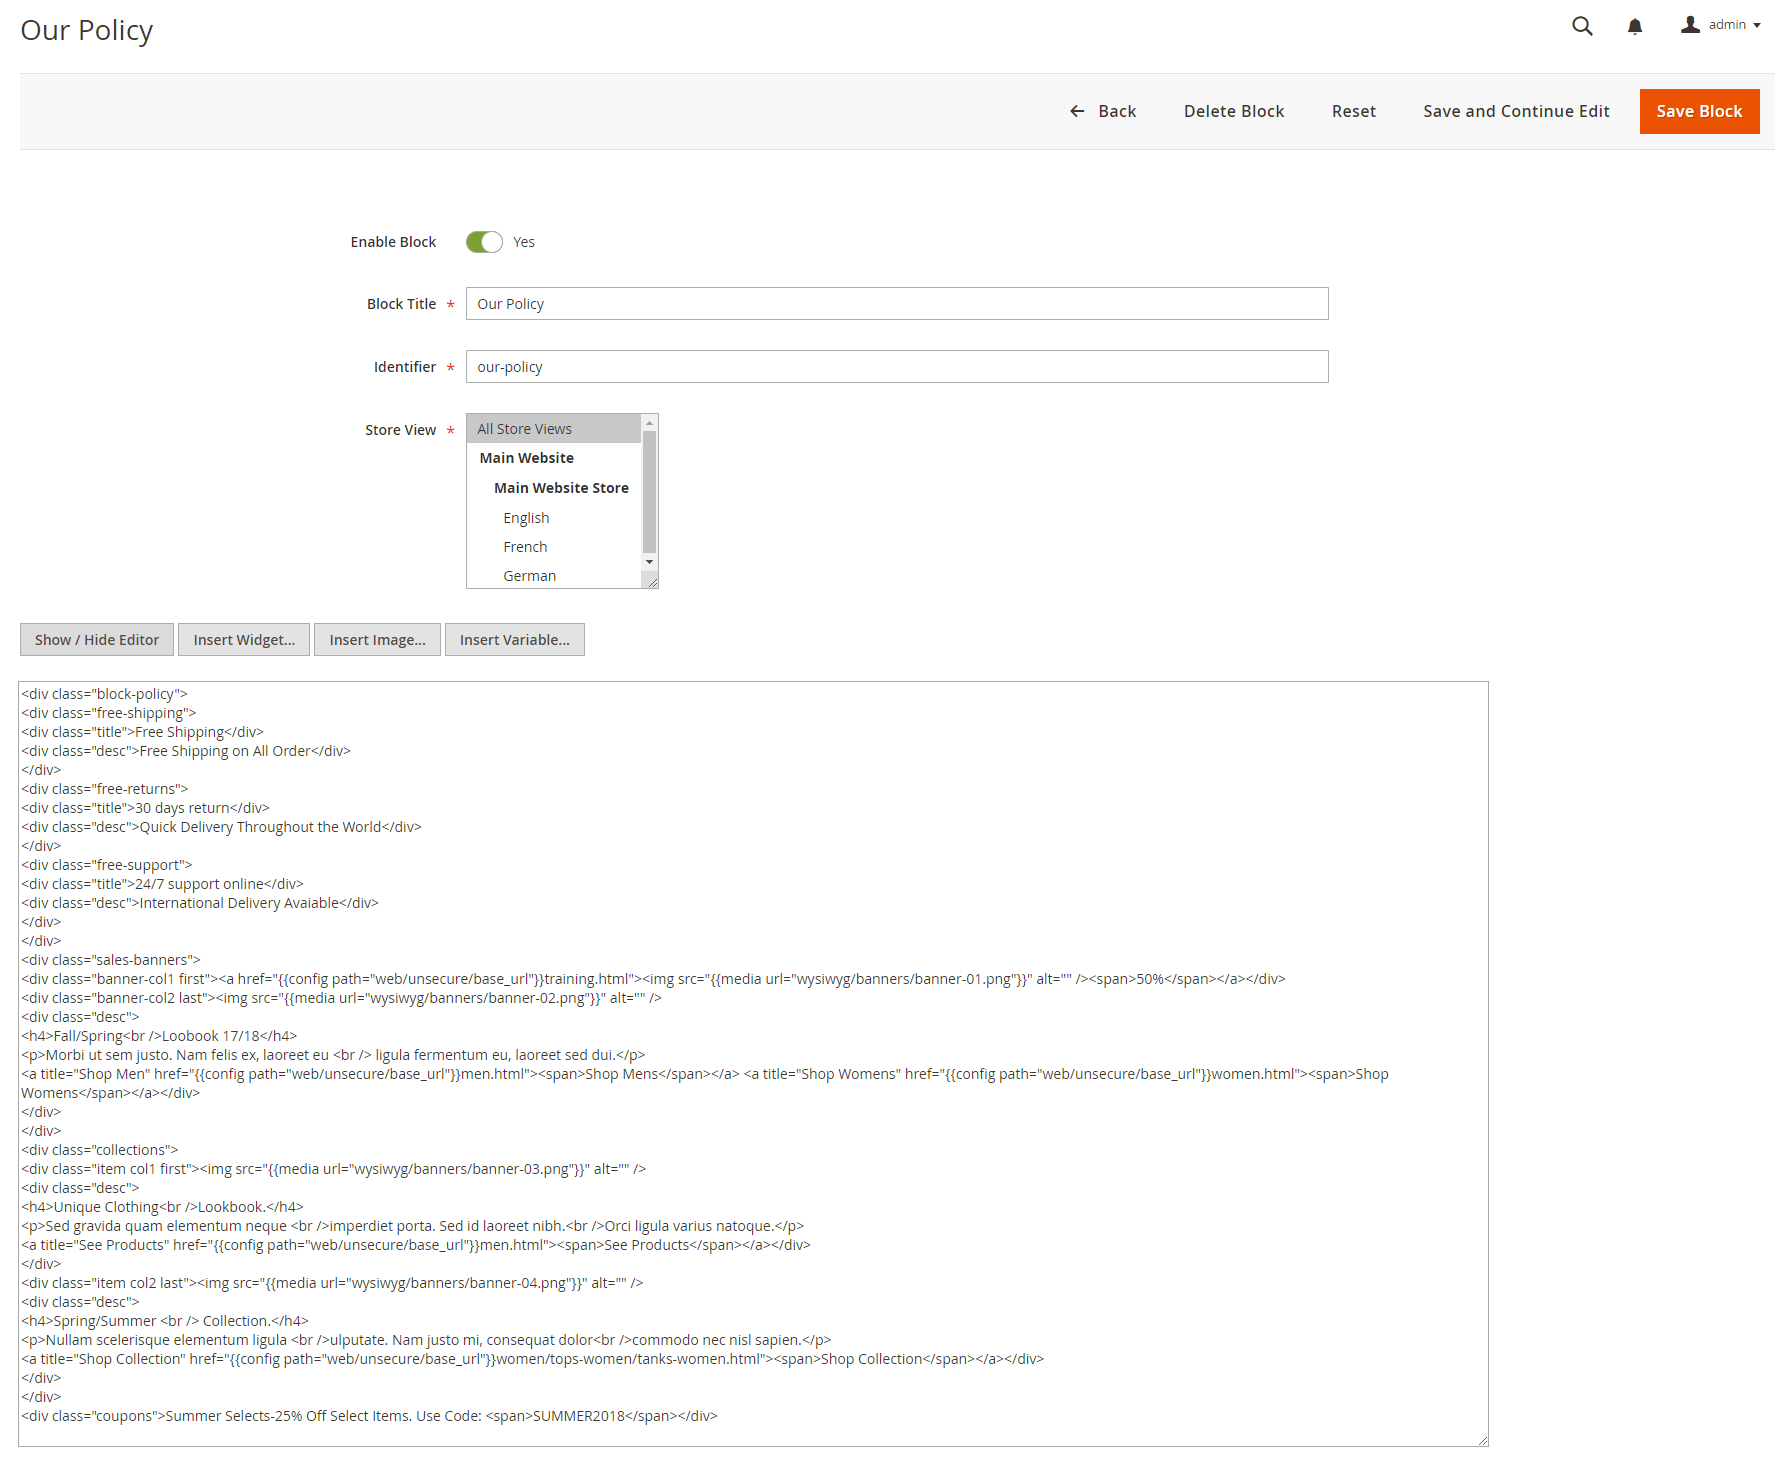
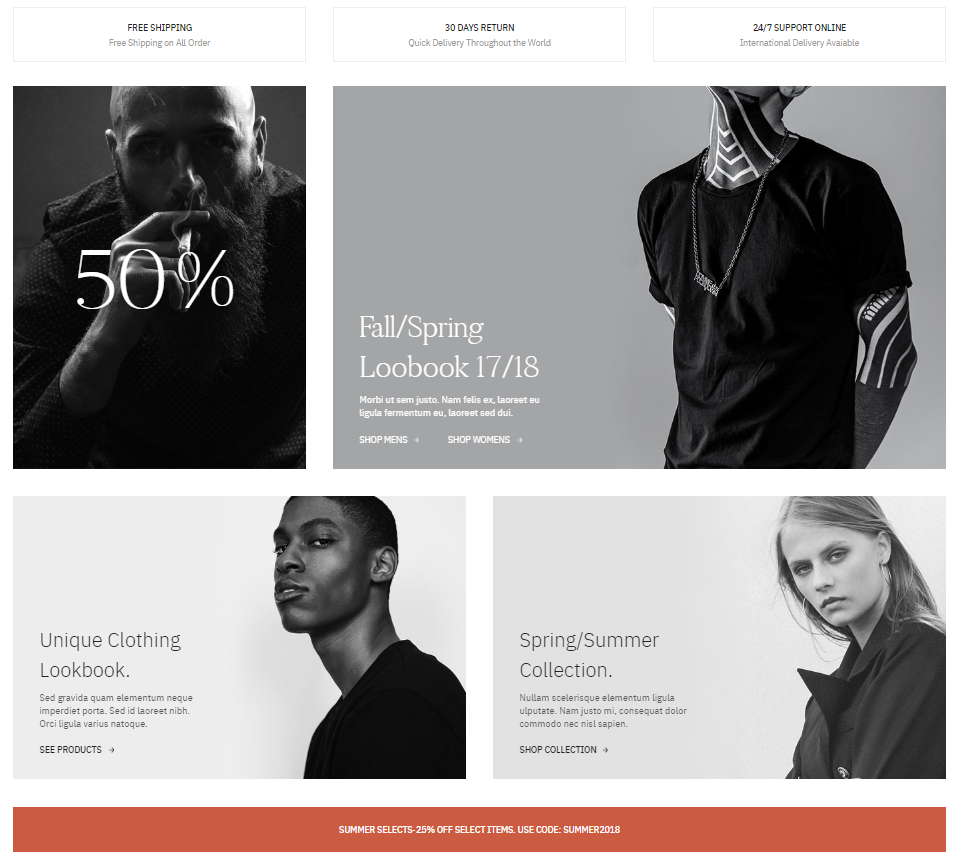
2. Our Policy
You can create the Our Policy block with configuration as follows:
Back-end setting
In the Content field, click Show/Hide Editor button, then copy and paste the following code:
<div class="block-policy">
<div class="free-shipping">
<div class="title">Free Shipping</div>
<div class="desc">Free Shipping on All Order</div>
</div>
<div class="free-returns">
<div class="title">30 days return</div>
<div class="desc">Quick Delivery Throughout the World</div>
</div>
<div class="free-support">
<div class="title">24/7 support online</div>
<div class="desc">International Delivery Avaiable</div>
</div>
</div>
<div class="sales-banners">
<div class="banner-col1 first"><a href="{{config path="web/unsecure/base_url"}}training.html"><img src="{{media url="wysiwyg/banners/banner-01.png"}}" alt="" /><span>50%</span></a></div>
<div class="banner-col2 last"><img src="{{media url="wysiwyg/banners/banner-02.png"}}" alt="" />
<div class="desc">
<h4>Fall/Spring<br />Loobook 17/18</h4>
<p>Morbi ut sem justo. Nam felis ex, laoreet eu <br /> ligula fermentum eu, laoreet sed dui.</p>
<a title="Shop Men" href="{{config path="web/unsecure/base_url"}}men.html"><span>Shop Mens</span></a> <a title="Shop Womens" href="{{config path="web/unsecure/base_url"}}women.html"><span>Shop Womens</span></a></div>
</div>
</div>
<div class="collections">
<div class="item col1 first"><img src="{{media url="wysiwyg/banners/banner-03.png"}}" alt="" />
<div class="desc">
<h4>Unique Clothing<br />Lookbook.</h4>
<p>Sed gravida quam elementum neque <br />imperdiet porta. Sed id laoreet nibh.<br />Orci ligula varius natoque.</p>
<a title="See Products" href="{{config path="web/unsecure/base_url"}}men.html"><span>See Products</span></a></div>
</div>
<div class="item col2 last"><img src="{{media url="wysiwyg/banners/banner-04.png"}}" alt="" />
<div class="desc">
<h4>Spring/Summer <br /> Collection.</h4>
<p>Nullam scelerisque elementum ligula <br />ulputate. Nam justo mi, consequat dolor<br />commodo nec nisl sapien.</p>
<a title="Shop Collection" href="{{config path="web/unsecure/base_url"}}women/tops-women/tanks-women.html"><span>Shop Collection</span></a></div>
</div>
</div>
<div class="coupons">Summer Selects-25% Off Select Items. Use Code: <span>SUMMER2018</span></div>
Front-end Appearance:
3. Trending Product
You can create the Trending Product block with configuration as follows:
Back-end setting
In the Content field, click Show/Hide Editor button, then copy and paste the following code:
<div id="ajax-product-wrapper" class="trending-products">{{widget type="Magento\CatalogWidget\Block\Product\ProductsList" title="Trending Products" show_pager="1" products_per_page="8" products_count="24" template="product/widget/content/home.phtml" conditions_encoded="^[`1`:^[`type`:`Magento||CatalogWidget||Model||Rule||Condition||Product`,`attribute`:`category_ids`,`operator`:`==`,`value`:`4`^]^]" page_var_name="peesiw"}}
<div id="item-more" class="mitem item-more">
<h3><a class="link-shop-now load-more-products" title="Load more..." href="#" data-wrapper="#ajax-product-wrapper" data-show_pager="1" data-products_per_page="8" data-products_count="24" data-page_var_name="peesiw">Load more...</a></h3>
</div>
</div>
Front-end Appearance:

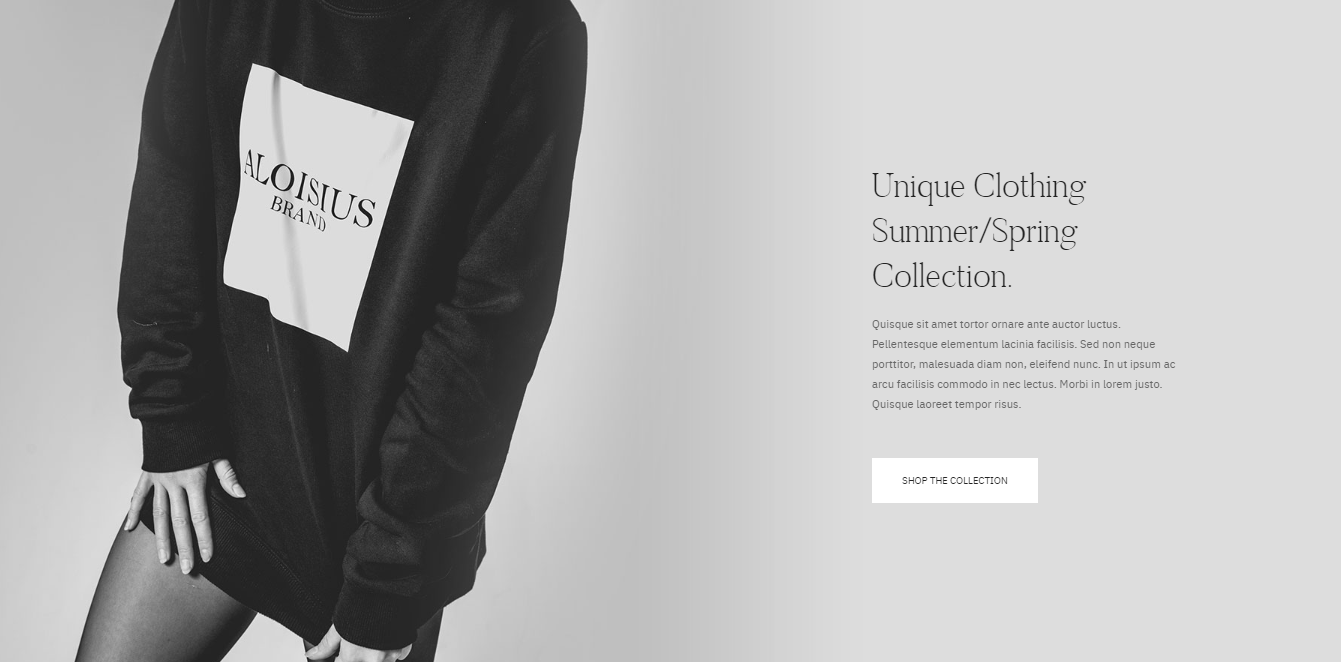
4. Collection
You can create Collection block with the configuration as follows:
Back-end setting
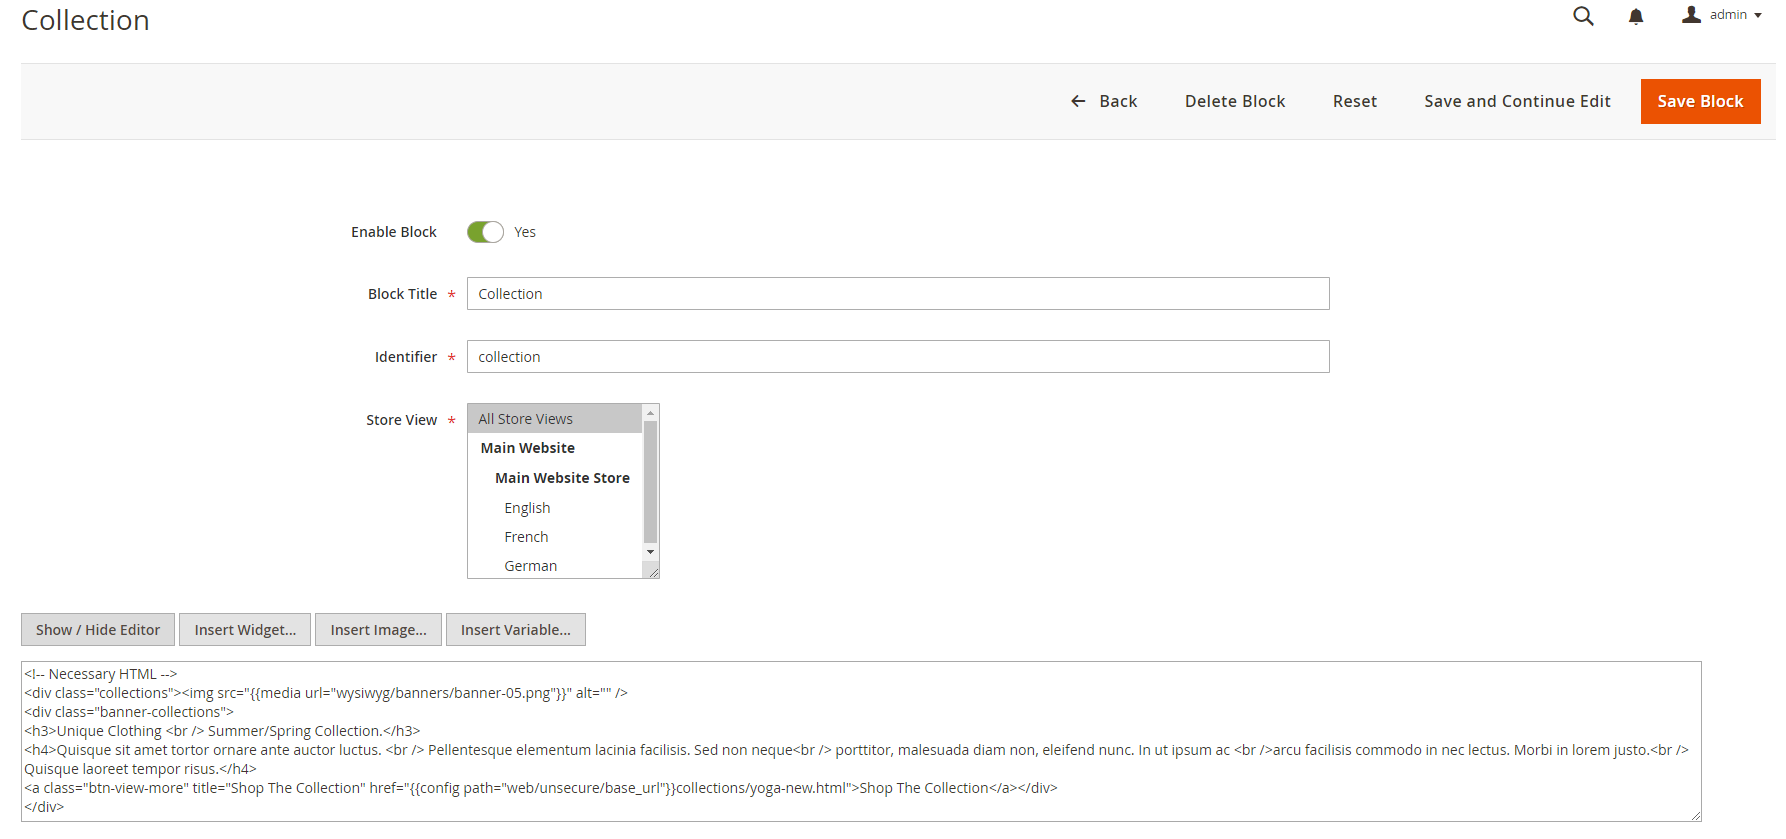
In the Content field, click Show/Hide Editor button, then copy and paste the following code:
<!-- Necessary HTML -->
<div class="collections"><img src="{{media url="wysiwyg/banners/banner-05.png"}}" alt="" />
<div class="banner-collections">
<h3>Unique Clothing <br /> Summer/Spring Collection.</h3>
<h4>Quisque sit amet tortor ornare ante auctor luctus. <br /> Pellentesque elementum lacinia facilisis. Sed non neque<br /> porttitor, malesuada diam non, eleifend nunc. In ut ipsum ac <br />arcu facilisis commodo in nec lectus. Morbi in lorem justo.<br /> Quisque laoreet tempor risus.</h4>
<a class="btn-view-more" title="Shop The Collection" href="{{config path="web/unsecure/base_url"}}collections/yoga-new.html">Shop The Collection</a></div>
</div>
Front-end Appearance:
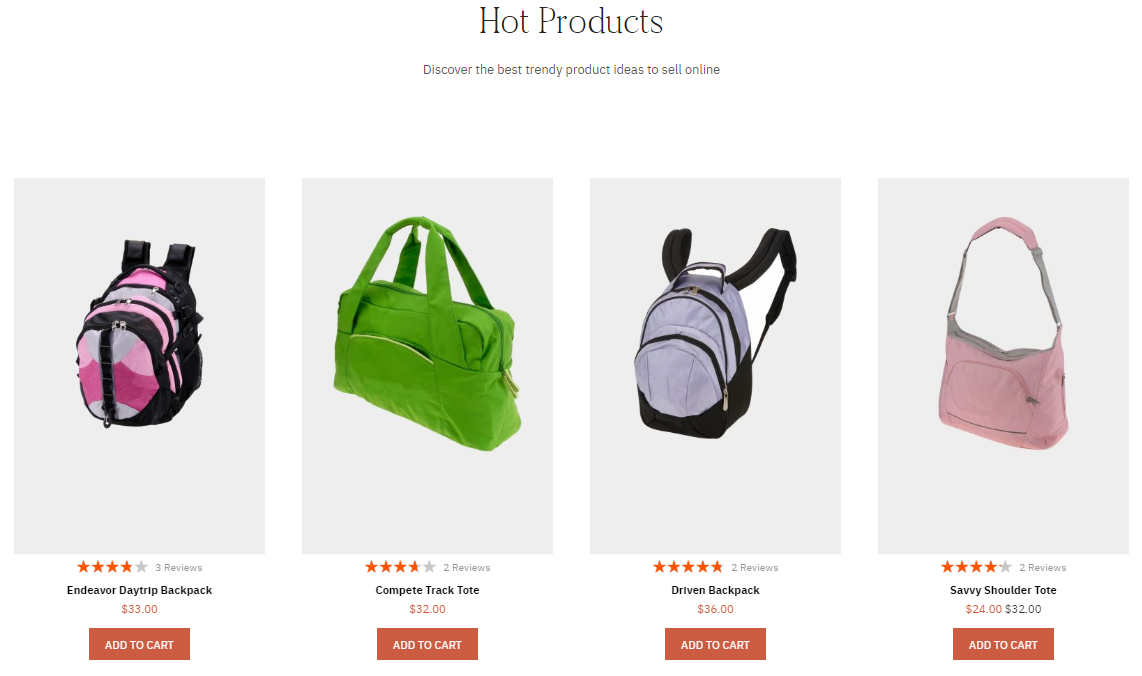
5. Hot Products
You create the Hot Products block with the configuration as follows:
Back-end setting
In the Content field, click Show/Hide Editor button, then copy and paste the following code:
<div class="home-product-slider">{{block class="Ubertheme\UbContentSlider\Block\Slider" name="ub.content.slider.hot.products" title="Hot Products" content_type="new_products"
template="Ubertheme_UbContentSlider::slider_hot_products.phtml" show_desc="0" show_review="1" show_wishlist="1" show_compare="1" show_add_cart="1" show_readmore="0" qty="10"
content_type="latest_products" number_items="4" number_items_desktop="3" number_items_tablet="2" auto_run="1" slide_transition="backSlide" single_item="0" category_ids="4"}}</div>
Front-end Appearance:
6. Socials
You create the Socials block with the configuration as follows:
Back-end setting
In the Content field, click Show/Hide Editor button, then copy and paste the following code:
<div class="socials">
<div class="title"><a title="Instagram @ Fashi.Store" href="#">Instagram @ Fashi.Store</a></div>
<ul>
<li><a href="#"><img src="{{media url="wysiwyg/banners/banner-06.png"}}" alt="" /></a></li>
<li><a href="#"><img src="{{media url="wysiwyg/banners/banner-07.png"}}" alt="" /></a></li>
<li><a href="#"><img src="{{media url="wysiwyg/banners/banner-08.png"}}" alt="" /></a></li>
<li><a href="#"><img src="{{media url="wysiwyg/banners/banner-09.png"}}" alt="" /></a></li>
<li><a href="#"><img src="{{media url="wysiwyg/banners/banner-10.png"}}" alt="" /></a></li>
<li><a href="#"><img src="{{media url="wysiwyg/banners/banner-11.png"}}" alt="" /></a></li>
</ul>
</div>
Front-end Appearance:

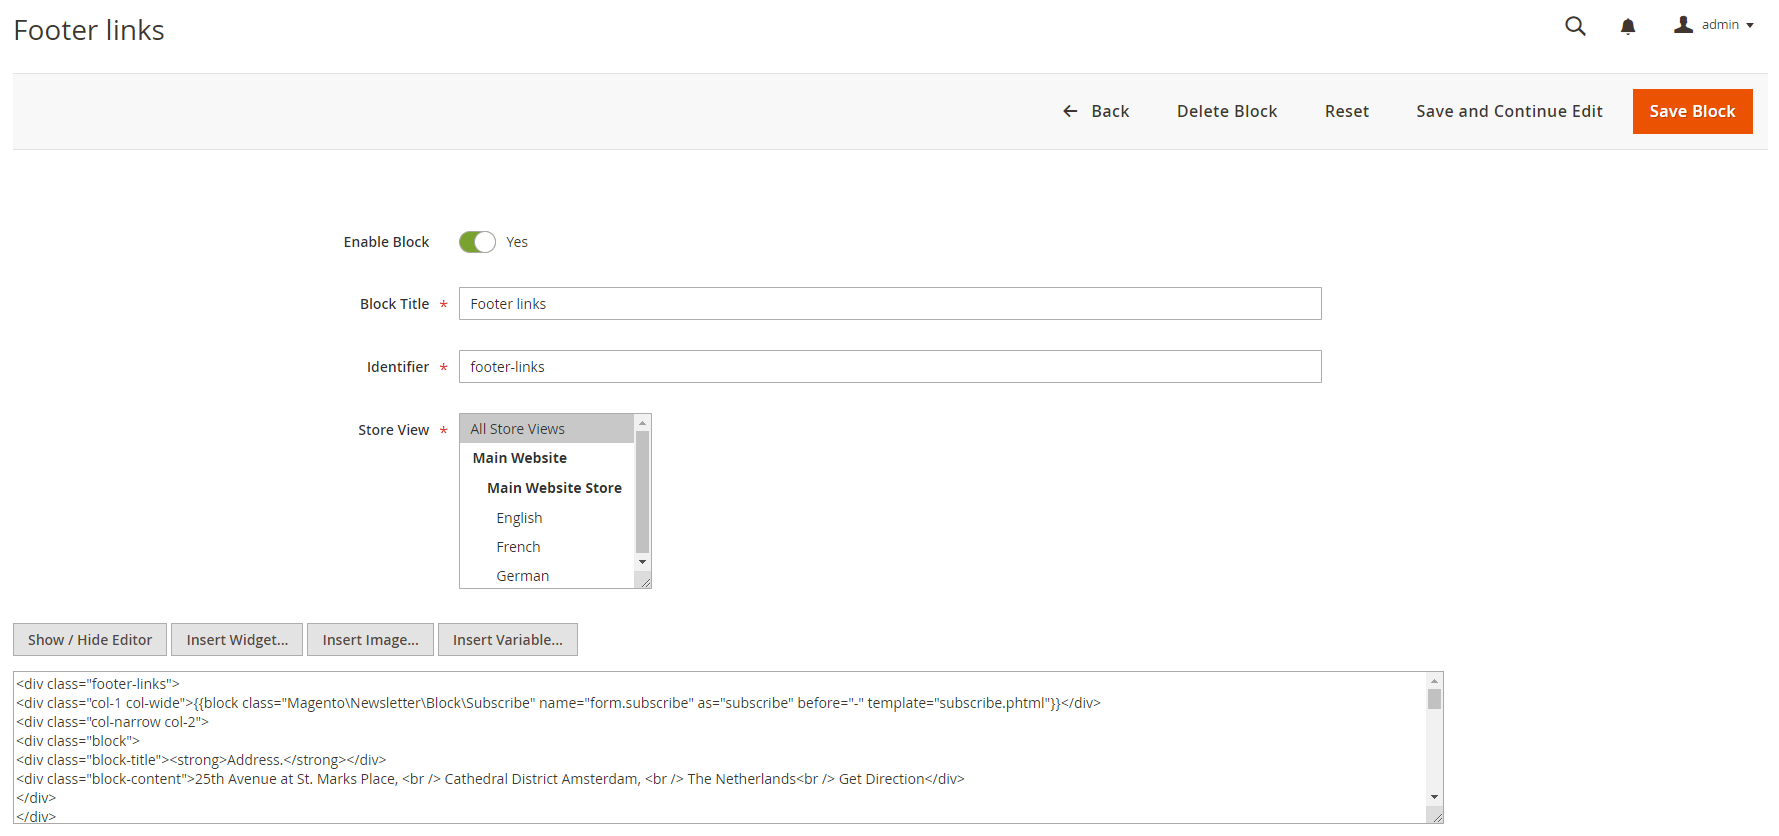
7. Footer links
You create the Footer links block with the configuration as follows:
Back-end setting
In the Content field, click Show/Hide Editor button, then copy and paste the following code:
<div class="footer-links">
<div class="col-1 col-wide">{{block class="Magento\Newsletter\Block\Subscribe" name="form.subscribe" as="subscribe" before="-" template="subscribe.phtml"}}</div>
<div class="col-narrow col-2">
<div class="block">
<div class="block-title"><strong>Address.</strong></div>
<div class="block-content">25th Avenue at St. Marks Place, <br /> Cathedral District Amsterdam, <br /> The Netherlands<br /> Get Direction</div>
</div>
</div>
<div class="col-narrow col-3">
<div class="block">
<div class="block-title"><strong>Contact.</strong></div>
<div class="block-content">+01 (0) 555 555 5555 <br /> [email protected]</div>
</div>
</div>
<div class="col-narrow col-4">
<div class="block">
<div class="block-title"><strong>Info.</strong></div>
<div class="block-content">
<ul>
<li><a href="#">Payment & Shipping</a></li>
<li><a href="#">Terms & Conditions</a></li>
<li><a href="#">Privacy Policy</a></li>
</ul>
</div>
</div>
</div>
<div class="col-narrow col-5">
<div class="block">
<div class="block-title"><strong> <span>Social.</span> </strong></div>
<div class="block-content">
<ul>
<li><a href="https://www.facebook.com/joomlart">Facebook</a></li>
<li><a href="http://twitter.com/joomlart">Instagram</a></li>
<li><a href="http://www.flickr.com/photos/joomlart">Pinterest</a></li>
<li><a href="http://feeds.feedburner.com/joomlart/blog">Tumblr</a></li>
</ul>
</div>
</div>
</div>
</div>
Front-end Appearance:

The free UB Trex theme is packed with a base theme only, with no built-in extensions. Depending on specific extensions (UB Mega Menu, UB Content Slider or UB Quick View) you purchased, please follow the userguides respectively below:
1. UB Content Slider extension
In the Magento 2 Admin Panel, navigate to Content | UB Content Slider | Manage Slider and configure the default settings as shown in the Back-end setting.

UB Trex is fully compatible with Magento 2 extenstion -- UB Content Slider. You can follow the steps indicated in above-mentioned guide: VI. Static Block Configuration -- section ’1. Slideshow’ to create a Slideshow static block.
UB Content Slider Documentation
2. UB Mega Menu extension
This section provides detailed instruction to configure Mega Menu style as per our UB Trex demo site.

Step 1 -- Create the Top Menu group
In your Magento 2 backend, navigate to Content | (UB Mega Menu) Manage Menu, then click Add New Menu. In the popup, you can configure as in this screenshot (Make sure you insert the menu identifier: main-menu).

Once done, you should see the new menu group visible as shown in the following screenshort:

Step 2 -- Create menu item in the Top Menu
Supposed that you have some sample products in place already, now we start creating menu items for the mega menu. In the same Menu Group panel, go to Select | Manage Menu items:

Step 2.1 -- Create Women and its sub-menu items:

Click Add New Menu Item button to create each of menu item, and follow configuration below:
- Women: Configuration steps -- menu setting 1 > menu setting 2
- Categories: Configuration steps -- menu setting 1 > menu setting 2
- Bras and Tanks: Configuration steps -- menu setting 1 > menu setting 2
Step 2.2 -- Insert Product List into UB Mega menu
Create Products item (by clicking Add New Menu Item) as the sub-menu of Women following settings below:
Setting 1 > Setting 2 (Make sure in the Setting 2 step, you insert Custom Content)
In the Custom Content field, click Show/Hide Editor button, then copy and paste the following code:
<div>{{widget type="Magento\CatalogWidget\Block\Product\ProductsList" show_pager="0" products_count="2" template="product/widget/content/grid.phtml" conditions_encoded="^[`1`:^[`type`:`Magento||CatalogWidget||Model||Rule||Condition||Combine`,`aggregator`:`all`,`value`:`1`,`new_child`:``^],`1--1`:^[`type`:`Magento||CatalogWidget||Model||Rule||Condition||Product`,`attribute`:`category_ids`,`operator`:`==`,`value`:`26`^]^]"}}</div>
Step 2.3 -- Create Free Shipping banner into UB Mega menu
Click Add New Menu Item again, to create:
Banner item: Configuration steps -- Setting 1 > Setting 2
In the Custom Content field, click Show/Hide Editor button, then copy and paste the following code:
<div class="mega-menu-banner"><img src="{{media url="wysiwyg/banners/banner_sale.jpg"}}" alt="" /></div>
UB Mega Menu Documentation
3. UB Quick View extension
In your Magento 2 Admin Panel, navigate to Content | UB Quick View | Setting and configure the default settings as shown in the Back-end setting
Front-end Appearance
UB Quick View Documentation