Following our last blog on how to install Magento 2 developer version, today we would like to show you how to install Magento 2 demo with sample data and admin access.
Our demo site for Magento 2 is ready for testing. You can access with the following details and please note that the site will be reset after every 12 hour.

Magento 2 -- Demo with sample data
Username : uber Password : uber123
I. System requirements
Before you install Magento 2, make sure your system meets or exceeds the following requirements:
- Operating systems : Linux distributions such as RedHat Enterprise Linux (RHEL), CentOS, Ubuntu, Debian, and so on
- Composer (latest stable version)
- Apache 2.2 or later
- PHP 5.4.11 or 5.5.x
- Required PHP extensions:
- PDO/MySQL
- mbstring
- mcrypt
- mhash
- simplexml
- curl
- gd2, ImageMagick 6.3.7 (or later) or both
- soap
- MySQL 5.6.x
- Mail Transfer Agent (MTA) or an SMTP server
- Optional but recommended:
- php_xdebug2.2.0 or later (development environments only; can have an adverse effect on performance)
- PHPUnit (as a command-line tool) 4.1 or later
II.How to install
When you are done with verifying your prerequisites, follow the steps below to install Magento 2.
1. Install composer
You can use Composer to install Magento 2. It is a tool for dependent management in PHP which allows you to declare the dependent libraries your project needs and install them for you. Composer enables you to manage Magento 2, extensions, and their dependencies.
Here are the key advantages for using Composer:
- Easy to integrate third-party components into the code base
- Component-based architecture with robust dependency management
- Reduce extension conflicts and compatibility issues
- Versioned dependencies, semantic versioning
- Supports PHP Framework Interoperability standards
- An alternative to Pear packaging system
Now, download Composer and run its latest version. For more details on further configuration when installing composer, please visit this Composer installation documentation.
Follow the 6 steps below to start Composer installation
Step 1 : Composer Setup

Step 2 : Select Composer

Step 3 : Check PHP and path settings

Step 4 : Ready to install

Step 5 : Turn off all window explorer and retry


Step 6 : Finish

2. Get Magento 2 installation package
Option 1:
Here is how you clone the Magento 2 GitHub repository:
- Change to your web server’s docroot directory.
- Enter commands to write to the web server docroot as document guide. Make sure you have correct access rights and the repository exists.
- Wait for the repository to clone on your server.
In case you get an error that includes Permission denied (publickey), see Troubleshooting.
Option 2:
- Download Magento 2 package
- Enter commands to write to the web server docroot as document guide
- Unzip the package on your web server’s docroot directory.
3. Update media file
- Download media file
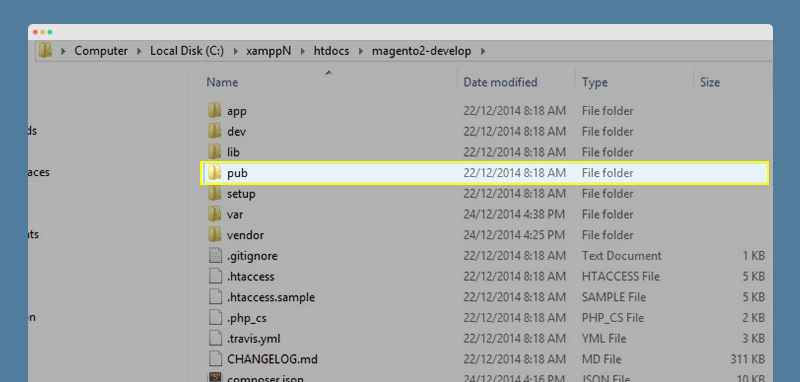
- Unzip and copy paste on sub folder
pubas image below

Magento2- Media folder
4.Install/reinstall Magento 2
4.1 Change file system permissions and ownership before installation
To make sure the installation completes successfully, we suggest the following file system permissions and ownership:
- All files and directories owned by the web server user.
- Certain directories must be writable.
4.2 Update Composer and run the installer
After you are done with updating the file system permissions and ownership, go onto update Composer and run the installer:
Open Command Prompt on Windows, then update composer on Magento 2 root folder as follow:

Update or install composer on Root Folder
4.3 Create Data Base
- Download sample data of Magento 2
- Open PHPmyadmin, then create Data base for Magento 2
- Import sample data which you download on step 1

Create Database

Import Database
4.4. Magento installation
Follow the 7 steps below to start your Magento installation
Step 1 : Agree and Setup

Step 2 : Verify System requirements

Step 3 : Verify System requirements (cont)

Step 4 : Data Base configuration

Step 5 : Web Configuration

Step 6 : Configure Language, Time zone and Currency

Step 7 : Create admin Account

Step 8 : Install & Finish

And now, your demo site for Magento 2 is ready. For further reference, view our Magento 2 demo site and backend here.Please note that the site will be reset after every 12 hour
Username : uber Password : uber123


