Tabs are valuable to your Magento 2 product page because they let you create a much richer user experience and control the content your shoppers see when they come to your page.
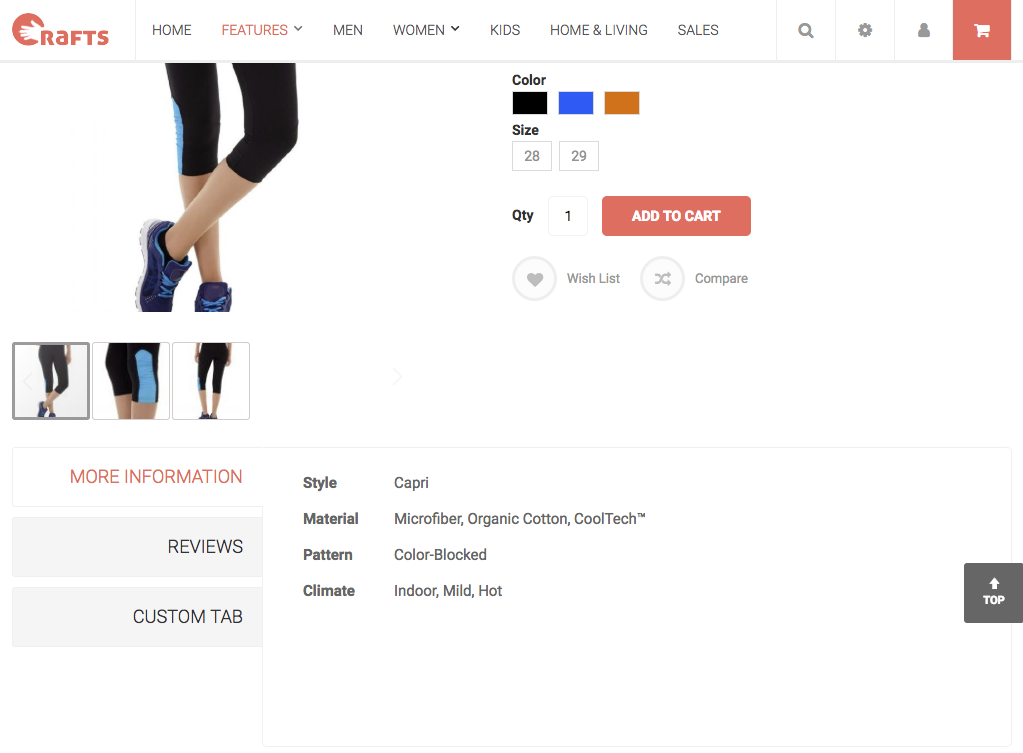
A custom product tab in (Magento 2) Crafts 2.0 theme
In this post I’m going to show you how you can add a custom global tab on a Magento 2 product page in addition to the existing default ‘Description’, ‘Reviews’ and ‘Additional information’ tabs.
One of the simplest ways to do this is to make use of Magento 2 static block. Please note this is just one way you can use to add custom tabs on your Magento 2 product page.
Let’s get started.
Step 1 -- Create a static block
You might wonder why use a static block? Static blocks are very useful for displaying the same content in many places. You may want to use a static block to regularly display a new product announcement or discount. By using a static block, you can update this information in one place and have it instantly appear throughout your site where it is referenced.
To get started, we will create a new static block -- for e.g. Size Chart as follows. You can use any available static block if you want though.
- Go to the Admin sidebar, tab Content | (Elements) Blocks.
- Click Add New Block button and fill in the configuration for the block:
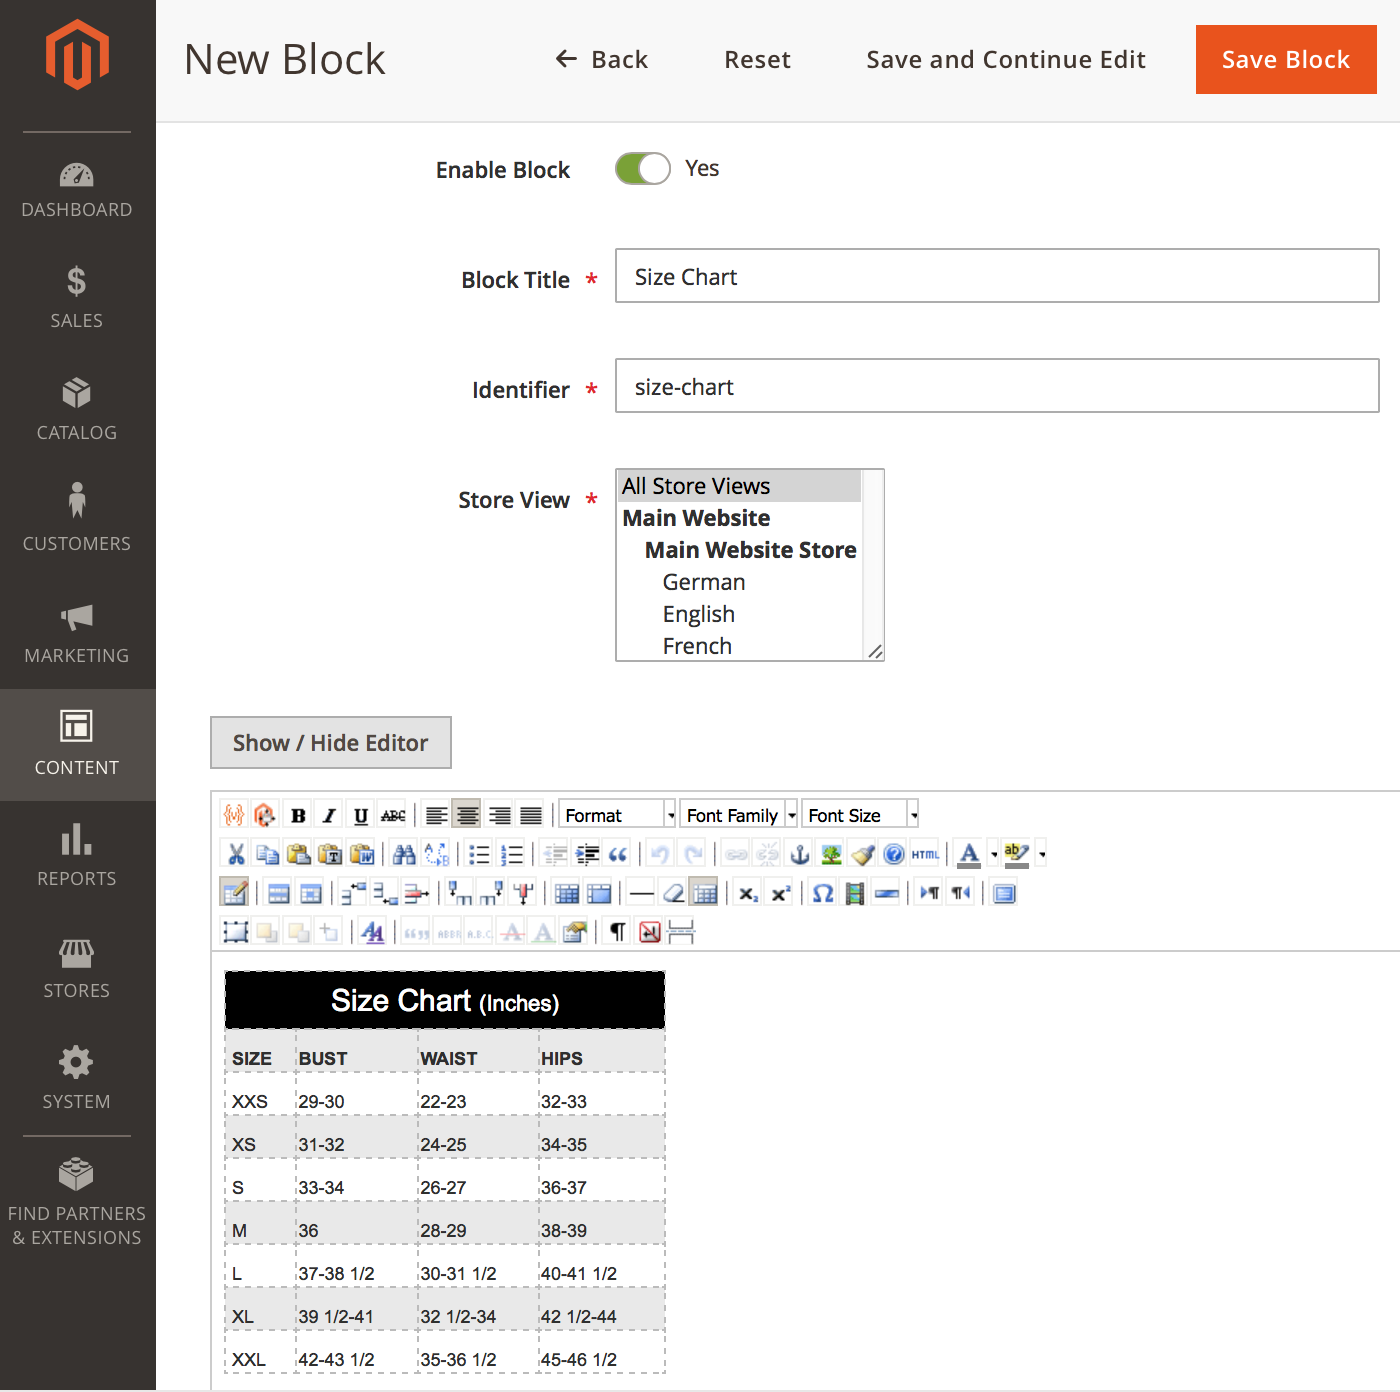
A custom product tab -- Add a static block
- Block Title: Enter the title of the new block for internal reference
- Identifier: Enter a unique Identifier to the block. Please keep in mind that you should use all lowercase characters, with underscores instead of spaces. In this tutorial, we inserted the Identifier ‘size-chart’.
- Store View: Select the Store View(s) where the block will be available.
- Content: Complete the content of the block as needed. If you prefer to work with the HTML code, tab ‘Show/Hide Editor’ button.
- Once done, click Save Block button. Then you should see the new block ‘size-chart’ at the bottom of the list in the Blocks grid.
Step 2 -- Create a template file
Next, you need to create a template file to call the static block we’ve added.
As you know, Magento 2 works with .phtml template files to generate the view layer for the users. Files with the .phtml extension contain both embedded HTML5 as well as PHP programming logic to render all page content using Magento processing. The modules and themes in Magento have their specific groups of .phtml files to show data to the users
Under the app/design/frontend/<Vendor>/<Theme>/Magento_Catalog/templates/product/view/ path, create the size_chart.phtml file with the following code:
<?php echo $block->getLayout()->createBlock('Magento\Cms\Block\Block')->setBlockId('size-chart')->toHtml();
?>
The syntax setBlockId($blockId) specifies the Identifier of a CMS block which refers to the identifier ‘size-chart’ created in Step 1. The content will be fetched and displayed when the product page is rendered.
Step 3 -- Create a layout file
Now, you need to create a layout file to display the custom tab block on the front-end:
First, create a file with name: catalog_product_view.xml and save it under: app/design/frontend/<Vendor>/<Theme>/Magento_Catalog/layout/catalog_product_view.xml
Add the following code into the file (within <body> section):
<referenceBlock name="product.info.details">
<block class="Magento\Framework\View\Element\Template" name="size.chart" template="Magento_Catalog::product/view/size_chart.phtml" group="detailed_info">
<arguments>
<argument translate="true" name="title" xsi:type="string">Size Chart</argument>
</arguments>
</block>
</referenceBlock>
From this code snippet, we can find out quite a bit about what it does to affect your layout:
The <referenceBlock> tag designates where the content block is to be placed.
As you look within <referenceBlock> tag, you’ll find a <block> tag and corresponding <argument> tags.
The <block> defines the content, and also specifies a template file, in this case size_chart.phtml that contains the HTML and PHP code defining the visual output for this block.
This is a sample file we added in the UB MegaMall theme:
<?xml version="1.0"?>
<page layout="1column" xmlns:xsi="http://www.w3.org/2001/XMLSchema-instance" xsi:noNamespaceSchemaLocation="urn:magento:framework:View/Layout/etc/page_configuration.xsd">
<body>
<referenceBlock name="product.info.details">
<block class="Magento\Framework\View\Element\Template" name="size.chart" template="Magento_Catalog::product/view/size_chart.phtml" group="detailed_info">
<arguments>
<argument translate="true" name="title" xsi:type="string">Size Chart</argument>
</arguments>
</block>
</referenceBlock>
<move element="page.main.title" destination="product.info.main" before="-"/>
<move element="product.info.stock.sku" destination="product.info.price" after="product.price.final"/>
<move element="product.info.review" destination="product.info.main" before="product.info.price"/>
</body>
</page>
Save the file, then clean Magento 2 cache. And you are done!
Enter your front-end to see what we’ve got: the Size Chart tab will appear on all product detail pages.
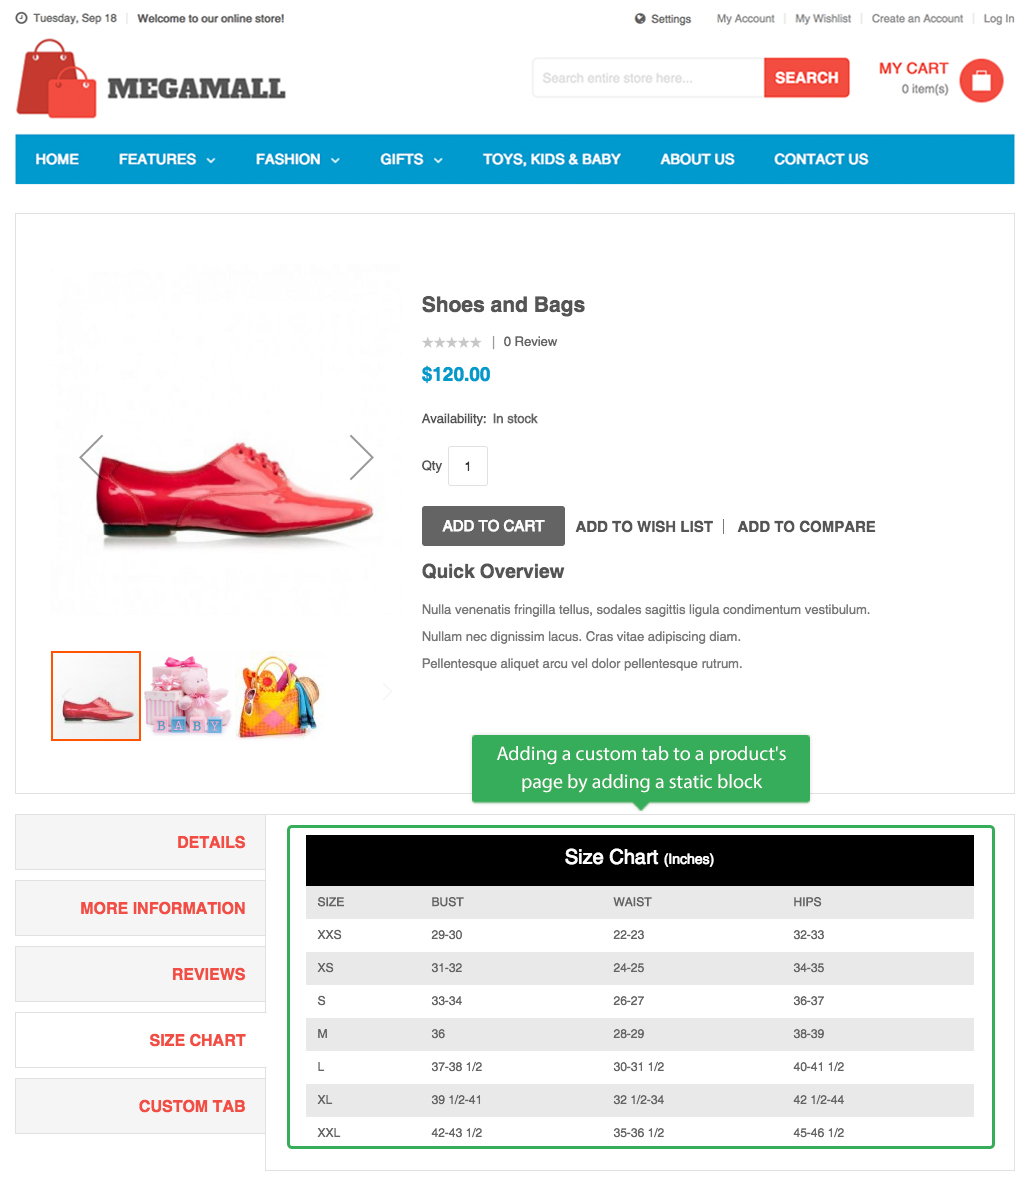
A custom product tab -- Sample in UB MegaMall theme
Conclusion
We hope this simple tutorial gives you a hint on how to add a global custom tab to your product pages. Additional information tabs are always great for helping you enhance the product’s page and provide details that entice customers to make a purchase.
If you’re interested, you can check out sample custom tabs we added to our Magento 2 themes, for example here, here and here.